Category Archives: Equipment

Using an M1 Mac for development work

Due to a battery issue with my work laptop (an Intel-based MacBook pro), I had an opportunity to try using a newer (ARM-based) M1 Mac to do development work. Since roughly a year had passed since these new machines had been introduced I assumed the kinks would have been generally worked out and I was excited to give my speedy new M1 Mac Mini a test run at some serious work. However, upon trying to do make some updates to a recent project (by the way, we launched our new staff directory!) I ran into many stumbling blocks.

M1 Mac Mini ensconced beneath multitudes of cables in my home office

My first step in starting with a new machine was to get my development environment setup. On my old laptop I’d typically use homebrew for managing packages and RVM (and previously rbenv) for ruby version management in different projects. I tried installing the tools normally and ran into multitudes of weirdness. Some guides suggested setting up a parallel version of homebrew (ibrew) using Rosetta (which is a translation layer for running Intel-native code). So I tried that – and then ran into all kinds of issues with managing Ruby versions. Oh and also apparently RVM / rbenv are no longer cool and you should be using chruby or asdf. So I tried those too, and ran into more problems. In the end, I stumbled on this amazing script by Moncef Belyamani. It was really simple to run and it just worked, plain and simple. Yay – working dev environment!

We’ve been using Docker extensively in our recent library projects over the past few years and the Staff Directory was setup to run inside a container on our local machines. So my next step was to get Docker up and running. The light research I’d done suggested that Docker was more or less working now with M1 macs so I dived in thinking things would go smoothly. I installed Docker Desktop (hopefully not a bad idea) and tried to build the project, but bundle install failed. The staff directory project is built in ruby on rails, and in this instance was using therubyracer gem, which embeds the V8 JS library. However, I learned that the particular version of the V8 library used by therubyracer is not compiled for ARM and breaks the build. And as you tend to do when running into questions like these, I went down a rabbit hole of potential work-arounds. I tried manually installing a different version of the V8 library and getting the bundle process to use that instead, but never quite got it working. I also explored using a different gem (like mini racer) that would correctly compile for ARM, or just using Node instead of V8, but neither was a good option for this project. So I was stuck.

Building the Staff Directory app in Docker

My text attempt at a solution was to try setting up a remote Docker host. I’ve got a file server at home running TrueNAS, so I was able to easily spin up a Ubuntu VM on that machine and setup Docker there. You could do something similar using Duke’s VCM service. I followed various guides, setup user accounts and permissions, generated ssh keys, and with some trial and error I was finally able to get things running correctly. You can setup a context for a Docker remote host and switch to it (something like: docker context use ubuntu), and then your subsequent Docker commands point to that remote making development work entirely seamless. It’s kind of amazing. And it worked great when testing with a hello-world app like whoami. Running docker run --rm -it -p 80:80 containous/whoami worked flawlessly. But anything that was more complicated, like running an app that used two containers as was the case with the Staff Dir app, seemed to break. So stuck again.

After consulting with a few of my brilliant colleagues, another option was suggested and this ended up being the best work around. Take my same ubuntu VM and instead of setting it up as a docker remote host, use it as the development server and setup a tunnel connection (something like: ssh -N -L localhost:8080:localhost:80 docker@ip.of.VM.machine) to it such that I would be able to view running webpages at localhost:8080. This approach requires the extra step of pushing code up to the git repository from the Mac and then pulling it back down on the VM, but that only takes a few extra keystrokes. And having a viable dev environment is well worth the hassle IMHO!

As apple moves away from Intel-based machines – rumors seem to indicate that the new MacBook Pros coming out this fall will be ARM-only – I think these development issues will start to be talked about more widely. And hopefully some smart people will be able to get everything working well with ARM. But in the meantime, running Docker on a Linux VM via a tunnel connection seems like a relatively painless way to ensure that more complicated Docker/Rails projects can be worked on locally using an M1 Mac.

FFV1: The Gains of Lossless

One of the greatest challenges to digitizing analog moving-image sources such as videotape and film reels isn’t the actual digitization. It’s the enormous file sizes that result, and the high costs associated with storing and maintaining those files for long-term preservation. For many years, Duke Libraries has generated 10-bit uncompressed preservation master files when digitizing our vast inventory of analog videotapes.

Unfortunately, one hour of uncompressed video can produce a 100 gigabyte file. That’s at least 50 times larger than an audio preservation file of the same duration, and about 1000 times larger than most still image preservation files. That’s a lot of data, and as we digitize more and more moving-image material over time, the long-term storage costs for these files can grow exponentially.

To help offset this challenge, Duke Libraries has recently implemented the FFV1 video codec as its primary format for moving image preservation. FFV1 was first created as part of the open-source FFmpeg software project, and has been developed, updated and improved by various contributors in the Association of Moving Image Archivists (AMIA) community.

FFV1 enables lossless compression of moving-image content. Just like uncompressed video, FFV1 delivers the highest possible image resolution, color quality and sharpness, while avoiding the motion compensation and compression artifacts that can occur with “lossy” compression. Yet, FFV1 produces a file that is, on average, 1/3 the size of its uncompressed counterpart.

sleeping bag
FFV1 produces a file that is, on average, 1/3 the size of its uncompressed counterpart. Yet, the audio & video content is identical, thanks to lossless compression.

The algorithms used in lossless compression are complex, but if you’ve ever prepared for a fall backpacking trip, and tightly rolled your fluffy goose-down sleeping bag into one of those nifty little stuff-sacks, essentially squeezing all the air out of it, you just employed (a simplified version of) lossless compression. After you set up your tent, and unpack your sleeping bag, it decompresses, and the sleeping bag is now physically identical to the way it was before you packed.

Yet, during the trek to the campsite, it took up a lot less room in your backpack, just like FFV1 files take up a lot less room in our digital repository. Like that sleeping bag, FFV1 lossless compression ensures that the compressed video file is mathematically identical to it’s pre-compressed state. No data is “lost” or irreversibly altered in the process.

Duke Libraries’ Digital Production Center utilizes a pair of 6-foot-tall video racks, which house a current total of eight videotape decks, comprised of a variety of obsolete formats such as U-matic (NTSC), U-matic (PAL), Betacam, DigiBeta, VHS (NTSC) and VHS (PAL, Secam). Each deck is converted from analog to digital (SDI) using Blackmagic Design Mini Converters.

The SDI signals are sent to a Blackmagic Design Smart Videohub, which is the central routing center for the entire system. Audio mixers and video transcoders allow the Digitization Specialist to tweak the analog signals so the waveform, vectorscope and decibel levels meet broadcast standards and the digitized video is faithful to its analog source. The output is then routed to one of two Retina 5K iMacs via Blackmagic UltraStudio devices, which convert the SDI signal to Thunderbolt 3.

FFV1 video digitization in progress in the Digital Production Center.

Because no major company (Apple, Microsoft, Adobe, Blackmagic, etc.) has yet adopted the FFV1 codec, multiple foundational layers of mostly open-source systems software had to be installed, tested and tweaked on our iMacs to make FFV1 work: Apple’s Xcode, Homebrew, AMIA’s vrecord, FFmpeg, Hex Fiend, AMIA’s ffmprovisr, GitHub Desktop, MediaInfo, and QCTools.

FFV1 operates via terminal command line prompts, so some understanding of programming language is helpful to enter the correct prompts, and be able to decipher the terminal logs.

The FFV1 files are “wrapped” in the open source Matroska (.mkv) media container. Our FFV1 scripts employ several degrees of quality-control checks, input logs and checksums, which ensure file integrity. The files can then be viewed using VLC media player, for Mac and Windows. Finally, we make an H.264 (.mp4) access derivative from the FFV1 preservation master, which can be sent to patrons, or published via Duke’s Digital Collections Repository.

An added bonus is that, not only can Duke Libraries digitize analog videotapes and film reels in FFV1, we can also utilize the codec (via scripting) to target a large batch of uncompressed video files (that were digitized from analog sources years ago) and make much smaller FFV1 copies, that are mathematically lossless. The script runs checksums on both the original uncompressed video file, and its new FFV1 counterpart, and verifies the content inside each container is identical.

Now, a digital collection of uncompressed masters that took up 9 terabytes can be deleted, and the newly-generated batch of FFV1 files, which only takes up 3 terabytes, are the new preservation masters for that collection. But no data has been lost, and the content is identical. Just like that goose-down sleeping bag, this helps the Duke University budget managers sleep better at night.

Videotelephony, Better Late than Never

A technology allowing most of us to keep working effectively during the COVID-19 pandemic is called “videotelephony,” which is real-time, simultaneous audio-visual communication between two or more users. Right now, millions of workers and families are using Zoom, FaceTime, WhatsApp, WebEx, Skype and other software to see and hear each other live, using the built-in microphones and video cameras on our computers, tablets and mobile phones.

We take this capability for granted now, but it’s actually been over a century in the making. Generations of trial and error, billions in spent capital, technical brick walls and failed business models have paved the way to this morning’s Zoom meeting with your work team. You might want to change out of your pajamas, by the way.

AT&T’s Picturephone (Model 1) was introduced at the 1964 World’s Fair.

Alexander Graham Bell famously patented the telephone in 1876. Shortly after, the concept of not only hearing the person you are talking to, but also seeing them simultaneously, stirred the imagination of inventors, writers and artists. It seemed like a reasonably-attainable next step. Early terms for a hypothetical device that could accomplish this included the “Telephonoscope” and the “Telectroscope

Mr. Bell himself conceived of a device called an “electrical radiophone,” and predicted “the day would come when the man at the telephone would be able to see the distant person to whom he was speaking.” But that day would not come until long after Bell’s death in 1922.

The problem was, the transmission of moving images was a lot more complicated than transmitting audio. Motion picture film, also introduced in the late 1800s, was brought to life by chemicals reacting to silver-halide crystals in a darkroom, but unlike the telephone, electricity played no part in film’s construction or dissemination.

The telephone converted sound waves to electrical signals, as did radio station towers. Neither could transmit without electricity. And a telephone is “full-duplex,” meaning the data is transmitted in both directions, simultaneously, on a single carrier. The next challenge was to somehow electrify moving images, make them full-duplex, and accommodate their exponentially larger bandwidth.

The Picturephone (Model 2). Only a few hundred were sold in the 1970s.

It wasn’t until the late 1930s that cathode-ray-tube television sets were introduced to the world, and the concept of analog video began to gain traction. Unlike motion picture film, video is an electronic medium. Now that moving images were utilizing electricity, they could be transmitted to others, using antennas.

After World War II ended, and Americans had more spending money, black & white television sets became popular household items in the 1950s. But unlike the telephone, communication was still one way. It wasn’t full-duplex. You could see “The Honeymooners,” but they couldn’t see you, and it wasn’t live.  Live television broadcasts were rare, and still in the experimental phase.

In 1964, AT&T’s Bell Labs (originally founded by Alexander Graham Bell), introduced the “Picturephone” at the New York World’s Fair and at Disneyland, demonstrating a video call between the two locales. Later, AT&T introduced public videophone booths in New York City, Chicago and Washington, DC. If you were in the New York videophone booth, you could see and hear someone in the Chicago videophone booth, in real time, and it was two-way communication.

The problem was, it was outrageously expensive. A three-minute call cost $225 in today’s money. The technology was finally here, but who could afford it? AT&T poured billions into this concept for years, manufacturing “PicturePhones” and “VideoPhones” for home and office, all the way through 1995, but they were always hampered by the limitations of low-bandwidth telephone lines and very high prices, making them not worth it for the consumer, and never widely adopted.

AT&T’s VideoPhone 2500, released in 1992, priced at $1599.99.

It wasn’t until broadband internet, and high-compression video codecs became widespread in the new millennium, that videotelephony finally became practical, affordable and thus marketable. In recent years, electronics manufacturers began to include video cameras and microphones as a standard feature in CPUs, tablets and mobile phones, making external webcams obsolete. Services like Skype, FaceTime and WebEx were introduced, and later WhatsApp, Zoom and numerous others.

Now it’s simple, and basically free, to have a high-quality, full-color video chat with your friend, partner or co-worker, and a company like Zoom has a net worth of 40 billion. It’s amazing that it took more than 100 years since the invention of the telephone to get here. And just in time for a global pandemic requiring strict physical distancing. Don’t forget to update your clever background image!

All About that Time Base

The video digitization system in Duke Libraries’ Digital Production Center utilizes many different pieces of equipment: power distributors, waveform and vectorscope monitors, analog & digital routers, audio splitters & decibel meters, proc-amps, analog (BNC, XLR and RCA) to digital (SDI) converters, CRT & LCD video monitors, and of course an array of analog video playback decks of varying flavors (U-matic-NTSC, U-matic-PAL, Betacam SP, DigiBeta, VHS-NTSC and VHS-PAL/SECAM). We also transfer content directly from born-digital DV and MiniDV tapes.

A grandfather clock is a time base.

One additional component that is crucial to videotape digitization is the Time Base Corrector (TBC). Each of our analog video playback decks must have either an internal or external TBC, in order to generate an image of acceptable quality. At the recent Association of Moving Image Archivist’s Conference in Baltimore, George Blood (of George Blood Audio/Video/Film/Data) gave a great presentation on exactly what a Time Base Corrector is, appropriately entitled “WTF is a TBC?” Thanks to George for letting me relay some of his presentation points here.

A time base is a consistent reference point that one can utilize to stay in sync. For example, The Earth rotating around the Sun is a time base that the entire human race relies on, to stay on schedule. A grandfather clock is also a time base. And so is a metronome, which a musical ensemble might use to all stay “in time.”

Frequency is defined as the number of occurrences of a repeating event per unit of time. So, the frequency of the Earth rotating around the Sun is once per 24 hrs. The frequency of a grandfather clock is one pendulum swing per second. The clock example can also be defined as one “cycle per second” or one hertz (Hz), named after Heinrich Hertz, who first conclusively proved the existence of electromagnetic waves in the late 1800’s.

One of the DPC’s external Time Base Correctors

But anything mechanical, like grandfather clocks and videotape decks, can be inconsistent. The age and condition of gears and rods and springs, as well as temperature and humidity, can significantly affect a grandfather clock’s ability to display the time correctly.

Videotape decks are similar, full of numerous mechanical and electrical parts that produce infinite variables in performance, affecting the deck’s ability to play the videotape’s frames-per-second (frequency) in correct time.

NTSC video is supposed to play at 29.97 frames-per-second, but due to mechanical and electro-magnetic variables, some frames may be delayed, or some may come too fast. One second of video might not have enough frames, another second may have too many. Even the videotape itself can stretch, expand and contract during playback, throwing off the timing, and making the image wobbly, jittery, too bright or dark, too blue, red or green.

A Time Base Corrector does something awesome. As the videotape plays, the TBC stores the unstable video content briefly, fixes the timing errors, and then outputs the corrected analog video signal to the DPC’s analog-to-digital converters. Some of our videotape decks have internal TBCs, which look like a computer circuit board (shown below). Others need an external TBC, which is a smaller box that attaches to the output cables coming from the videotape deck (shown above, right). Either way, the TBC can delay or advance the video frames to lock them into correct time, which fixes all the errors.

An internal Time Base Corrector card from a Sony U-matic BVU-950 deck

An internal TBC is actually able to “talk” to the videotape deck, and give it instructions, like this…

“Could you slow down a little? You’re starting to catch up with me.”

“Hey, the frames are arriving at a strange time. Please adjust the timing between the capstan and the head drum.”

“There’s a wobble in the rate the frames are arriving. Can you counter-wobble the capstan speed to smooth that out?”

“Looks like this tape was recorded with bad heads. Please increase gain on the horizontal sync pulse so I can get a clearer lock.”

Without the mighty TBC, video digitization would not be possible, because all those errors would be permanently embedded in the digitized file. Thanks to the TBC, we can capture a nice, clean, stable image to share with generations to come, long after the magnetic videotape, and playback decks, have reached the end of their shelf life.

Lighting and the PhaseOne: It’s More Than Point and Shoot

Last week, I went to go see the movie IT: Chapter 2. One thing I really appreciated about the movie was how it used a scene’s lighting to full effect. Some scenes are brightly lit to signify the friendship among the main characters. Conversely, there are dark scenes that signify the evil Pennywise the Clown. For the movie crew, no doubt it took a lot of time and manpower to light an individual scene – especially when the movie is nearly 3 hours long.

We do the same type of light setup and management inside the Digital Production Center (DPC) when we take photos of objects like books, letters, or manuscripts. Today, I will talk specifically about how we light the bound material that comes our way, like books or booklets. Generally, this type of material is always going to be shot on our PhaseOne camera, so I will particularly highlight that lighting setup today.

Before We Begin

It’s not enough to just turn the lights on in our camera room to do the trick. In order to properly light all the things that need to be shot on the PhaseOne, we have specific tools and products we use that you can see in the photo below.

We have 4 high-powered lights (two sets of two Buhl SoftCube SC-150 models) pointed directly in the camera’s field of view. There are two on the right and two on the left. These are stationed approximately 3.5 feet off the ground and approximately 2.5 feet away from the objects themselves. These lights are supported by Avenger A630B light stands. They allow for a wide range of movement, extension, and support if we need them.

But if bright, hot lights were pointed directly at sensitive documents for hours, it would damage them. So light diffusers are necessary. For both sets of lights, we have 3 layers of material to diffuse the light and prevent material from warping or text from fading. The first layer, directly attached to the light box itself, is an inexpensive sheet of diffusion fabric. This type of material is often made from nylon or silk, and are usually inexpensive.

The second diffusion layer is an FJ Westcott Scrim Jim, a similar thin fabric that is attached to a lightweight stand-up frame, the Manfrotto 156BLB. This frame can also be moved or extended if need be. The last layer is another sheet of diffusion fabric, attached to a makeshift “cube” held up by lightweight wooden rods. This cube can be picked up or carried, making it very convenient if we need to eventually move our lights.

So in total, we have 4 lights, 4 layers of diffusion fabric attached to the light boxes, two Scrim Jims, and the cube featuring 2 sides of additional diffusion fabric. After having all these items stationed, surely we can start taking pictures, right? Not yet.

Around the Room

There are still more things to be aware of – this time in the camera room itself. We gently place the materials themselves on a cradle lined with a black felt, similar to velvet. This cradle is visible in the bottom right part of the photo above. It is placed on top of a table, also coated in black felt. This is done so no background colors bounce back or reflect onto the object and change what it looks like in the final image itself. The walls of the camera room are also painted a neutral grey color for the same reason, as you can see in the background of the above photo. Finally, any tiny reflective segments between the ceiling tiles have been blacked out with gaffer tape. Having the room this muted and intentionally dark also helps us when we have to shoot multi-spectral images. No expense has been spared to make sure our colors and photos are correct.

Camera Settings

With all these precautions in place, can we finally take photos of our materials? Almost. Before we can start photographing, we have to run some tests to make sure everything looks correct to our computers. After making sure our objects are sharp and in focus, we use a program called DTDCH (see the photo to the right) to adjust the aperture and exposure of the PhaseOne so that nothing appears either way too dim or too bright. In our camera room, we use a PhaseOne IQ180 with a Schneider Kreuznach Apo-Digitar lens (visible in the top-right corner of the photo above). We also use the program CaptureOne to capture, save, and export our photos.

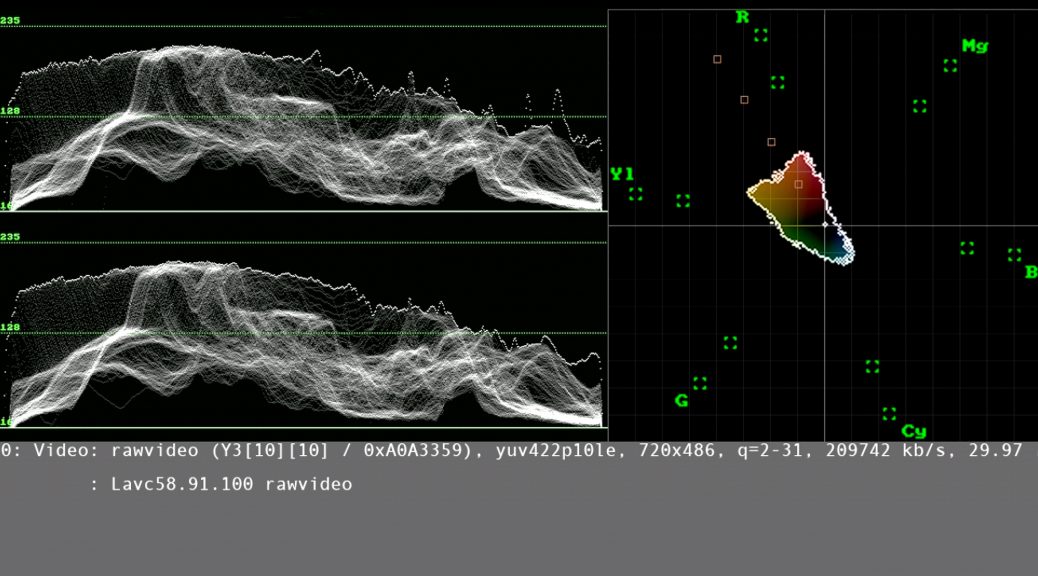
Once the shot is in focus and appropriately bright, we will check our colors against an X-Rite ColorChecker Classic card (see the photo on the left) to verify that our camera has a correct white balance. When we take a photo of the ColorChecker, CaptureOne displays a series of numbers, known as RGB values, found in the photo’s colors. We will check these numbers against what they should be, so we know that our photo looks accurate. If these numbers match up, we can continue. You could check our work by saving the photo on the left and opening it in a program like Adobe Photoshop.

Finally, we have specific color profiles that the DPC uses to ensure that all our colors appear accurate as well. For more information on how we consistently calibrate the color in our images, please check out this previous blog post.

After all this setup, now we can finally shoot photos! Lighting our materials for the PhaseOne is a lot of hard work and preparation. But it is well worth it to fulfill our mission of digitizing images for preservation.

U-matic for the People

Duke Libraries has a large collection of analog videotapes, in several different formats. One of the most common in our archives is 3/4″ videotape, also called “U-matic” (shown above). Invented by Sony in 1969, U-matic was the first videotape to be housed inside a plastic cassette for portability. Before U-matic, videotape was recorded on very large reels in the 2″ format known as Quadruplex which required heavy recording and playback machines the size of household refrigerators. U-matic got its name from the shape of the tape path as it wraps around the video head drum, which looks like the letter U.

The VO-3800 enabled TV news crews to record directly to U-matic videotape at breaking news events.

The format was officially released in 1971, and soon became popular with television stations, when the portable Sony VO-3800 video deck was released in 1974. The VO-3800 enabled TV crews to record directly to U-matic videotape at breaking news events, which previously had to be shot with 16mm film. The news content was now immediately available for broadcast, as opposed to film, which had to wait for processing in a darkroom. And the compact videocassettes could easily and quickly be transported to the TV station.

In the 1970’s, movie studios also used U-matic tapes to easily transport filmed scenes or “dailies,” such as the first rough cut of “Apocalypse Now.” In 1976, the high-band BVU (Broadcast Video U-matic) version of 3/4″ videotape, with better color reproduction and lower noise levels, replaced the previous “lo-band” version.

The Digital Production Center’s Sony VO-9800P for PAL videotapes (top), and a Sony BVU-950 for NTSC tapes (bottom).

The U-matic format remained popular at TV stations throughout the 1980’s, but was soon replaced by Sony’s 1/2″ Betacam SP format. The BVU-900 series was the last U-matic product line made by Sony, and Duke Libraries’ Digital Production Center uses two BVU-950s for NTSC tapes, as well as a VO-9800P for tapes in PAL format. A U-matic videotape player in good working order is now an obsolete collector’s item, so they can be hard to find, and expensive to purchase.

Unfortunately, most U-matic tapes have not aged well. After decades in storage, many of the videotapes in our collection now have sticky-shed syndrome, a condition in which the oxide that holds the visual content is literally flaking off the polyester tape base, and is moist and gummy in texture. When a videotape has sticky-shed, not only will it not play correctly, the residue can also clog up the tape heads in the U-matic playback deck, then transfer the contaminant to other tapes played afterwards in the same deck.

The DPC’s RTI VT3100 U-matic tape cleaner.

To combat this, we always bake (dehumidify) our U-matic videotapes in a scientific oven at 52 celsius (125 fahrenheit) for at least 10 hours. Then we run each tape through a specialized tape-cleaning machine, which fast-forwards and rewinds each tape, while using a burnishing blade to wipe off any built-up residue. We also clean the video heads inside our U-matic decks before each playback, using denatured alcohol.

Most of the time, these procedures make the U-matic tape playable, and we are able to digitize them, which rescues the content from the videotapes, before the magnetic tape ages and degrades any further. While the U-matic tapes are nearing the end of their life-span, the digital surrogates will potentially last for centuries to come, and will be accessible online through our Duke Digital Repository, from anywhere in the world.

Mythical Beasts of Audio

Gear. Kit. Hardware. Rig. Equipment.

In the audio world, we take our tools seriously, sometimes to an unhealthy and obsessive degree. We give them pet names, endow them with human qualities, and imbue them with magical powers. In this context, it’s not really strange that a manufacturer of professional audio interfaces would call themselves “Mark of the Unicorn.”

Here at the Digital Production Center, we recently upgraded our audio interface to a MOTU 896 mk3 from an ancient (in tech years) Edirol UA-101. The audio interface, which converts analog signals to digital and vice-versa, is the heart of any computer-based audio system. It controls all of the routing from the analog sources (mostly cassette and open reel tape decks in our case) to the computer workstation and the audio recording/editing software. If the audio interface isn’t seamlessly performing analog to digital conversion at archival standards, we have no hope of fulfilling our mission of creating high-quality digital surrogates of library A/V materials.

Edirol UA-101
The Edirol enjoying its retirement with some other pieces of kit

While the Edirol served us well from the very beginning of the Library’s forays into audio digitization, it had recently begun to cause issues resulting in crashes, restarts, and lost work. Given that the Edirol is over 10 years old and has been discontinued, it is expected that it would eventually fail to keep up with continued OS and software updates. After re-assessing our needs and doing a bit of research, we settled on the MOTU 896 mk3 as its replacement. The 896 had the input, output, and sync options we needed along with plenty of other bells and whistles.

I’ve been using the MOTU for several weeks now, and here are some things that I’m liking about it:

  • Easy installation of drivers
  • Designed to fit into standard audio rack
  • Choice of USB or Firewire connection to PC workstation
  • Good visual feedback on audio levels, sample rate, etc. via LED meters on front panel
  • Clarity and definition of sound
MOTU 896mk3
The MOTU sitting atop the audio tower

I haven’t had a chance to explore all of the additional features of the MOTU yet, but so far it has lived up to expectations and improved our digitization workflow. However, in a production environment such as ours, each piece of equipment needs to be a workhorse that can perform its function day in and day out as we work our way through the vaults. Only time can tell if the Mark of the Unicorn will be elevated to the pantheon of gear that its whimsical name suggests!

A New(-ish) Look for Public Computing

Photo of library public computing terminals

Over the past year, you’ve probably noticed a change in the public computing environments in Duke University Libraries. Besides new patron-facing hardware, we’ve made even larger changes behind the scenes — the majority of our public computing “computers” have been converted to a Virtual Desktop Infrastructure (VDI).

The physical hardware that you sit down at looks a little different, with larger monitors and no “CPU tower”:

Close-up photo of a public terminal

What isn’t apparent is that these “computers” actually have NO computational power at all! They’re essentially just a remote keyboard and monitor that connects to a VDI-server sitting in a data-center.
Photo of the VDI serverThe end-result is really that you sit down at what looks like a regular computer, and you have an experience that “feels” like a regular computer.  The VDI-terminal and VDI-server work together to make that appear seamless.

All of the same software is installed on the new “computers” — really, virtual desktop connections back to the server — and we’ve purchased a fairly “beefy” VDI-server so that each terminal should feel very responsive and fast.  The goal has been to provide as good an experience on VDI as you would get on “real” computers.

But there are also some great benefits …

Additional Security:
When a patron sits down at a terminal, they are given a new, clean installation of a standard Windows environment. When they’re done with their work, the system will automatically delete that now-unused virtual desktop session, and then create a brand-new one for the next patron. From a security standpoint, this means there is no “leakage” of any credentials from one user to another — passwords, website cookies, access tokens, etc. are all wiped clean when the user logs out.

Reduced Staff Effort:
It also offers some back-end efficiency for the Specialized Computing team. First off, since the VDI-terminal hardware is less complex (it’s not a full computer), the devices themselves have been seen to last 7 to 10 years (vs. 4 years for a standard PC). There have also been reports that they can take quite a beating and remain operational (and while I don’t want to jinx it, there are reports of them being fully submerged in water and, once dried out, being fully functional).

Beyond that, when we need to update the operating system or software, we make the change on one “golden image” and that image is copied to each new virtual desktop session. So despite having 50 or more public computing terminals, we don’t spend 50-times as much effort in maintaining them.

It is worth noting that we can also make these updates transparent to our patrons. After logging in, that VDI session will remain as-is until the person logs out — we will not reboot the system from under them.  Once they logout, the system deletes the old, now-outdated image and replaces it with a new image. There is no downtime for the next user, they just automatically get the new image, and no one’s work gets disrupted by a reboot.

Flexibility:
We can, in fact, define multiple “golden images”, each with a different suite of software on it. And rather than having to individually update each machine or each image, the system understands common packages — if we update the OS, then all images referring to that OS automatically get updated. Again, this leads to a great reduction in staff effort needed to support these more-standardized environments.

We have deployed SAP and Envisionware images on VDI, as well as some more customized images (e.g. Divinity-specific software).  For managers who don’t otherwise have access to SAP, please contact Core Services and we can get you set up to use the VDI-image with SAP installed.

Future Expansion:
We recently upgraded the storage system that is attached to the VDI-server, and with that, we are able to add even more VDI-terminals to our public computing environment. Over the next few months, we’ll be working with stakeholders to identify where those new systems might go.

As the original hardware is nearing it’s end-of-life, we will also be looking at a server upgrade near the end of this year. Of note: the server upgrade should provide an immediate “speed up” to all public computing terminals, without us having to touch any of those 50+ devices.

Shiny New Chrome!

Chrome bumper and grill

In 2008, Google released their free web browser, Chrome.  It’s improved speed and features led to quick adoption by users, and by the middle of 2012, Chrome had become the world’s most popular browser. Recent data puts it at over 55% market share [StatCounter].

As smartphones and tablets took off, Google decided to build an “operating system free” computer based around the Chrome browser – the first official Chromebook launched in mid-2011.  The idea was that since everyone is doing their work on the web anyway (assuming your work==Google Docs), then there wasn’t a need for most users to have a “full” operating system – especially since full operating systems require maintenance patches and security updates.  Their price-point didn’t hurt either – while some models now top-out over $1000, many Chromebooks come in under $300.Acer Chromebook

We purchased one of the cheaper models recently to do some testing and see if it might work for any DUL use-cases.  The specific model was an Acer Chromebook 14, priced at $250.  It has a 14” screen at full HD resolution, a metal body to protect against bumps and bruises, and it promises up to 12 hours of battery life.  Where we’d usually look at CPU and memory specs, these tend to be less important on a Chromebook — you’re basically just surfing the web, so you shouldn’t need a high-end (pricey) CPU nor a lot of memory.  At least that’s the theory.

But what can it do?

Basic websurfing, check!  Google Docs, check!  Mail.duke.edu for work-email, check!  Duke.box.com, check!  LibGuides, LibCal, Basecamp, Jira, Slack, Evernote … check!

LastPass even works to hold all the highly-complex, fully secure passwords that you use on all those sites (you do you complex passwords, don’t you?).

Not surprisingly, if you do a lot of your day-to-day work inside a browser, then a Chromebook can easily handle that.  For a lot of office workers, a Chromebook may very well get the job done – sitting in a meeting, typing notes into Evernote; checking email while you’re waiting for a meeting; popping into Slack to send someone a quick note.  All those work perfectly fine.

What about the non-web stuff I do?

Microsoft Word and Excel, well, kinda sorta.  You can upload them to Google Docs and then access them through the usual Google Docs web interface.  Of course, you can then share them as Google Docs with other people, but to get them back into “real” Microsoft Word requires an extra step.

Aleph, umm, no.  SAP for your budgets, umm, no. Those apps simply won’t run on the ChromeOS.  At least not directly.

Acer ChromebookBut just as many of you currently “remote” into your work computer from home, e.g., you _can_ use a Chromebook to “remote” into other machines, including “virtual” machines that we can set up to run standard Windows applications.  There’s an extra step or two in the process to reserve a remote system and connect to it.  But if you’re in a job where just a small amount of your work needs “real” Windows applications, there still might be some opportunity to leverage Chromebooks as a cheaper alternative to a laptop.

Final Thoughts:

I’m curious to see where (or not) Chromebooks might fit into the DUL technology landscape.  Their price is certainly budget-friendly, and since Google automatically updates and patches them, they could reduce IT staff effort.  But there are clearly issues we need to investigate.  Some of them seem solvable, at least technically.  But it’s not clear that the solution will be usable in day-to-day work.Google Chrome logo

If you’re interested in trying one out, please contact me!


Adventures in 4K

When it comes to moving image digitization, Duke Libraries’ Digital Production Center primarily deals with obsolete videotape formats like U-matic, Betacam, VHS and DV, which are in standard-definition (SD). We typically don’t work with high-definition (HD) or ultra-high-definition (UHD) video because that’s “born digital,” and doesn’t need any kind of conversion from analog, or real-time migration from magnetic tape. It’s already in the form of a digital file.

However, when I’m not at Duke, I do like to watch TV at home, in high-definition. This past Christmas, the television in my living room decided to kick the bucket, so I set out to get a new one. I went to my local Best Buy and a few other stores, to check out all the latest and greatest TVs. The first thing I noticed is that just about every TV on the market now features 4K ultra-high-definition (UHD), and many have high dynamic range (HDR).

Before we dive into 4K, some history is in order. Traditional, standard-definition televisions offered 480 lines of vertical resolution, with a 4:3 aspect ratio, meaning the height of the image display is 3/4 the dimension of the width. This is how television was broadcast for most of the 20th century. Full HD television, which gained popularity at the turn of the millennium, has 1080 pixels of vertical resolution (over twice as much as SD), and an aspect ratio of 16:9, which makes the height barely more than 1/2 the size of the width.

16:9 more closely resembles the proportions of a movie theater screen, and this change in TV specification helped to usher in the “home theater” era. Once 16:9 HD TVs became popular, the emergence of Blu-ray discs and players allowed consumers to rent or purchase movies, watch them in full HD and hear them in theater-like high fidelity, by adding 5.1 surround sound speakers and subwoofers. Those who could afford it started converting their basements and spare rooms into small movie theaters.

4K UHD has 3840 horizontal pixels and 2160 vertical pixels, twice as much resolution as HD, and almost five times more resolution than SD.

The next step in the television evolution was 4K ultra-high-definition (UHD) TVs, which have flooded big box stores in recent years. 4K UHD has an astounding resolution of 3840 horizontal pixels and 2160 vertical pixels, twice as much resolution as HD, and almost five times more resolution than SD. Gazing at the images on these 4K TVs in that Best Buy was pretty disorienting. The image is so sharp and finely-detailed, that it’s almost too much for your eyes and brain to process.

For example, looking at footage of a mountain range in 4K UHD feels like you’re seeing more detail than you would if you were actually looking at the same mountain range in person, with your naked eye. And high dynamic range (HDR) increases this effect, by offering a much larger palette of colors and more levels of subtle gradation from light to dark. The latter allows for more detail in the highlight and shadow areas of the image. The 4K experience is a textbook example of hyperreality, which is rapidly encroaching into every aspect of our modern lives, from entertainment to politics.

The next thing that dawned on me was: If I get a 4K TV, where am I going to get the 4K content? No television stations or cable channels are broadcasting in 4K and my old Blu-ray player doesn’t play 4K. Fortunately, all 4K TVs will also display 1080p HD content beautifully, so that warmed me up to the purchase. It meant I didn’t have to immediately replace my Blu-ray player, or just stare at a black screen night after night, waiting for my favorite TV stations to catch up with the new technology.

The salesperson that was helping me alerted me to the fact that Best Buy also sells 4K UHD Blu-ray discs and 4K-ready Blu-ray players, and that some content providers, like Netflix, are streaming many shows in 4K and in HDR, like “Stranger Things,” “Daredevil” and “The Punisher,” to name a few. So I went ahead with the purchase and brought home my new 4K TV. I also picked up a 4K-enabled Roku, which allows anyone with a fast internet connection and subscription to stream content from Netflix, Amazon and Hulu, as well as accessing most cable-TV channels via services like DirecTV Now, YouTube TV, Sling and Hulu.

I connected the new TV (a 55” Sony X800E) to my 4K Roku, ethernet, HD antenna and stereo system and sat down to watch. The 1080p broadcasts from the local HD stations looked and sounded great, and so did my favorite 1080p shows streaming from Netflix. I went with a larger TV than I had previously, so that was also a big improvement.

To get the true 4K HDR experience, I upgraded my Netflix account to the 4K-capable version, and started watching the new Marvel series, “The Punisher.” It didn’t look quite as razor sharp as the 4K images did in Best Buy, but that’s likely due to the fact that the 4K Netflix content is more compressed for streaming, whereas the TVs on the sales floor are playing 4K video in-house, that has very little, if any, compression.

As a test, I went back and forth between watching The Punisher in 4K UHD, and watching the same Punisher episodes in HD, using an additional, older Roku though a separate HDMI port. The 4K version did have a lot more detail than its HD counterpart, but it was also more grainy, with horizons of clear skies showing additional noise, as if the 4K technology is trying too hard to bring detail out of something that is inherently a flat plane of the same color.

Also, because of the high dynamic range, the image loses a bit of overall contrast when displaying so many subtle gradations between dark and light. 4K streaming also requires a fast internet connection and it downloads a lot of data, so if you want to go 4K, you may need to upgrade your ISP plan, and make sure there are no data caps. I have a 300 Mbps fiber connection, with ethernet cable routed to my TV, and that works perfectly when I’m streaming 4K content.

I have yet to buy a 4K Blu-ray player and try out a 4K Blu-ray disc, so I don’t know how that will look on my new TV, but from what I’ve read, it more fully takes advantage of the 4K data than streaming 4K does. One reason I’m reluctant to buy a 4K Blu-ray player gets back to content. Almost all the 4K Blu-ray discs for sale or rent now are recently-made Hollywood movies. If I’m going to buy a 4K Blu-ray player, I want to watch classics like 2001: A Space Odyssey,” The Godfather,” “Apocalypse Now” and Vertigo” in 4K, but those aren’t currently available because the studios have yet to release them in 4K. This requires going back to the original film stock and painstakingly digitizing and restoring them in 4K.

Some older films may not have enough inherent resolution to take full advantage of 4K, but it seems like films such as “2001: A Space Odyssey,” which was originally shot in 65 mm, would really be enhanced by a 4K restoration. Filmmakers and the entertainment industry are already experimenting with 8K and 16K technology, so I guess my 4K TV will be obsolete in a few years, and we’ll all be having seizures while watching TV, because our brains will no longer be able to handle the amount of data flooding our senses.

Prepare yourself for 8K and 16K video.