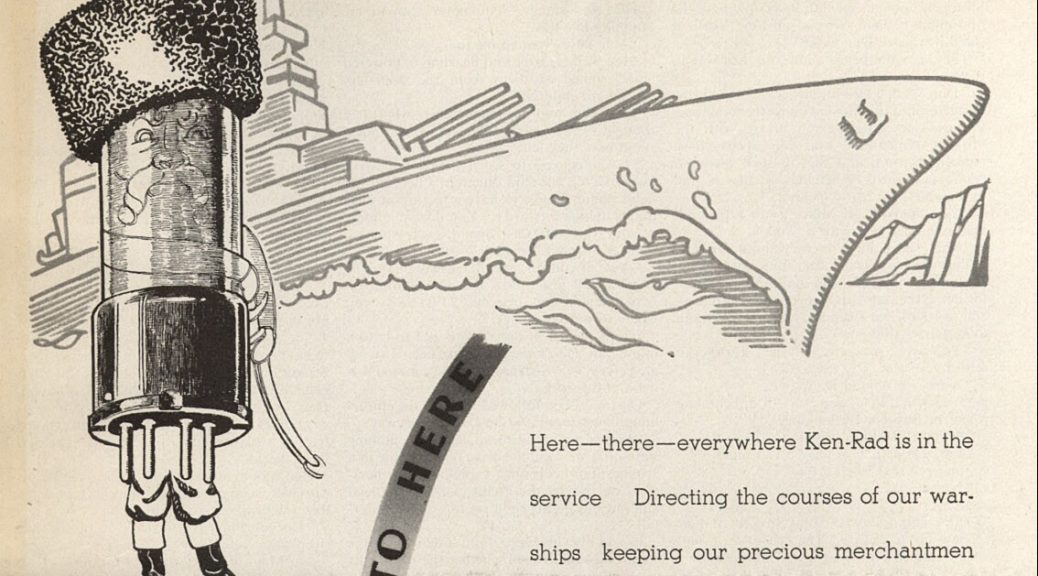
In the spirit of Friday fun (and to keep with my running theme of obsolete, obscure, and endangered audio equipment,) I present this gallery of anthropomorphic electronics from Rubenstein Library’s Ad*Access digital collection. Enjoy!


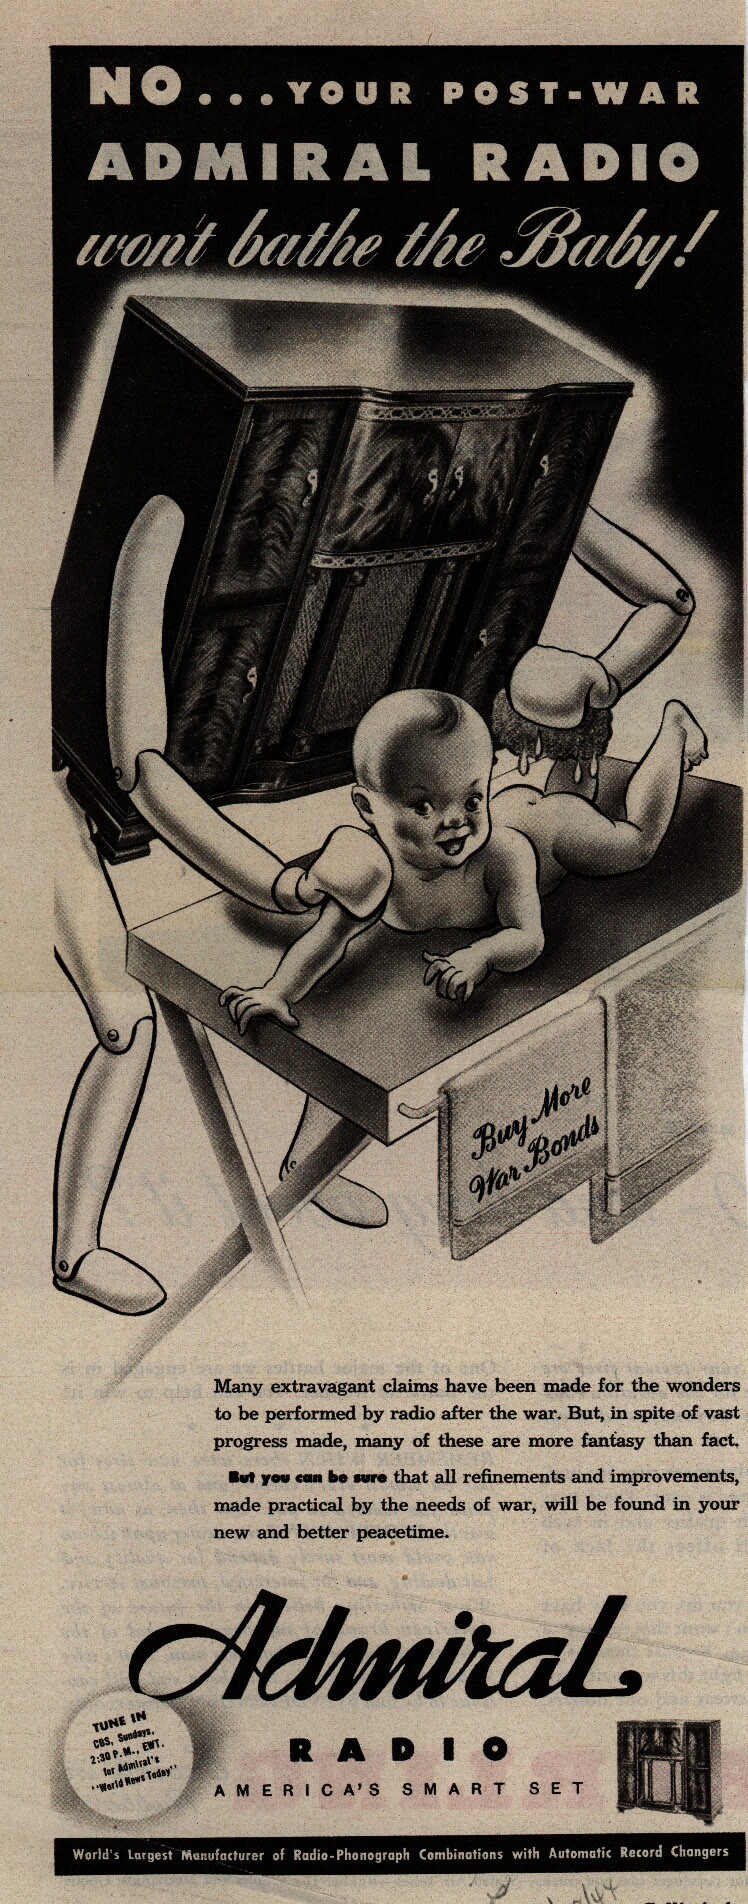


In the spirit of Friday fun (and to keep with my running theme of obsolete, obscure, and endangered audio equipment,) I present this gallery of anthropomorphic electronics from Rubenstein Library’s Ad*Access digital collection. Enjoy!
As a Digital Production Specialist at Duke Libraries, I work with a variety of obsolete videotape formats, digitizing them for long-term preservation and access. Videotape is a form of magnetic tape, consisting of a magnetized coating on one side of a strip of plastic film. The film is there to support the magnetized coating, which usually consists of iron oxide. Magnetic tape was first invented in 1928, for recording sound, but it would be several decades before it could be used for moving images, due to the increased bandwidth that is required to capture the visual content.
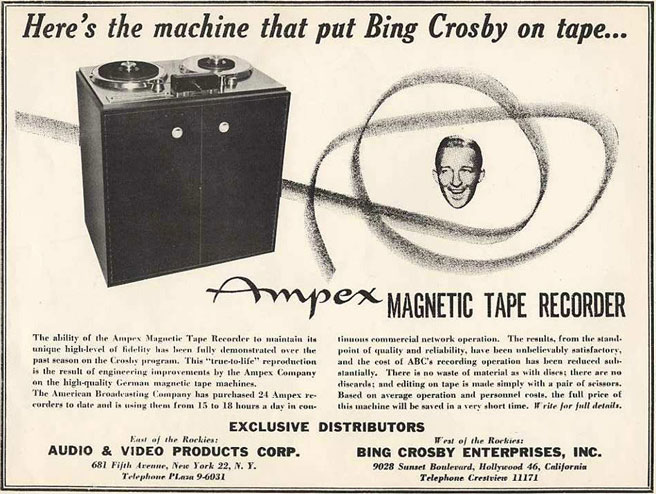
Television was live in the beginning, because there was no way to pre-record the broadcast other than with traditional film, which was expensive and time-consuming. In 1951, Bing Crosby Enterprises (BCE), owned by actor and singer Bing Crosby, demonstrated the first videotape recording. Crosby had previously incorporated audiotape recording into the production of his radio broadcasts, so that he would have more time for other commitments, like golf! Instead of having to do a live radio broadcast once a week for a month, he could record four broadcasts in one week, then have the next three weeks off. The 1951 demonstration ran quarter-inch audiotape at 360 inches per second, using a modified Ampex 200 tape recorder, but the images were reportedly blurry and not broadcast quality.
More companies experimented with the emerging technology in the early 1950’s, until Ampex introduced 2” black and white quadruplex videotape at the National Association of Broadcasters convention in 1956. This was the first videotape that was broadcast quality. Soon, television networks were broadcasting pre-recorded shows on quadruplex, and were able to present them at different times in all four U.S. time zones. Some of the earliest videotape broadcasts were CBS’s “The Edsel Show,” CBS’s “Douglas Edwards with the News,” and NBC’s “Truth or Consequences.” In 1958, Ampex debuted a color quadruplex videotape recorder. NBC’s “An Evening with Fred Astaire” was the first major TV show to be videotaped in color, also in 1958.
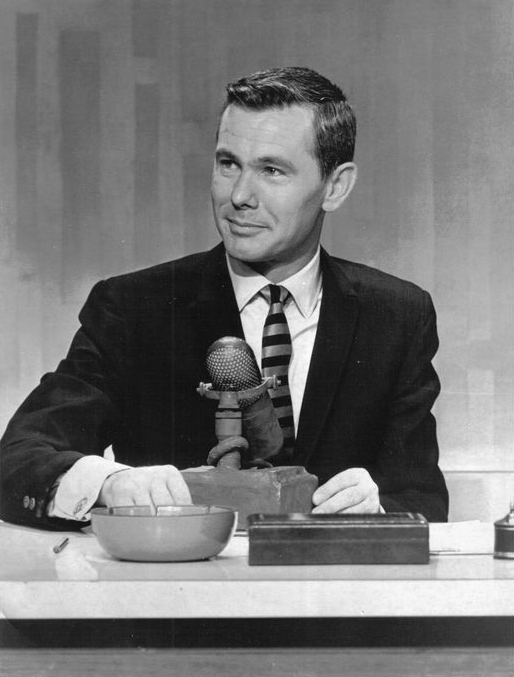
One of the downsides to quadruplex, is that the videotapes could only be played back using the same tape heads which originally recorded the content. Those tape-heads wore out very quickly, which mean’t that many tapes could not be reliably played back using the new tape-heads that replaced the exhausted ones. Quadruplex videotapes were also expensive, about $300 per hour of tape. So, many TV stations maximized the expense, by continually erasing tapes, and then recording the next broadcast on the same tape. Unfortunately, due to this, many classic TV shows are lost forever, like the vast majority of the first ten years (1962-1972) of “The Tonight Show with Johnny Carson,” and Super Bowl II (1968).
Quadruplex was the industry standard until the introduction of 1” Type C, in 1976. Type C video recorders required less maintenance, were more compact and enabled new functions, like still frame, shuttle and slow motion, and 1” Type C did not require time base correction, like 2” Quadruplex did. Type C is a composite videotape format, with quality that matches later component formats like Betacam. Composite video merges the color channels so that it’s consistent with a broadcast signal. Type C remained popular for several decades, until the use of videocassettes gained in popularity. We will explore that in a future blog post.
At the beginning of March, the multispectral imaging working group presented details about the imaging system and the group’s progress so far to other library staff at a First Wednesday event. Representatives from Conservation Services, Data and Visualization Services, the Digital Production Center, the Duke Collaboratory for Classics Computing (DC3) and the Rubenstein Library each shared their involvement and interest in the imaging technology. Our presentation attempted to answer some basic questions about how the equipment works and how it can be used to benefit the scholarly community. You can view a video of that presentation here.

Some of the images we have already shared illustrate a basic benefit or goal of spectral imaging for books and manuscripts: making obscured text visible. But what else can this technology tell us about the objects in our collections? As a library conservator, I am very interested in the ways that this technology can provide more information about the composition and condition of objects, as well as inform conservation treatment decisions and document their efficacy.
Conservators and conservation scientists have been using spectral imaging to help distinguish between and to characterize materials for some time. For example, pigments, adhesives, or coatings may appear very differently under ultraviolet or infrared radiation. Many labs have the equipment to image under a few wavelengths of light, but our new imaging system allows us to capture at a much broader range of wavelengths and compare them in an image stack.

Spectral imaging can help to identify the materials used to make or repair an object by the way they react under different light sources. Correct identification of components is important in making the best conservation treatment decisions and might also be used to establish the relative age of a particular object or to verify its authenticity. While spectral imaging offers the promise of providing a non-destructive tool for identification, it does have limitations and other analytical techniques may be required.

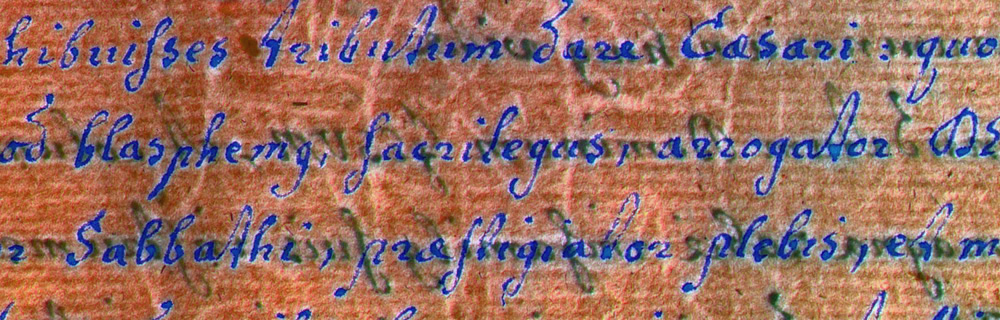
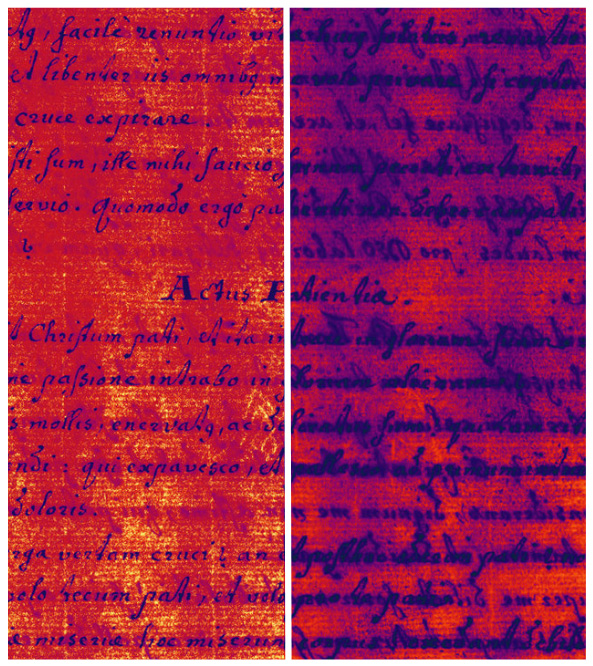
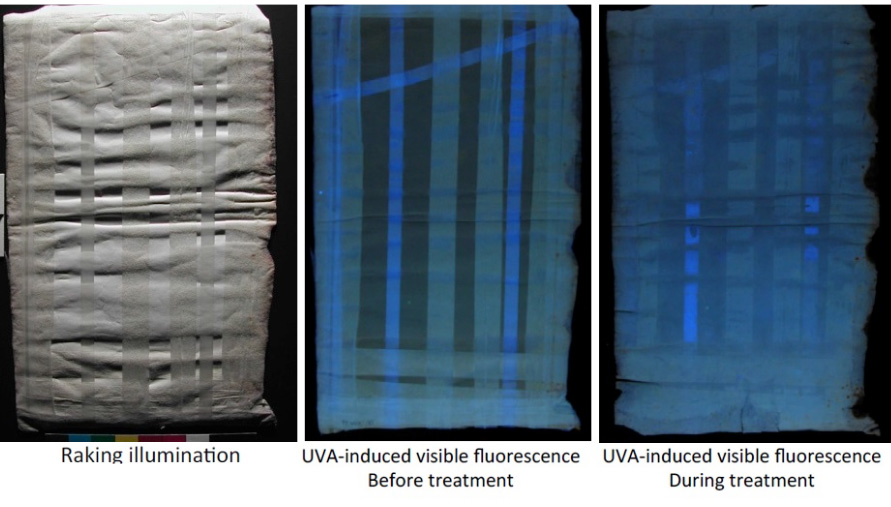
Multispectral imaging offers new opportunities to evaluate and document the condition of objects within our collections. Previous repairs may be so well executed or intentionally obscured that the location or extent of the repair is not obvious under visible light. Areas of paper or parchment that have been replaced or have added reinforcements (such as linings) may appear different from the original when viewed under UV radiation. Spectral imaging can provide better visual documentation of the degradation of inks ( see image below) or damage from mold or water that is not apparent under visible light.
This imaging equipment provides opportunities for better measuring the effectiveness of the treatments that conservators perform in-house. For example, a common treatment that we perform in our lab is the removal of pressure sensitive tape repairs from paper documents using solvents. Spectral imaging before, during, and after treatment could document the effectiveness of the solvents or other employed techniques in removing the tape carrier and adhesive from the paper.
Staff from the Conservation Services department have a long history of participating in the library’s digitization program in order to ensure the safety of fragile collection materials. Our department will continue to serve in this capacity for special collections objects undergoing multispectral imaging to answer specific research questions; however, we are also excited to employ this same technology to better care for the cultural heritage within our collections.
______
Want to learn even more about MSI at DUL?
In past posts, I’ve paid homage to the audio ancestors with riffs on such endangered–some might say extinct–formats as DAT and Minidisc. This week we turn our attention to the smallest (and perhaps the cutest) tape format of them all: the Microcassette.
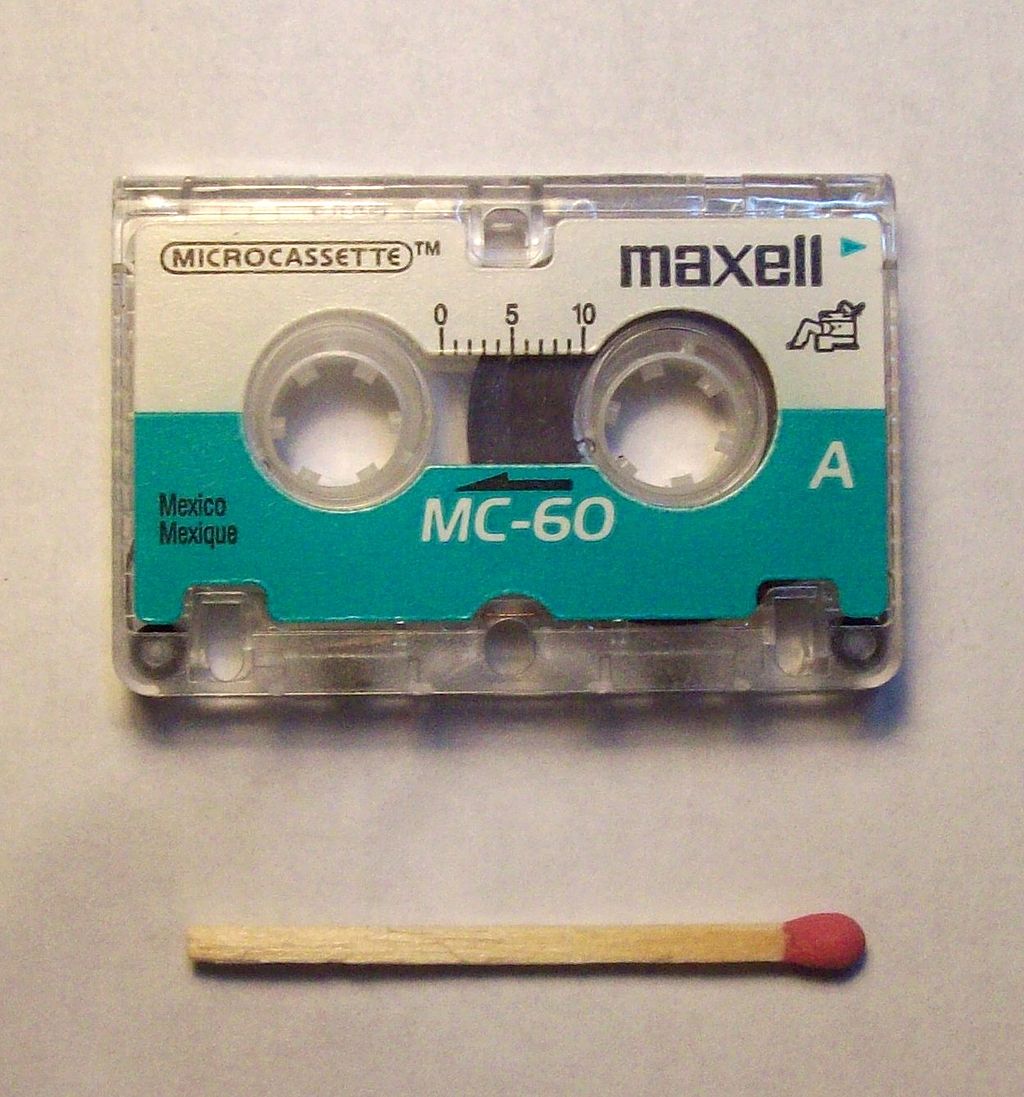
Introduced by the Olympus Corporation in 1969, the Microcassette used the same width tape (3.81 mm) as the more common Philips Compact Cassette but housed it in a much smaller and less robust plastic shell. The Microcassette also spooled from right to left (opposite from the compact cassette) as well as using slower recording speeds of 2.4 and 1.2 cm/s. The speed adjustment, allowing for longer uninterrupted recording times, could be toggled on the recorder itself. For instance, the original MC60 Microcassette allowed for 30 minutes of recorded content per “side” at standard speed and 60 minutes per side at low speed.
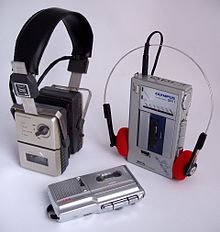
The microcassette was mostly used for recording voice–e.g. lectures, interviews, and memos. The thin tape (prone to stretching) and slow recording speeds made for a low-fidelity result that was perfectly adequate for the aforementioned applications, but not up to the task of capturing the wide dynamic and frequency range of music. As a result, the microcassette was the go-to format for cheap, portable, hand-held recording in the days before the smartphone and digital recording. It was standard to see a cluster of these around the lectern in a college classroom as late as the mid-1990s. Many of the recorders featured voice-activated recording (to prevent capturing “dead air”) and continuously variable playback speed to make transcription easier.
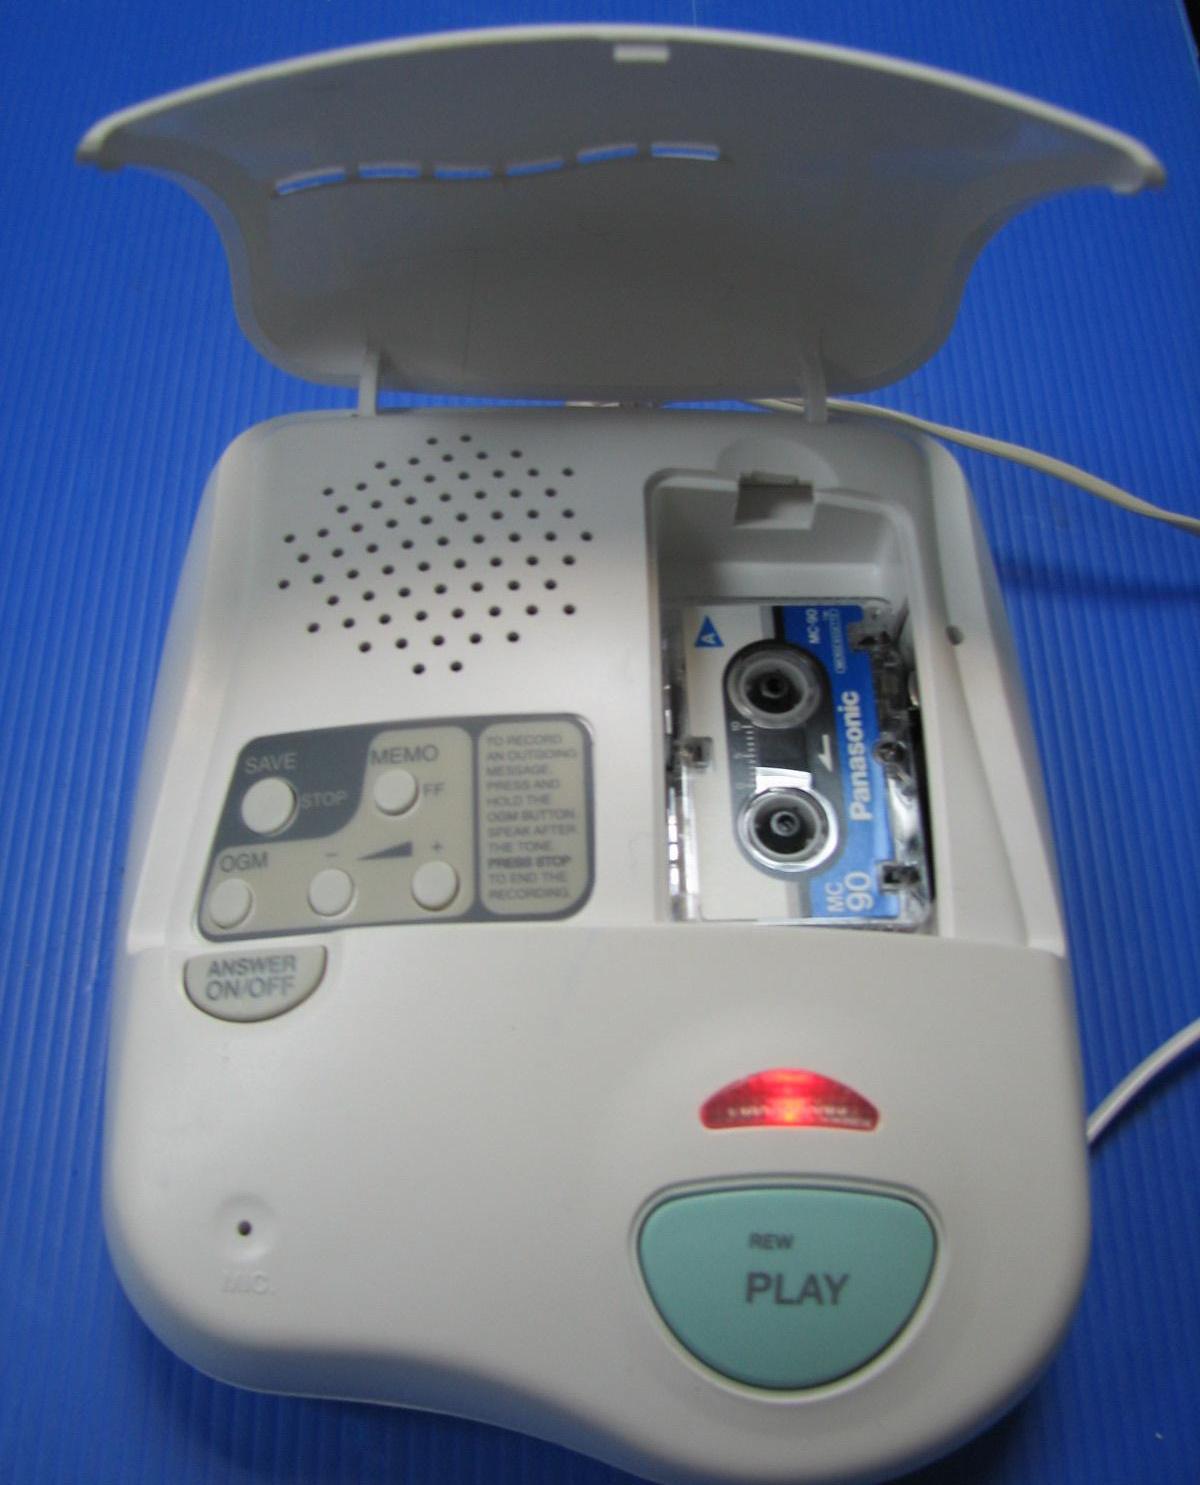
The tiny tapes were also commonly used in telephone answering machines and dictation machines.
As you may have guessed, the rise of digital recording, handheld devices, and cheap data storage quickly relegated the microcassette to a museum piece by the early 21st century. While the compact cassette has enjoyed a resurgence as a hip medium for underground music, the poor audio quality and durability of the microcassette have largely doomed it to oblivion except among the most willful obscurantists. Still, many Rubenstein Library collections contain these little guys as carriers of valuable primary source material. That means we’re holding onto our Microcassette player for the long haul in all of its atavistic glory.

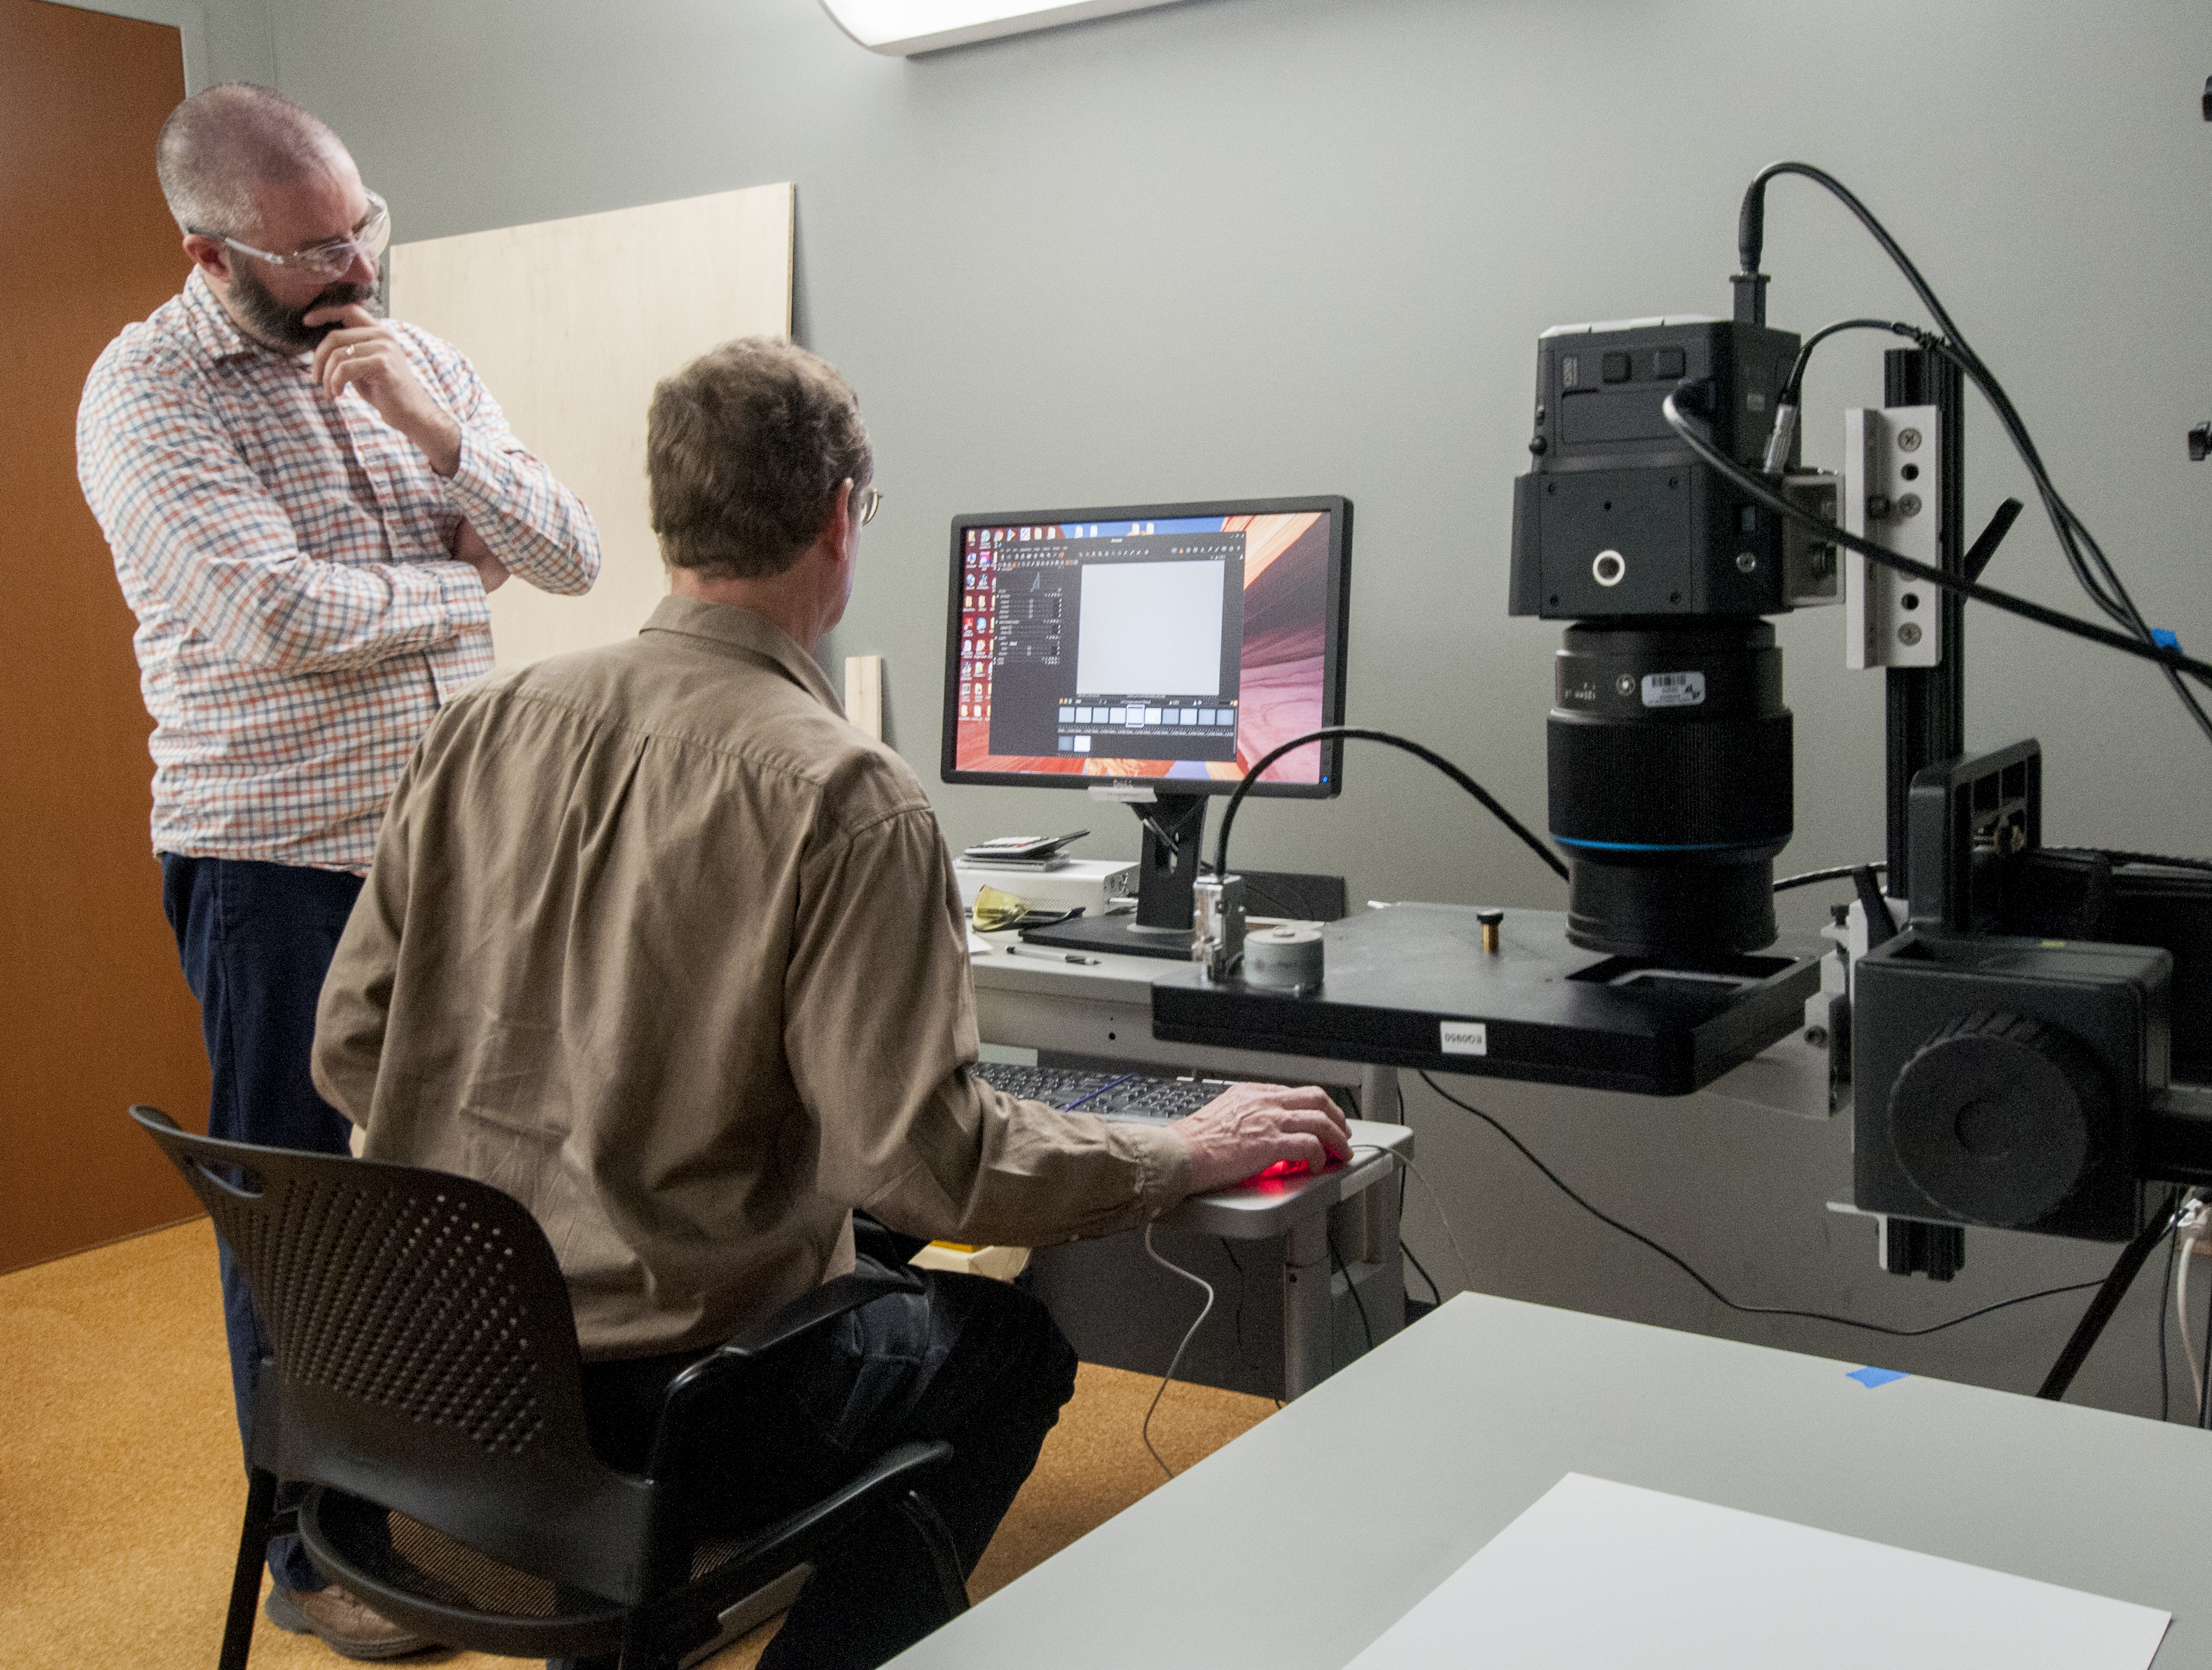
I am sure you have all been following the Library’s exploration into Multispectral Imaging (MSI) here on Bitstreams, Preservation Underground and the News & Observer. Previous posts have detailed our collaboration with R.B. Toth Associates and the Duke Eye Center, the basic process and equipment, and the wide range of departments that could benefit from MSI. In early December of last year (that sounds like it was so long ago!), we finished readying the room for MSI capture, installed the equipment, and went to MSI boot camp.

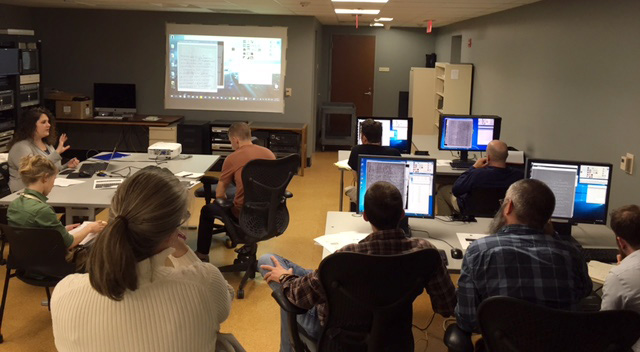
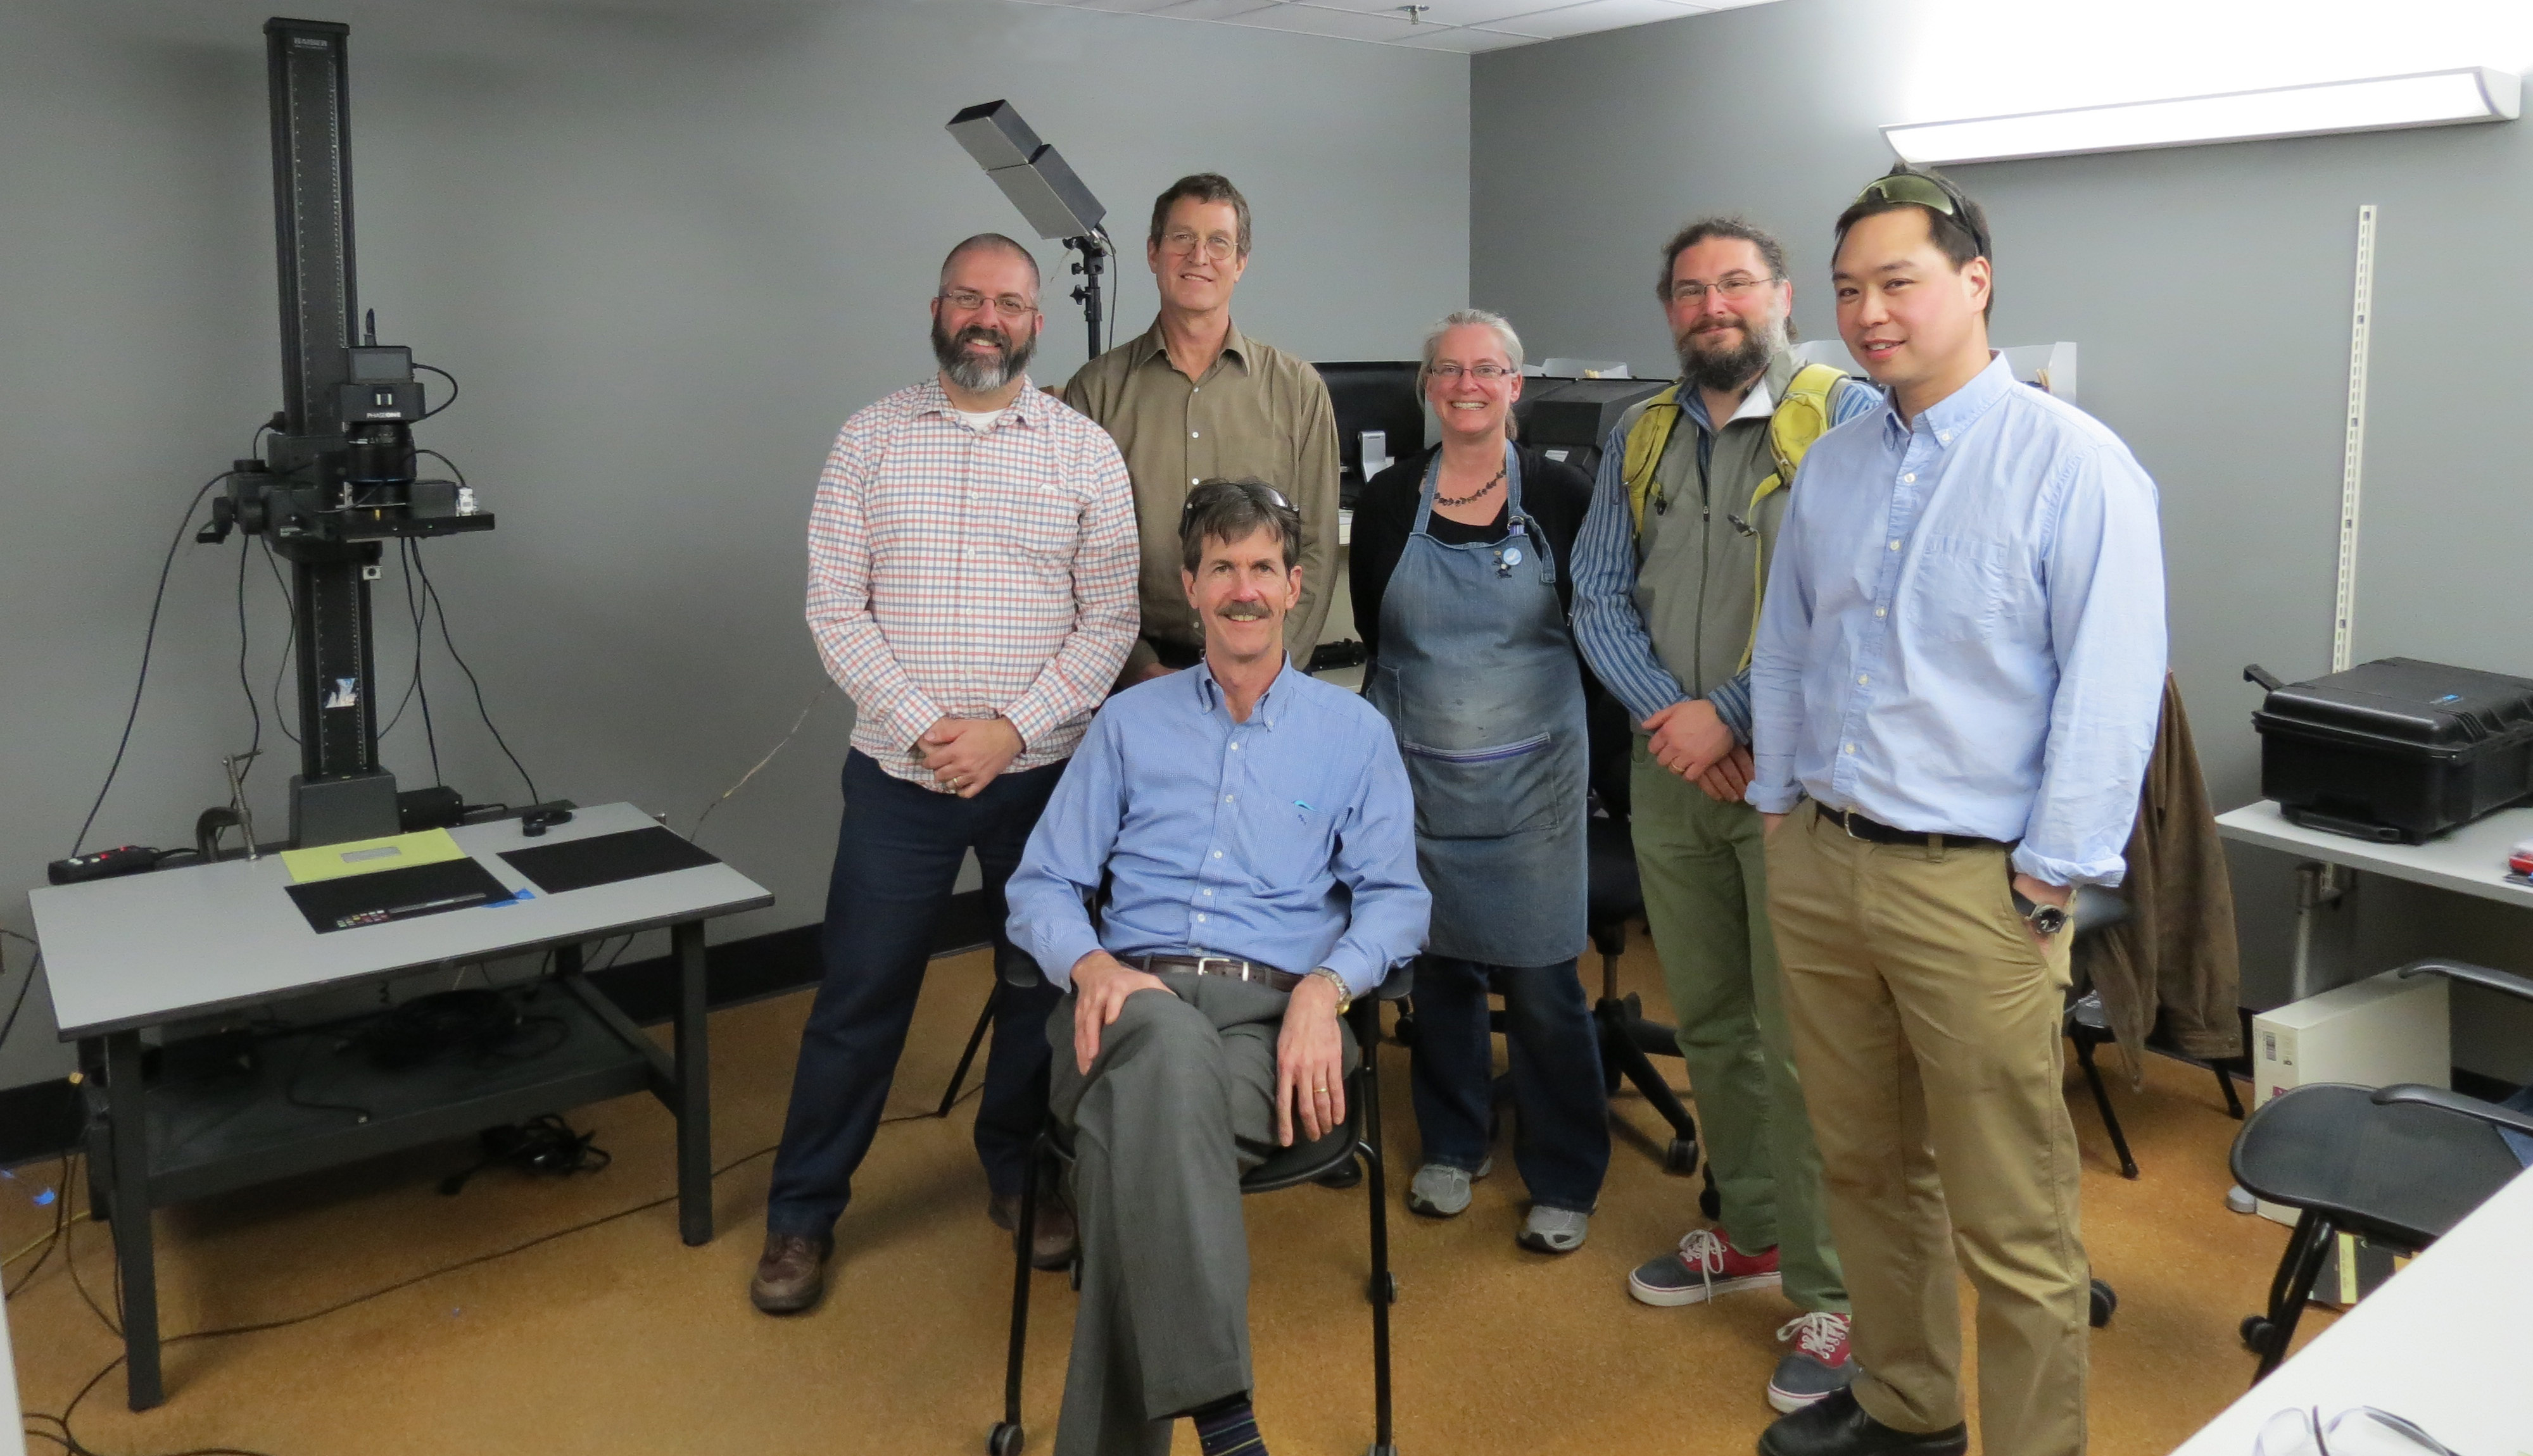
Well, boot camp came to us. Meghan Wilson, an independent contractor who has worked with R.B. Toth Associates for many years, started our training with an overview of the equipment and the basic science behind it. She covered the different lighting schemes and when they should be used. She explained MSI applications for identifying resins, adhesives and pigments and how to use UV lighting and filters to expose obscured text. We quickly went from talking to doing. As with any training session worth its salt, things went awry right off the bat (not Meghan’s fault). We had powered up the equipment but the camera would not communicate with the software and the lights would not fire when the shutter was triggered. This was actually a good experience because we had to troubleshoot on the spot and figure out what was going on together as a team. It turns out that there are six different pieces of equipment that have to be powered-up in a specific sequence in order for the system to communicate properly (tee up Apollo 13 soundtrack). Once we got the system up and running we took turns driving the software and hardware to capture a number of items that we had pre-selected. This is an involved process that produces a bunch of files that eventually produce an image stack that can be manipulated using specialized software. When it’s all said and done, files have been converted, cleaned, flattened, manipulated and variations produced that are somewhere in the neighborhood of 300 files. Whoa!
This is not your parents’ point and shoot—not the room, the lights, the curtains, the hardware, the software, the pricetag, none of it. But it is different in another more important way too. This process is team-driven and interdisciplinary. Our R&D working group is diverse and includes representatives from the following library departments.
To get the most out of MSI we need all of those skills and perspectives. What MSI really offers is the ability to ask—and we hope answer—strings of good questions. Is there ink beneath that paste-down or paint? Is this a palimpsest? What text is obscured by that stain or fire-damage or water damage? Can we recover it without having to intervene physically? What does the ‘invisible’ text say and what if anything does this tell us about the object’s history? Is the reflectance signature of the ink compatible with the proposed date or provenance of the object? That’s just for starters. But you can see how even framing the right question requires a range of perspectives; we have to understand what kinds of properties MSI is likely to illuminate, what kinds of questions the material objects themselves suggest or demand, what the historical and scholarly stakes are, what the wider implications for our and others’ collections are, and how best to facilitate human interface with the data that we collect. No single person on the team commands all of this.
Working in any large group can be a challenge. But when it all comes together, it is worth it. Below is a page from Jantz 723, one processed as a black and white image and the other a Principal Component Analysis produced by the MSI capture and processed using ImageJ and a set of tools created by Bill Christens-Barry of R.B. Toth Associates with false color applied using Photoshop. Using MSI we were able to better reveal this watermark which had previously been obscured.

I think we feel like 16-year-old kids with newly minted drivers’ licenses who have never driven a car on the highway or out of town. A whole new world has just opened up to us, and we are really excited and a little apprehensive!
What now?
Practice, experiment, document, refine. Over the next 12 (16? 18) months we will work together to hone our collective skills, driving the system, deepening our understanding of the scholarly, conservation, and curatorial use-cases for the technology, optimizing workflow, documenting best practices, getting a firm grip on scale, pace, and cost of what we can do. The team will assemble monthly, practice what we have learned, and lean on each other’s expertise to develop a solid workflow that includes the right expertise at the right time. We will select a wide variety of materials so that we can develop a feel for how far we can push the system and what we can expect day to day. During all of this practice, workflows, guidelines, policies and expectations will come into sharper focus.
As you can tell from the above, we are going to learn a lot over the coming months. We plan to share what we learn via regular posts here and elsewhere. Although we are not prepared yet to offer MSI as a standard library service, we are interested to hear your suggestions for Duke Library collection items that may benefit from MSI imaging. We have a long queue of items that we would like to shoot, and are excited to add more research questions, use cases, and new opportunities to push our skills forward. To suggest materials, contact Molly Bragg, Digital Collections Program Manager (molly.bragg at Duke.edu), Joshua Sosin, Associate Professor in Classical Studies & History (jds15 at Duke.edu) or Curator of Collections (andrew.armacost at Duke.edu).
Want to learn even more about MSI at DUL?
Noise is an inescapable part of our sonic environment. As I sit at my quiet library desk writing this, I can hear the undercurrent of the building’s pipes and HVAC systems, the click-clack of the Scribe overhead book scanner, footsteps from the floor above, doors opening and closing in the hallway, and the various rustlings of my own fidgeting. In our daily lives, our brains tune out much of this extraneous noise to help us focus on the task at hand and be alert to sounds conveying immediately useful information: a colleagues’s voice, a cell-phone buzz, a fire alarm.
When sound is recorded electronically, however, this tuned-out noise is often pushed to the foreground. This may be due to the recording conditions (e.g. a field recording done on budget equipment in someone’s home or outdoors) or inherent in the recording technology itself (electrical interference, mechanical surface noise). Noise is always present in the audio materials we digitize and archive, many of which are interviews, oral histories, and events recorded to cassette or open reel tape by amateurs in the field. Our first goal is to make the cleanest and most direct analog-to-digital transfer possible, and then save this as our archival master .wav file with no alterations. Once this is accomplished, we have some leeway to work with the digital audio and try to create a more easily listenable and intelligible access copy.

I recently started experimenting with Steinberg WaveLab software to clean up digitized recordings from the Larry Rubin Papers. This collection contains some amazing documentation of Rubin’s work as a civil rights organizer in the 1960s, but the ever-present hum & hiss often threaten to obscure the content. I worked with two plug-ins in WaveLab to try to mitigate the noise while leaving the bulk of the audio information intact.
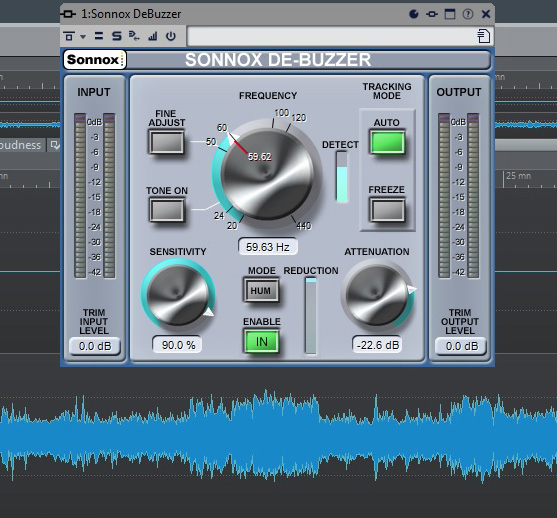
Even if you don’t know it by name, anyone who has used electronic audio equipment has probably heard the dreaded 60 Cycle Hum. This is a fixed low-frequency tone that is related to our main electric power grid operating at 120 volts AC in the United States. Due to improper grounding and electromagnetic interference from nearby wires and appliances, this current can leak into our audio signals and appear as the ubiquitous 60 Hz hum (disclaimer–you may not be able to hear this as well on tiny laptop speakers or earbuds). Wavelab’s De-Buzzer plug-in allowed me to isolate this troublesome frequency and reduce its volume level drastically in relation to the interview material. Starting from a recommended preset, I adjusted the sensitivity of the noise reduction by ear to cut unwanted hum without introducing any obvious digital artifacts in the sound.
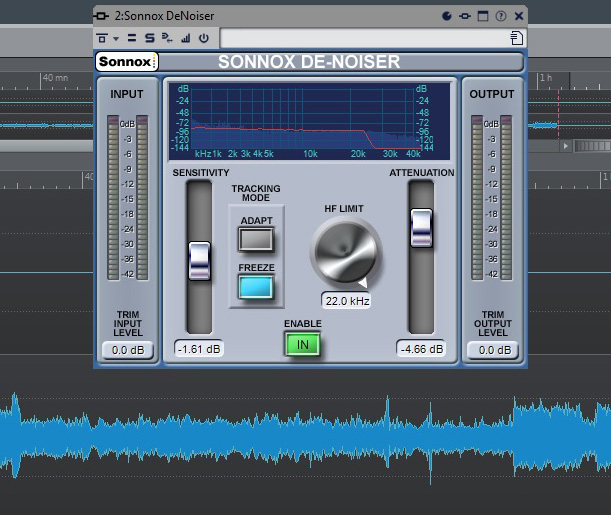
Similarly omnipresent in analog audio is High-Frequency Hiss. This wash of noise is native to any electrical system (see Noise Floor) and is especially problematic in tape-based media where the contact of the recording and playback heads against the tape introduces another level of “surface noise.” I used the De-Noiser plug-in to reduce hiss while being careful not to cut into the high-frequency content too much. Applying this effect too heavily could make the voices in the recording sound dull and muddy, which would be counterproductive to improving overall intelligibility.
Listen to the before & after audio snippets below. While the audio is still far from perfect due to the original recording conditions, conservative application of the noise reduction tools has significantly cleaned up the sound. It’s possible to cut the noise even further with more aggressive use of the effects, but I felt that would do more harm than good to the overall sound quality.
BEFORE:
AFTER:
I was fairly pleased with these results and plan to keep working with these and other software tools in the future to create digital audio files that meet the needs of archivists and researchers. We can’t eliminate all of the noise from our media-saturated lives, but we can always keep striving to keep the signal-to-noise ratio at manageable and healthy levels.

Back in March I wrote a blog post about the Library exploring Multispectral Imaging (MSI) to see if it was feasible to bring this capability to the Library. It seems that all the stars have aligned, all the ducks have been put in order, the t’s crossed and the i’s dotted because over the past few days/weeks we have been receiving shipments of MSI equipment, scheduling the painting of walls and installation of tile floors and finalizing equipment installation and training dates (thanks Molly!). A lot of time and energy went into bringing MSI to the Library and I’m sure I speak for everyone involved along the way that WE ARE REALLY EXCITED!
I won’t get too technical but I feel like geeking out on this a little… like I said… I’m excited!
Lights, Cameras and Digital Backs: To maximize the usefulness of this equipment and the space it will consume we will capture both MSI and full color images with (mostly) the same equipment. MSI and full color capture require different light sources, digital backs and software. In order to capture full color images, we will be using the Atom Lighting and copy stand system and a Phase One IQ180 80MP digital back from Digital Transitions. To capture MSI we will be using narrowband multispectral EurekaLight panels with a Phase One IQ260 Achromatic, 60MP digital back. These two setups will use the same camera body, lens and copy stand. The hope is to set the equipment up in a way that we can “easily” switch between the two setups.

The computer that drives the system: Bill Christianson of R. B. Toth Associates has been working with Library IT to build a work station that will drive both the MSI and full color systems. We opted for a dual boot system because the Capture One software that drives the Phase One digital back for capturing full-color images has been more stable in a Mac environment and MSI capture requires software that only runs on a Windows system. Complicated, but I’m sure they will work out all the technical details. 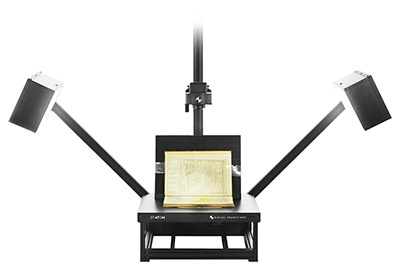
The Equipment (Geek out):
The space: We are moving our current Phase One system and the MSI system into the same room. While full-color capture is pretty straightforward in terms of environment (overhead lights off, continuous light source for exposing material, neutral wall color and no windows), the MSI environment requires total darkness during capture. In order to have both systems in the same room we will be using blackout curtains between the two systems so the MSI system will be able to capture in total darkness and the full-color system will be able to use a continuous light source. While the blackout curtains are a significant upgrade, the overall space needs some minor remodeling. We will be upgrading to full spectrum overhead lighting, gray walls and a tile floor to match the existing lab environment.
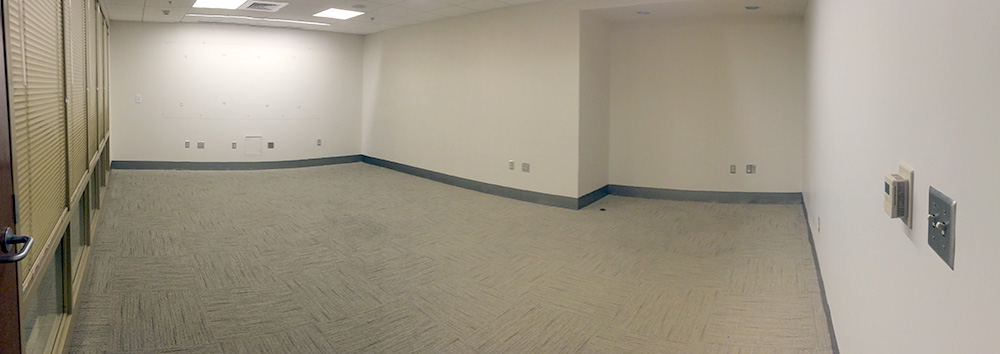
As shown above… we have begun to receive MSI equipment, installation and training dates have been finalized, the work station is being built and configured as I write this and the room that will house both Phase One systems has been cleared out and is ready for a makeover… It is actually happening!
What a team effort!
I look forward to future blog posts about the discoveries we will make using our new MSI system!
______
In the Digital Production Center, many of the videotapes we digitize have “bars and tone” at the beginning of the tape. These are officially called “SMPTE color bars.” SMPTE stands for The Society of Motion Picture and Television Engineers, the organization that established the color bars as the North American video standard, beginning in the 1970s. In addition to the color bars presented visually, there is an audio tone that is emitted from the videotape at the same time, thus the phrase “bars and tone.”

The purpose of bars and tone is to serve as a reference or target for the calibration of color and audio levels coming from the videotape during transmission. The color bars are presented at 75% intensity. The audio tone is a 1kHz sine wave. In the DPC, we can make adjustments to the incoming signal, in order to bring the target values into specification. This is done by monitoring the vectorscope output, and the audio levels. Below, you can see the color bars are in proper alignment on the DPC’s vectorscope readout, after initial adjustment.
We use Blackmagic Design’s SmartView monitors to check the vectorscope, as well as waveform and audio levels. The SmartView is an updated, more compact and lightweight version of the older, analog equipment traditionally used in television studios. The Smartview monitors are integrated into our video rack system, along with other video digitization equipment, and numerous videotape decks.

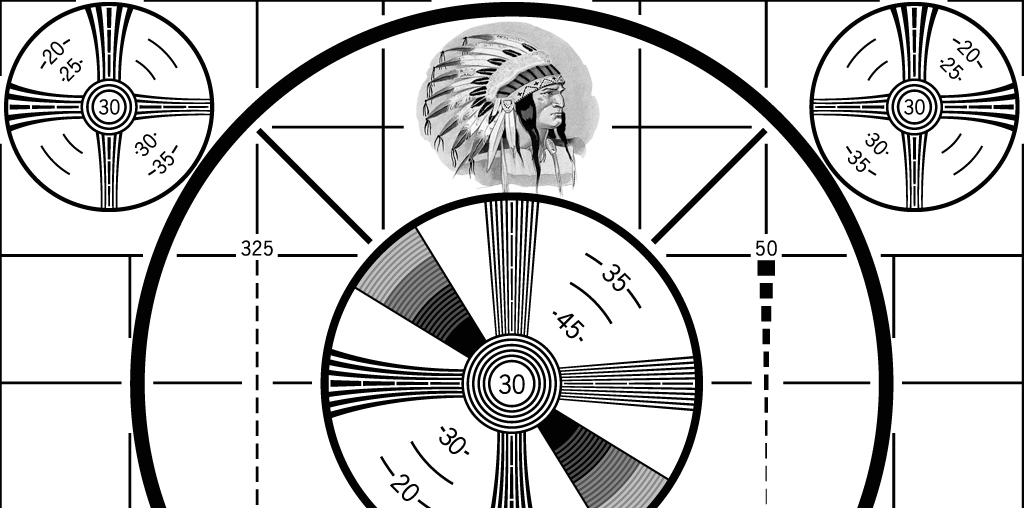
If you are old enough to have grown up in the black and white television era, you may recognize this old TV test pattern, commonly referred to as the “Indian-head test pattern.” This often appeared just before a TV station began broadcasting in the morning, and again right after the station signed off at night. The design was introduced in 1939 by RCA. The “Indian-head” image was integrated into a pattern of lines and shapes that television engineers used to calibrate broadcast equipment. Because the illustration of the Native American chief contained identifiable shades of gray, and had fine detail in the feathers of the headdress, it was ideal for adjusting brightness and contrast.

When color television debuted in the 1960’s, the “Indian-head test pattern” was replaced with a test card showing color bars, a precursor to the SMPTE color bars. Today, the “Indian-head test pattern” is remembered nostalgically, as a symbol of the advent of television, and as a unique piece of Americana. The master art for the test pattern was discovered in an RCA dumpster in 1970, and has since been sold to a private collector. In 2009, when all U.S. television stations were required to end their analog signal transmission, many of the stations used the Indian-head test pattern as their final analog broadcast image.
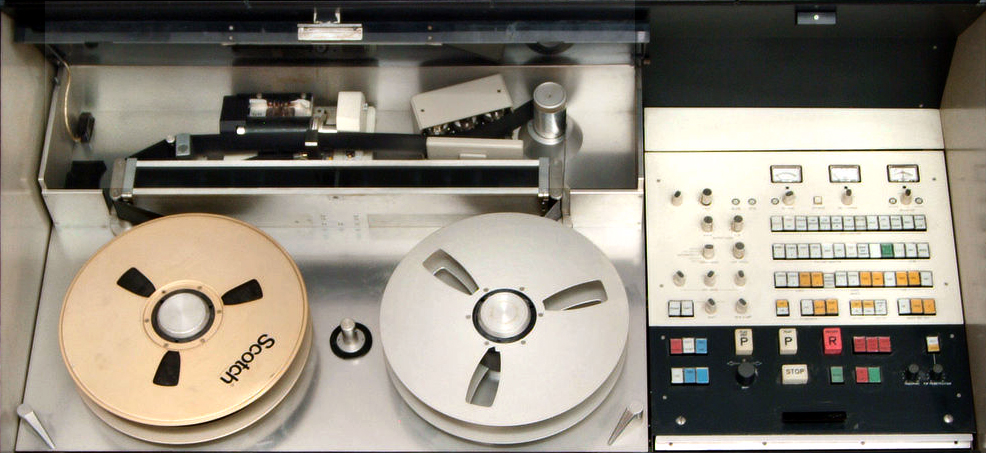
If you happen to be rummaging through your parents’ or grandparents’ attic, basement or garage, and stumble upon some old reel-to-reel audiotape, or perhaps some dust-covered videotape reels that seem absurdly large & clunky, they are most likely worthless, except for perhaps sentimental value. Even if these artifacts did, at one time, have some unique historic content, you may never know, because there’s a strong chance that decades of temperature extremes have made the media unplayable. The machines that were once used to play the media are often no longer manufactured, hard to find, and only a handful of retired engineers know how to repair them. That is, if they can find the right spare parts, which no one sells anymore.

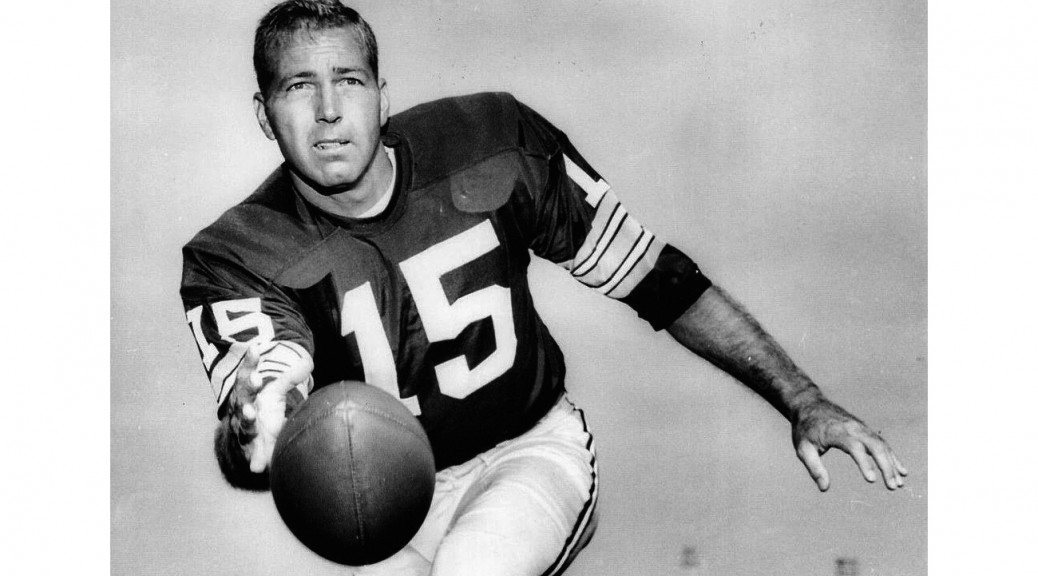
However, once in a while, something that is one of a kind miraculously survives. That was the case for Troy Haupt, a resident of North Carolina’s Outer Banks, who discovered that his father, Martin Haupt, had recorded the very first Super Bowl onto 2” Quadruplex color videotape directly from the 1967 live television broadcast. After Martin passed away, the tapes ended up in Troy’s mother’s attic, yet somehow survived the elements.
What makes this so unique is that, in 1967, videotape was very expensive and archiving at television networks was not a priority. So the networks that aired the first Super Bowl, CBS and NBC, did not save any of the broadcast.
But Martin Haupt happened to work for a company that repaired professional videotape recorders, which were, in 1967, cutting edge technology. Taping television broadcasts was part of Martin’s job, a way to test the machines he was rebuilding. Fortunately, Martin went to work the day Super Bowl 1 aired live. The two Quadruplex videotapes that Martin Haupt used to record Super Bowl 1 cost $200 each in 1967. In today’s dollars, that’s almost $3000 total for the two tapes. Buying a “VCR” at your local department store was unfathomable then, and would not be possible for at least another decade. Somehow, Martin missed recording halftime, and part of the third quarter, but it turns out that Martin’s son Troy now owns the most complete known video recording of Super Bowl 1, in which the quarterback Bart Starr led the Green Bay Packers to a 35-10 victory over the Kansas City Chiefs.

For music fans, another treasure was uncovered in a storage locker in Marin County, CA, in 1986. Betty Cantor-Jackson worked for The Grateful Dead’s road crew, and made professional multi-track recordings of many of their best concerts, between 1971-1980, on reel-to-reel audiotape. The Dead were known for marathon concerts in which some extended songs, like “Dark Star” could easily fill an entire audio reel. The band gave Betty permission to record, but she purchased her own gear and blank tape, tapping into the band’s mixing console to capture high-quality, soundboard recordings of the band’s epic concerts during their prime era. Betty held onto her tapes until she fell on hard times in the 1980’s, lost her home, and had to move the tapes to a storage locker. She couldn’t pay the storage fees, so the locker contents went up for auction.

Some 1000 audio reels ended up in the hands of three different buyers, none of whom knew what the tapes contained. Once the music was discovered, copies of the recordings began to leak to hardcore tape-traders within the Deadhead community, and they became affectionately referred to as “The Betty Boards.” It turns out the tapes include some legendary performances, such as the 1971 Capitol Theatre run, and the May 1977 tour, including “Barton Hall, May 8, 1977,” considered by many Deadheads as one of the best Grateful Dead concerts of all time.
You would think the current owners of Super Bowl 1 and Barton Hall, May 8, 1977 would be sitting on gold. But, that’s where the lawyers come in. Legally, the people who possess these tapes own the physical tapes, but not the content on those tapes. So, Troy Haupt owns the 2” inch quadriplex reels of Super Bowl 1, but the NFL owns what you can see on those reels. The NFL owns the copyright of the broadcast. Likewise, The Grateful Dead owns the music on the audio reels, regardless of who owns the physical tape that contains the music. Unfortunately, for NFL fans and Deadheads, this makes the content somewhat inaccessable for now. Troy Haupt has offered to sell his videotapes to the NFL, but they have mostly ignored him. If Troy tries to sell the tapes to a third party instead, the NFL says they will sue him, for unauthorized distribution of their content. The owners of the Grateful Dead tapes face a similar dilema. The band’s management isn’t willing to pay money for the physical tapes, but if the owners, or any third party the owners sell the tapes to, try to distribute the music, they will get sued. However, if it weren’t for Martin Haupt and Betty Cantor-Jackson, who had the foresight to record these events in the first place, the content would not exist at all.
Over the past 6 months or so the Digital Production Center has been collaborating with Duke Collaboratory for Classics Computing (DC3) and the Conservation Services Department to investigate multispectral imaging capabilities for the Library. Multispectral imaging (MSI) is a mode of image capture that uses a series of narrow band lights of specific frequencies along with a series of filters to illuminate an object. Highly tailored hardware and software are used in a controlled environment to capture artifacts with the goal of revealing information not seen by the human eye. This type of capture system in the Library would benefit many departments and researchers alike. Our primary focus for this collaboration are the needs of the Papyri community, Conservation Services along with additional capacity for the Digital Production Center.
Josh Sosin of DC3 was already in contact with Mike Toth of R. B. Toth Associates, a company that is at the leading edge of MSI for Cultural Heritage and research communities, on a joint effort between DC3, Conservation Services and the Duke Eye Center to use Optical Coherence Tomography (OCT) to hopefully reveal hidden layers of mummy masks made of papyri. The DPC has a long standing relationship with Digital Transitions, a reseller of the Phase One digital back, which happens to be the same digital back used in the Toth MSI system. And the Conservation lab was already involved in the OCT collaboration so it was only natural to invite R. B. Toth Associates to the Library to show us their MSI system.
After observing the OCT work done at the Eye Center we made our way to the Library to setup the MSI system. Bill Christens-Barry of R. B. Toth Associates walked me through some very high-level physics related to MSI, we setup the system and got ready to capture selected material which included Ashkar-Gilson manuscripts, various papyri and other material that might benefit from MSI. By the time we started capturing images we had a full house. Crammed into the room were members of DC3, DPC, Conservation, Digital Transitions and Toth Associates all of whom had a stake in this collaboration. After long hours of sitting in the dark (necessary for MSI image capture) we emerged from the room blurry eyed and full of hope that something previously unseen would be revealed.

The resulting captures are as ‘stack’ or ‘block’ of monochromatic images captured using different wavelengths of light and ultraviolet and infrared filters. Using software developed by Bill Christens-Barry to process and manipulate the images will reveal information if it is there by combining, removing or enhancing images in the stack. One of the first items we processed was Ashkar-GilsonMS14 Deuteronomy 4.2-4.23 seen below. This really blew us away.
This item went from nearly unreadable to almost entirely readable! Bill assured me that he had only done minimal processing and that he should be able to uncover more of the text in the darker areas with some fine tuning. The text of this manuscript was revealed primarily through the use of the IR filter and was not necessarily the direct product of exposing the manuscript to individual bands of light but the result is no less spectacular. Because the capture process is so time consuming and time was limited no other Ashkar-Gilson manuscript was digitized at this time.
We digitized the image on the left in 2010 and ever since then, when asked, ‘What is the most exciting thing you have digitized’ I often answer, “The Ashkar-Gilson manuscripts. Manuscripts from ca. 7th to 8th Century C.E. Some of them still have fur on the back and a number of them are unreadable… but you can feel the history.” Now my admiration for these manuscripts is renewed and maybe Josh can tell me what it says.
It is our hope that we can bring this technology to Duke University so we can explore our material in greater depth and reveal information that has not been seen for a very, very long time.
Beth Doyle, Head of Conservation Services, wrote a blog post for Preservation Underground about her experience with MSI. Check it out!
Also, check out this article from the New & Observer.
________
Want to learn even more about MSI at DUL?