Last week, I went to go see the movie IT: Chapter 2. One thing I really appreciated about the movie was how it used a scene’s lighting to full effect. Some scenes are brightly lit to signify the friendship among the main characters. Conversely, there are dark scenes that signify the evil Pennywise the Clown. For the movie crew, no doubt it took a lot of time and manpower to light an individual scene – especially when the movie is nearly 3 hours long.
We do the same type of light setup and management inside the Digital Production Center (DPC) when we take photos of objects like books, letters, or manuscripts. Today, I will talk specifically about how we light the bound material that comes our way, like books or booklets. Generally, this type of material is always going to be shot on our PhaseOne camera, so I will particularly highlight that lighting setup today.
Before We Begin
It’s not enough to just turn the lights on in our camera room to do the trick. In order to properly light all the things that need to be shot on the PhaseOne, we have specific tools and products we use that you can see in the photo below.
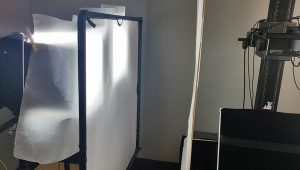
We have 4 high-powered lights (two sets of two Buhl SoftCube SC-150 models) pointed directly in the camera’s field of view. There are two on the right and two on the left. These are stationed approximately 3.5 feet off the ground and approximately 2.5 feet away from the objects themselves. These lights are supported by Avenger A630B light stands. They allow for a wide range of movement, extension, and support if we need them.
But if bright, hot lights were pointed directly at sensitive documents for hours, it would damage them. So light diffusers are necessary. For both sets of lights, we have 3 layers of material to diffuse the light and prevent material from warping or text from fading. The first layer, directly attached to the light box itself, is an inexpensive sheet of diffusion fabric. This type of material is often made from nylon or silk, and are usually inexpensive.
The second diffusion layer is an FJ Westcott Scrim Jim, a similar thin fabric that is attached to a lightweight stand-up frame, the Manfrotto 156BLB. This frame can also be moved or extended if need be. The last layer is another sheet of diffusion fabric, attached to a makeshift “cube” held up by lightweight wooden rods. This cube can be picked up or carried, making it very convenient if we need to eventually move our lights.
So in total, we have 4 lights, 4 layers of diffusion fabric attached to the light boxes, two Scrim Jims, and the cube featuring 2 sides of additional diffusion fabric. After having all these items stationed, surely we can start taking pictures, right? Not yet.
Around the Room
There are still more things to be aware of – this time in the camera room itself. We gently place the materials themselves on a cradle lined with a black felt, similar to velvet. This cradle is visible in the bottom right part of the photo above. It is placed on top of a table, also coated in black felt. This is done so no background colors bounce back or reflect onto the object and change what it looks like in the final image itself. The walls of the camera room are also painted a neutral grey color for the same reason, as you can see in the background of the above photo. Finally, any tiny reflective segments between the ceiling tiles have been blacked out with gaffer tape. Having the room this muted and intentionally dark also helps us when we have to shoot multi-spectral images. No expense has been spared to make sure our colors and photos are correct.
Camera Settings

With all these precautions in place, can we finally take photos of our materials? Almost. Before we can start photographing, we have to run some tests to make sure everything looks correct to our computers. After making sure our objects are sharp and in focus, we use a program called DTDCH (see the photo to the right) to adjust the aperture and exposure of the PhaseOne so that nothing appears either way too dim or too bright. In our camera room, we use a PhaseOne IQ180 with a Schneider Kreuznach Apo-Digitar lens (visible in the top-right corner of the photo above). We also use the program CaptureOne to capture, save, and export our photos.
 Once the shot is in focus and appropriately bright, we will check our colors against an X-Rite ColorChecker Classic card (see the photo on the left) to verify that our camera has a correct white balance. When we take a photo of the ColorChecker, CaptureOne displays a series of numbers, known as RGB values, found in the photo’s colors. We will check these numbers against what they should be, so we know that our photo looks accurate. If these numbers match up, we can continue. You could check our work by saving the photo on the left and opening it in a program like Adobe Photoshop.
Finally, we have specific color profiles that the DPC uses to ensure that all our colors appear accurate as well. For more information on how we consistently calibrate the color in our images, please check out this previous blog post.
After all this setup, now we can finally shoot photos! Lighting our materials for the PhaseOne is a lot of hard work and preparation. But it is well worth it to fulfill our mission of digitizing images for preservation.