Category Archives: Behind the Scenes

Cutting Through the Noise

Noise is an inescapable part of our sonic environment.  As I sit at my quiet library desk writing this, I can hear the undercurrent of the building’s pipes and HVAC systems, the click-clack of the Scribe overhead book scanner, footsteps from the floor above, doors opening and closing in the hallway, and the various rustlings of my own fidgeting.  In our daily lives, our brains tune out much of this extraneous noise to help us focus on the task at hand and be alert to sounds conveying immediately useful information: a colleagues’s voice, a cell-phone buzz, a fire alarm.

When sound is recorded electronically, however, this tuned-out noise is often pushed to the foreground.  This may be due to the recording conditions (e.g. a field recording done on budget equipment in someone’s home or outdoors) or inherent in the recording technology itself (electrical interference, mechanical surface noise).  Noise is always present in the audio materials we digitize and archive, many of which are interviews, oral histories, and events recorded to cassette or open reel tape by amateurs in the field.  Our first goal is to make the cleanest and most direct analog-to-digital transfer possible, and then save this as our archival master .wav file with no alterations.  Once this is accomplished, we have some leeway to work with the digital audio and try to create a more easily listenable and intelligible access copy.

img_2190

I recently started experimenting with Steinberg WaveLab software to clean up digitized recordings from the Larry Rubin Papers.  This collection contains some amazing documentation of Rubin’s work as a civil rights organizer in the 1960s, but the ever-present hum & hiss often threaten to obscure the content.  I worked with two plug-ins in WaveLab to try to mitigate the noise while leaving the bulk of the audio information intact.

plugin1

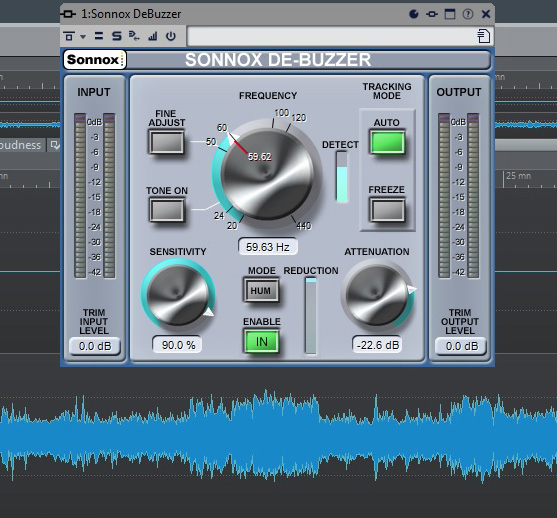
Even if you don’t know it by name, anyone who has used electronic audio equipment has probably heard the dreaded 60 Cycle Hum.  This is a fixed low-frequency tone that is related to our main electric power grid operating at 120 volts AC in the United States.  Due to improper grounding and electromagnetic interference from nearby wires and appliances, this current can leak into our audio signals and appear as the ubiquitous 60 Hz hum (disclaimer–you may not be able to hear this as well on tiny laptop speakers or earbuds).  Wavelab’s De-Buzzer plug-in allowed me to isolate this troublesome frequency and reduce its volume level drastically in relation to the interview material.  Starting from a recommended preset, I adjusted the sensitivity of the noise reduction by ear to cut unwanted hum without introducing any obvious digital artifacts in the sound.

plugin2

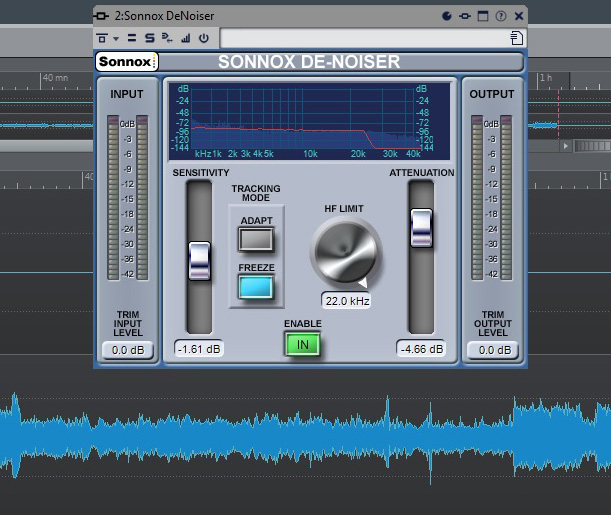
Similarly omnipresent in analog audio is High-Frequency Hiss.  This wash of noise is native to any electrical system (see Noise Floor) and is especially problematic in tape-based media where the contact of the recording and playback heads against the tape introduces another level of “surface noise.”  I used the De-Noiser plug-in to reduce hiss while being careful not to cut into the high-frequency content too much.  Applying this effect too heavily could make the voices in the recording sound dull and muddy, which would be counterproductive to improving overall intelligibility.

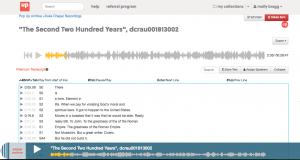
Listen to the before & after audio snippets below.  While the audio is still far from perfect due to the original recording conditions, conservative application of the noise reduction tools has significantly cleaned up the sound.  It’s possible to cut the noise even further with more aggressive use of the effects, but I felt that would do more harm than good to the overall sound quality.

BEFORE:

AFTER:


I was fairly pleased with these results and plan to keep working with these and other software tools in the future to create digital audio files that meet the needs of archivists and researchers.  We can’t eliminate all of the noise from our media-saturated lives, but we can always keep striving to keep the signal-to-noise ratio at manageable and healthy levels.


img_2187

Time Management Zines and Other Confessions of a Project Management Nerd

As the Digital Collections Program Manager at DUL, I spend most of my time managing projects. I really enjoy the work, and I’m always looking for ways to improve my methods, skills and overall approach.  For this reason, I was excited to join forces with a few colleagues to think about how we could help graduate students develop and sharpen their project management skills.  We have been meeting since last Spring and our accomplishments include defining key skills, reaching out to grad school departments about available resources and needs, assembling a list of project management readings and resources that we think are relevant in the academic context (still a work in progress: http://bit.ly/DHProjMgmt), and we are in the process of planning a workshop.  But my most favorite project has been making project management themed zines.

Yes, you read that correctly:  project management zines.  You can print them on letter sized paper, and they are very easy to assemble (check out the a demo our friends in Rubenstein put together).  But before you download, read on to learn more about the process behind the time management related zine.

Part of the Introduction to Project Management zine.
Part of the Introduction to Project Management zine – click to view/download.

Gathering Zine Content

Early on in our work the group decided to focus on 5 key aspects of project management:  time management, communicating with others, logging research activities, goal setting, and document or research management.   After talking with faculty we decided to focus on time management and document/research management.

I’ve been working with a colleague on time management tips for grad students, so we spent a lot of time combing Lifehacker and GradHacker and found some really good ideas and great resources!  Based on our findings, we decided to break the concept of time management down further into smaller areas:  planning, prioritizing and monotasking.  From there, we made zines (monotasking coming soon)!  We are also working on a libguide and some kind of learning module for a workshop.

Part of a real time management zine! Click to view the whole thing.
Part of a the Planning and Prioritizing zine – click to view/download.


Here are a few of my favorite new ideas from our time management research:

  • Monotasking: sometimes focussing on one task for an extended period of time sounds impossible, but my colleague found some really practical approaches for doing one thing at a time, such as the “Pomodoro technique” (http://pomodorotechnique.com/)
  • Park your work when multitasking: the idea is that before you move from task a to task b, spend a moment noting where you are leaving off on task a, and what you plan to do next when you come back to it.
Part of the Monotasking zine - click to view/download.
Part of the Monotasking zine – click to view/download.
  • Prioritization grids:  if you don’t know where to begin with the long list of tasks in front of you (something grand students can surely related to), try plotting them on a priority matrix.  The most popular grid for this kind of work that I found is the Eisenhower grid, which has you rank tasks by urgency and importance (https://www.mindtools.com/pages/article/newHTE_91.htm).  Then you accomplish your tasks by grid quadrant in a defined order (starting with tasks that are both important and urgent).  Although I haven’t tried this, I feel like you use other variables depending on your context, perhaps impact and effort.  I have an example grid on my zine so you can try this method out yourself!
  • Use small amounts of time effectively: this is really a mind shift more than a tool or tip, and relates to the Pomodoro technique.  Essentially the idea is to stop thinking that you cannot get anything done in those random 15-30 minute windows of downtime we all have between meetings, classes or other engagements.  I often feel defeated by 20 minutes of availability and 4 hours of work to do.  So I tried really jumping into those small time blocks, and it has been great.  Instead of waiting for a longer time slot to work on a “big” task, I’m getting better at carving away at my projects over time. I’ve found that I can really get more done than I thought in 20 minutes.  It has been a game changer for me!


Part of the Project Manage Longer Writing Projects zine
Part of the Project Manage Longer Writing Projects zine -click to view/download.

Designing the Zines

I was inspired to make zines by my colleague in Rubenstein, who created a researcher how-to zine.  The 1-page layout makes the idea of designing a zine much less intimidating.  Everyone in the ad-hoc project management group adopted the template and we designed our zines in a variety of design tools: google draw, powerpoint or illustrator.  We still have a few more to finish, but you can see our work so far online:  http://tinyurl.com/pmzines

Each zine prints out to an 8.5 x 11 piece of paper and can easily be cut and folded into its zine form following an easy gif demo.

Available zines

Introduction to Project Management (you can use this one as a coloring book too!)
Monotasking for Productive Work Blocks
Planning and Prioritizing
Project Manage your Writing

Access them all at this link: tinyurl.com/pmzines

Ad hoc Project Management working group members
Molly Bragg
Ciara Healy
Hannah Jacobs
Liz Milewicz
Angela Zoss

We will have more zines and a libguide available soon, happy reading and learning!

Getting Things Done in ArchivesSpace, or, Fun with APIs

aspace_iconMy work involves a lot of problem-solving and problem solving often requires learning new skills. It’s one of the things I like most about my job. Over the past year, I’ve spent most of my time helping Duke’s Rubenstein Library implement ArchivesSpace, an open source web application for managing information about archival collections.

As an archivist and metadata librarian by training (translation: not a programmer), I’ve been working mostly on data mapping and migration tasks, but part of my deep-dive into ArchivesSpace has been learning about the ArchivesSpace API, or, really, learning about APIs in general–how they work, and how to take advantage of them. In particular, I’ve been trying to find ways we can use the ArchivesSpace API to work smarter and not harder as the saying goes.

Why use the ArchivesSpace API?

Quite simply, the ArchivesSpace API lets you do things you can’t do in the staff interface of the application, especially batch operations.

So what is the ArchivesSpace API? In very simple terms, it is a way to interact with the ArchivesSpace backend without using the application interface. To learn more, you should check out this excellent post from the University of Michigan’s Bentley Historical Library: The ArchivesSpace API.

aspace_api_doc_example
Screenshot of ArchivesSpace API documentation showing how to form a GET request for an archival object record using the “find_by_id” endpoint

Working with the ArchivesSpace API: Other stuff you might need to know

As with any new technology, it’s hard to learn about APIs in isolation. Figuring out how to work with the ArchivesSpace API has introduced me to a suite of other technologies–the Python programming language, data structure standards like JSON, something called cURL, and even GitHub.  These are all technologies I’ve wanted to learn at some point in time, but I’ve always found it difficult to block out time to explore them without having a concrete problem to solve.

Fortunately (I guess?), ArchivesSpace gave me some concrete problems–lots of them.  These problems usually surface when a colleague asks me to perform some kind of batch operation in ArchivesSpace (e.g. export a batch of EAD, update a bunch of URLs, or add a note to a batch of records).

Below are examples of some of the requests I’ve received and some links to scripts and other tools (on Github) that I developed for solving these problems using the ArchivesSpace API.

ArchivesSpace API examples:

“Can you re-publish these 12 finding aids again because I fixed some typos?”

Problem:

I get this request all the time. To publish finding aids at Duke, we export EAD from ArchivesSpace and post it to a webserver where various stylesheets and scripts help render the XML in our public finding aid interface. Exporting EAD from the ArchivesSpace staff interface is fairly labor intensive. It involves logging into the application, finding the collection record (resource record in ASpace-speak) you want to export, opening the record, making sure the resource record and all of its components are marked “published,” clicking the export button, and then specifying the export options, filename, and file path where you want to save the XML.

In addition to this long list of steps, the ArchivesSpace EAD export service is really slow, with large finding aids often taking 5-10 minutes to export completely. If you need to post several EADs at once, this entire process could take hours–exporting the record, waiting for the export to finish, and then following the steps again.  A few weeks after we went into production with ArchivesSpace I found that I was spending WAY TOO MUCH TIME exporting and re-exporting EAD from ArchivesSpace. There had to be a better way…

Solution:

asEADpublish_and_export_eadid_input.py – A Python script that batch exports EAD from the ArchivesSpace API based on EADID input. Run from the command line, the script prompts for a list of EADID values separated with commas and checks to see if a resource record’s finding aid status is set to ‘published’. If so, it exports the EAD to a specified location using the EADID as the filename. If it’s not set to ‘published,’ the script updates the finding aid status to ‘published’ and then publishes the resource record and all its components. Then, it exports the modified EAD. See comments in the script for more details.

Below is a screenshot of the script in action. It even prints out some useful information to the terminal (filename | collection number | ASpace record URI | last person to modify | last modified date | export confirmation)

EAD Batch Export Script
Terminal output from EAD batch export script

[Note that there are some other nice solutions for batch exporting EAD from ArchivesSpace, namely the ArchivesSpace-Export-Service plugin.]

“Can you update the URLs for all the digital objects in this collection?”

Problem:

We’re migrating most of our digitized content to the new Duke Digital Repository (DDR) and in the process our digital objects are getting new (and hopefully more persistent) URIs. To avoid broken links in our finding aids to digital objects stored in the DDR, we need to update several thousand digital object URLs in ArchivesSpace that point to old locations. Changing the URLs one at a time in the ArchivesSpace staff interface would take, you guessed it, WAY TOO MUCH TIME.  While there are probably other ways to change the URLs in batch (SQL updates?), I decided the safest way was to, of course, use the ArchivesSpace API.

Digital Object Screenshot
Screenshot of a Digital Object record in ArchivesSpace. The asUpdateDAOs.py script will batch update identifiers and file version URIs based on an input CSV
Solution:

asUpdateDAOs.py – A Python script that will batch update Digital Object identifiers and file version URIs in ArchivesSpace based on an input CSV file that contains refIDs for the the linked Archival Object records. The input is a five column CSV file (without column headers) that includes: [old file version use statement], [old file version URI], [new file version URI], [ASpace ref_id], [ark identifier in DDR (e.g. ark:/87924/r34j0b091)].

[WARNING: The script above only works for ArchivesSpace version 1.5.0 and later because it uses the new “find_by_id” endpoint. The script is also highly customized for our environment, but could easily be modified to make other batch changes to digital object records based on CSV input. I’d recommend testing this in a development environment before using in production].

“Can you add a note to these 300 records?”

Problem:

We often need to add a note or some other bit of metadata to a set of resource records or component records in ArchivesSpace. As you’ve probably learned, making these kinds of batch updates isn’t really possible through the ArchivesSpace staff interface, but you can do it using the ArchivesSpace API!

Solution:

duke_archival_object_metadata_adder.py –  A Python script that reads a CSV input file and batch adds ‘repository processing notes’ to archival object records in ArchivesSpace. The input is a simple two-column CSV file (without column headers) where the first column contains the archival object’s ref_ID and the second column contains the text of the note you want to add. You could easily modify this script to batch add metadata to other fields.

duke_archival_object_metadata_adder
Terminal output of duke_archival_object_metadata_adder.py script

[WARNING: Script only works in ArchivesSpace version 1.5.0 and higher].

Conclusion

The ArchivesSpace API is a really powerful tool for getting stuff done in ArchivesSpace. Having an open API is one of the real benefits of an open-source tool like ArchivesSpace. The API enables the community of ArchivesSpace users to develop their own solutions to local problems without having to rely on a central developer or development team.

There is already a healthy ecosystem of ArchivesSpace users who have shared their API tips and tricks with the community. I’d like to thank all of them for sharing their expertise, and more importantly, their example scripts and documentation.

Here are more resources for exploring the ArchivesSpace API:

The Return of the Filmstrip

The Student Nonviolent Coordinating Committee worked on the cutting edge. In the fight for Black political and economic power, SNCC employed a wide array of technology and tactics to do the work. SNCC bought its own WATS (Wide Area Telephone Service) lines, allowing staff to make long-distance phone calls for a flat rate. It developed its own research department, communications department, photography department, transportation bureau, and had network of supporters that spanned the globe. SNCC’s publishing arm printed tens of thousands of copies of The Student Voice weekly to hold mass media accountable to the facts and keep the public informed. And so, when SNCC discovered they could create an informational organizing tool at 10¢ a pop that showed how people were empowering themselves, they did just that.

SomethingOfOurOwnPartOne009

SNCC activist Maria Varela was one of the first to work on this experimental project to develop filmstrips. Varela had come into SNCC’s photography department through her interest in creating adult literacy material that was accessible, making her well-positioned for this type of work. On 35mm split-frame film, Varela and other SNCC photographers pieced together positives that told a story, could be wound up into a small metal canister, stuffed into a cloth drawstring, and attached to an accompanying script. Thousands of these were mailed out all across the South, where communities could feed them into a local school’s projector and have a meeting to learn about something like the Delano Grape Strike or the West Batesville Farmers Cooperative.

SomethingOfOurOwnPartOne014

Fifty years later, Varela, a SNCC Digital Gateway Visiting Documentarian, is working with us to digitize some of these filmstrips for publication on our website. Figuring out the proper way to digitize these strips took some doing. Some potential options required cutting the film so that it could be mounted. Others wouldn’t capture the slides in their entirety. We had to take into account the limitations of certain equipment, the need to preserve the original filmstrips, and the desire to make these images accessible to a larger public.

Ultimately, we partnered with Skip Elsheimer of A/V Geeks in Raleigh, who has done some exceptional work with the film. Elsheimer, a well-known name in the field, came into his line of work through his interest in collecting old 16mm film reels. As collection, equipment, and network expanded, Elsheimer turned to this work full-time, putting together and A/V archive of over 25,000 films in the back of his former residence.

SomethingOfOurOwnPartOne027

We’re very excited to incorporate these filmstrips into the SNCC Digital Gateway. The slides really speak for themselves and act as a window into the organizing tools of the day. They educated communities about each other and helped knit a network of solidarity between movements working to bring power to the people.  Stay tuned to witness this on snccdigital.org when our site debuts.

Nobody Wants a Slow Repository

As we’ve been adding features and refining the public interface to Duke’s Digital Repository, the application has become increasingly slow. Don’t worry, the very slowest versions were never deployed beyond our development servers. This blog post is about how I approached addressing the application’s performance problems before they made their way to our production site.

14729168562_ecc30e44d8_b
A modern web application, like the public interface to Duke’s Digital Repository, is a complex beast, relying on layers of software and services just to deliver a bunch of HTML, CSS, and JavaScript to your web browser. A page like this, the front page to the Alex Harris collection takes a lot to build — code to read configuration files, methods that assemble information needed to build the page, requests to Solr to find the images to display, requests to a separate administrative application service that provides contact information for the collection, another request to fetch related blog posts, and requests to our finding aid application to deliver information about the physical collection. All of these requests take time and all of them have to finish before anything gets delivered to your browser.

My main suspects for the slowness: HTTP requests to external services, such as the ones mentioned above; and repeated calls to slow methods in the application. But identifying precisely which HTTP requests are slow and what code needs to be optimized takes a bit of sleuthing.

The first thing I wanted to know was: how slow is this thing, really? Turns out it was getting getting really slow. Too slow. There’s old research (1960s old) about computer system performance and its impact on user perception and task performance that still applies today. This also old (1993 old) article from the Nielsen Norman Group summarizes the issue nicely.

To determine just how slow things were getting I used Chrome’s developer tools. The “Network” tab in Chrome’s developer tools is where the hard truth comes to light about just how bloated and slow your web application is. Or, as my high school teachers used to say when handing back test results: “read ’em and weep.”

network-panel-dev-tools

By using the Network tab in Browser Tools I was able to see that the browser was having to wait 15 or more seconds for anything to come back from the server. This is too slow.

The next thing I wanted to know was how many HTTP requests were being made to external services and which ones were being made repeatedly or were taking a long time. For this dose of reality I used the httplog gem, which logs useful information about every HTTP request, including how long the application has to wait for a response.

When added to the project’s Gemfile, httplog starts printing out useful information to the log about HTTP requests, such as this set of entries about the request to fetch finding aid information. I can see that the application is waiting over half a second to get a response back from the finding aid service:


D, [2016-08-06T12:51:09.531076 #2529] DEBUG -- : [httplog] Connecting: library.duke.edu:80
D, [2016-08-06T12:51:09.854003 #2529] DEBUG -- : [httplog] Sending: GET http://library.duke.edu:80/rubenstein/findingaids/harrisalex.xml
D, [2016-08-06T12:51:09.855387 #2529] DEBUG -- : [httplog] Data:
D, [2016-08-06T12:51:10.376456 #2529] DEBUG -- : [httplog] Status: 200
D, [2016-08-06T12:51:10.377061 #2529] DEBUG -- : [httplog] Benchmark: 0.520600972 seconds

As I expected, this request and many others were contributing significantly to the application’s slowness.

It was a bit harder to determine which parts of the code and which methods were also making the application slow. For this, I mainly used two approaches. The first was to look at the application logs which tracks how long different views take to assemble. This helped narrow down which parts of the code were especially slow (and also confirmed what I was seeing with httplog). For instance in the log I can see different partials that make up the whole page and how long each of them takes to assemble. From the log:


12:51:09 INFO: Rendered digital_collections/_home_featured_collections.html.erb (0.8ms)
12:51:09 INFO: Rendered digital_collections/_home_highlights.html.erb (1.3ms)
12:51:10 INFO: Rendered catalog/_show_finding_aid_full.html.erb (953.4ms)
12:51:11 INFO: Rendered catalog/_show_blog_post_feature.html.erb (0.9ms)
12:51:11 INFO: Rendered catalog/_show_blog_posts.html.erb (914.5ms)

(The finding aid and blog posts are slow due to the aforementioned HTTP requests.)

widget2

One particular area of concern was extremely slow searches. To identify the problem I turned to yet another tool. Rack-mini-profiler is a gem that when added to your project’s Gemfile adds an expandable tab on every page of the site. When you visit pages of the application in a browser it displays a detailed report of how long it takes to build each section of the page. This made it possible to narrow down areas of the application that were too slow.

search_results

What I found was that the thumbnail section of the page — which can appear up to twenty times or more on a search result page was very slow. And it wasn’t loading the images that was slow but running the code to select the correct thumbnail image took a long time to run. (Thumbnail selection is complicated in the repository because there are various types and sources for thumbnails.)

Having identified several contributors to the site’s poor performance (expensive thumbnail selection, and frequent and costly HTTP requests to various services) I could now work to address each of the issues.

I used three different approaches to improving the application’s performance: fragment caching, memoization, and code optimization.

Caching

finding_aid

I decided to use fragment caching to address the slow loading of finding aid information. The benefit of caching is that it’s really fast. Once Rails has the snippet of HTML cached (either in memory or on disk, depending on how it’s configured) it can use that fragment of cached markup, bypassing a lot of code and, in this case, that slow HTTP request. One downside to caching is that if something in the finding aid changes the application won’t reflect the change until the cache is cleared or expires (after 7 days in this case).


<% cache("finding_aid_brief_#{document.ead_id}", expires_in: 7.days) do %>
<%= source_collection({ :document => document, :placement => 'left' }) %>
<% end %>

Memoization

Memoization is similar to caching in that you’re storing information to be used repeatedly rather then recalculated every time. This can be a useful technique to use with expensive (slow) methods that get called frequently. The parent_collection_count method returns the total number of collections in a portal in the repository (such as the Digital Collections portal). This method is somewhat expensive because it first has to run a query to get information about all of the collections and then count them. Since this gets used more than once, I’m using Ruby’s conditional assignment operator (||=) to tell Ruby not to recalculate the value of @parent_collection_count every time the method is called. With memoization, if the value is already stored Ruby just reuses the previously calculated value. (There are some gotchas with this technique, but it’s very useful in the right circumstances.)


def parent_collections_count
@parent_collections_count ||= response(parent_collections_search).total
end

Code Optimization

One of the reasons thumbnails were slow to load in search results is that some items in the repository have hundreds of images. The method used to find the thumbnail path was loading image path information for all the item’s images rather than just the first one. To address this I wrote a new method that fetches just the item’s first image to use as the item’s thumbnail.

Combined, these changes made a significant improvement to the site’s performance. Overall application speed and performance will remain one of our priorities as we add features to the Duke Digital Repository.

Lessons Learned from the Duke Chapel Recordings Project

Although we launched the Duke Chapel Recordings Digital Collection in April, work on the project has not stopped.  This week I finally had time to pull together all our launch notes into a post mortem report, and several of the project contributors shared our experience at the Triangle Research Libraries Network (TRLN) Annual meeting.  So today I am going to share some of the biggest lessons learned that fueled our presentation, and provide some information and updates about the continuing project work.  

Chapel Recordings Digital Collection landing page

Just to remind you, the Chapel Recordings digital collection features recordings of services and sermons given in the chapel dating back to the mid 1950s.  The collection also includes a set of written versions of the sermons that were prepared prior to the service dating back to the mid 1940s.

What is Unique about the Duke Chapel Recordings Project?

All of our digital collections projects are unique, but the Chapel Recordings had some special challenges that raised the level of complexity of the project overall.   All of our usual digital collections tasks (digitization, metadata, interface development) were turned up to 11 (in the Spinal Tap sense) for all the reasons listed below.

  • More stakeholders:  Usually there is one person in the library who champions a digital collection, but in this case we also had stakeholders from both the Chapel and the Divinity School who applied for the grant to get funding to digitize.  The ultimate goal for the collection is to use the recordings of sermons as a homiletics teaching tool.  As such they continue to create metadata for the sermons, and use it as a resource for their homiletics communities both at Duke and beyond.
  • More formats and data:  we digitized close to 1000 audio items, around 480 video items and 1300 written sermons.  That is a lot of material to digitize!  At the end of the project we had created 58 TB of data!!  The data was also complex; we had some sermons with just a written version, some with written, audio, and video versions and every possible combination in between.  Following digitization we had to match all the recordings and writings together as well as clean up metadata and file identifiers.  It was a difficult, time-consuming, and confusing process.
  • More vendors:  given the scope of digitization for this project we outsourced the work to two vendors.  We also decided to contract with a  vendor for transcription and closed captioning.  Although this allowed our Digital Production Center to keep other projects and digitization pipelines moving, it was still a lot of work to ship batches of material, review files, and keep in touch throughout the process.
  • More changes in direction:  during the implementation phase of the project we made 2 key decisions which elevated the complexity of our project.  First, we decided to launch the new material in the new Digital Repository platform.  This meant we basically started from scratch in terms of A/V interfaces, and representing complex metadata.  Sean, one of our digital projects developers, talked about that in a past blog post and our TRLN presentation. Second, in Spring of 2015 colleagues in the library started thinking deeply about how we could make historic A/V like the Chapel Recordings more accessible through closed captions and transcriptions.  After many conversations both in the library and with our colleagues in the Chapel and Divinity, we decided that the Chapel Recordings would be a good test case for working with closed captioning tools and vendors.  The Divinity School graciously diverted funds from their Lilly Endowment grant to make this possible.  This work is still in the early phases, and we hope to share more information about the process in an upcoming blog post.


Duke Chapel Recordings project was made possible by a grant from the Lilly Endowment.

Lessons learned and re-learned

As with any big project that utilizes new methods and technology, the implementation team learned a lot.  Below are our key takeaways.

  • More formal RFP / MOU:  we had invoices, simple agreements, and were in constant communication with the digitization vendors, but we could have used a more detailed MOU defining vendor practices at a more detailed level.  Not every project requires this kind of documentation, but a project of this scale with so many batches of materials going back and forth would have benefitted from a more detailed agreement.
  • Interns are the best:  University Archives was able to redirect intern funding to digital collections, and we would not have finished this project (or the Chronicle) with any sanity left if not for our intern.  We have had field experience students, and student workers, but it was much more effective to have someone dedicated to the project throughout the entire digitization and launch process. From now on, we will include interns in any similar grant funded project.
  • Review first – digitize 2nd:  this is definitely a lesson we re-learned for this project.  Prior to digitization, the collection was itemized and processed and we thought we were ready to roll.  However there were errors that would have been easier to resolve had we found them prior to digitization.  We also could have gotten a head start on normalizing data, and curating the collection had we spent more time with the inventory prior to digitization.
  • Modeling and prototypes:  For the last few years we have been able to roll out new digital collections through an interface that was well known, and very flexible.  However we developed Chapel Recordings in our new interface, and it was a difficult and at times confusing process. Next time around, we plan to be more proactive with our modeling and prototyping the interface before we implement it.  This would have saved both the team and our project stakeholders time, and would have made for less surprises at the end of the launch process.

Post Launch work

The Pop Up Archive editing interface.

As I mentioned at the top of this blog post, Chapel Recordings work continues.  We are working with Pop Up Archive to transcribe the Chapel Recordings, and there is a small group of people at the Divinity School who are currently in the process of cleaning up transcripts specifically for the sermons themselves.  Eventually these transcriptions will be made available in the Chapel Recordings collection as closed captions or time synced transcripts or in some other way.  We have until December 2019 to plan and implement these features.

The Divinity School is also creating specialized metadata that will help make the the collection a more effective homiletics teaching tool.  They are capturing specific information from the sermons (liturgical season, bible chapter and verse quoted), but also applying subject terms from a controlled list they are creating with the help of their stakeholders and our metadata architect.  These terms are incredibly diverse and range from LCSH terms, to very specific theological terms (ex, God’s Love), to current events (ex, Black Lives Matter), to demographic-related terms (ex, LGBTQ) and more.  Both the transcription and enhanced metadata work is still in the early phases, and both will be integrated into the collection sometime before December 2019.  

The team here at Duke has been both challenged and amazed by working with the Duke Chapel Recordings.  Working with the Divinity School and the Chapel has been a fantastic partnership, and we look forward to bringing the transcriptions and metadata into the collection.  Stay tuned to find out what we learn next!

Repository Mega-Migration Update

We are shouting it from the roof tops: The migration from Fedora 3 to Fedora 4 is complete!  And Digital Repository Services are not the only ones relieved.  We appreciate the understanding that our colleagues and users have shown as they’ve been inconvenienced while we’ve built a more resilient, more durable, more sustainable preservation platform in which to store and share our digital assets.

shouting_from_the_rooftops

We began the migration of data from Fedora 3 on Monday, May 23rd.  In this time we’ve migrated roughly 337,000 objects in the Duke Digital Repository.  The data migration was split into several phases.  In case you’re interested, here are the details:

  1. Collections were identified for migration beginning with unpublished collections, which comprise about 70% of the materials in the repository
  2. Collections to be migrated were locked for editing in the Fedora 3 repository to prevent changes that inadvertently won’t be migrated to the new repository
  3. Collections to be migrated were passed to 10 migration processors for actual ingest into Fedora 4
    • Objects were migrated first.  This includes the collection object, content objects, item objects, color targets for digital imaging, and attachments (objects related to, but not part of, a collection like deposit agreements
    • Then relationships between objects were migrated
    • Last, metadata was migrated
  4. Collections were then validated in Fedora 4
  5. When validation is complete, collections will be unlocked for editing in Fedora 4

Presto!  Voila!  That’s it!

MV5BMTEwNjMwMjc3MDdeQTJeQWpwZ15BbWU4MDg0OTA4MDIx._V1_UX182_CR0,0,182,268_AL_

While our customized version of the Fedora migrate gem does some validation of migrated content, we’ve elected to build an independent process to provide validation.  Some of the validation is straightforward such as comparing checksums of Fedora 3 files against those in Fedora 4.  In other cases, being confident that we’ve migrated everything accurately can be much more difficult. In Fedora 3, we can compare checksums of metadata files while in Fedora 4 object metadata is stored opaquely in a database without checksums that can be compared.  The short of it is that we’re working hard to prove successful migration of all of our content and it’s harder than it looks.  It’s kind of like insurance- protecting us from the risk of lost or improperly migrated data.

We’re in the final phases of spiffing up the Fedora 4 Digital Repository user interface, which is scheduled to be deployed the week of July 11th.  That release will not include any significant design changes, but is simply compatible with the new Fedora 4 code base.  We are planning to release enhancements to our Data & Visualizations collection, and are prioritizing work on the homepage of the Duke Digital Repository… you will likely see an update on that coming up in a subsequent blog post!

The FADGI Still Image standard: It isn’t just about file specs

In previous posts I have referred to the FADGI standard for still image capture when describing still image creation in the Digital Production Center in support of our Digital Collections Program.  We follow this standard in order to create archival files for preservation, long-term retention and access to our materials online.  These guidelines help us create digital content in a consistent, scalable and efficient way.  The most common cited part of the standard is the PPI guidelines for capturing various types of material.  It is a collection of charts that contain various material types, physical dimensions and recommended capture specifications.  The charts are very useful and relatively easy to read and understand.  But this standard includes 93 “exciting” pages of all things still image capture including file specifications, color encoding, data storage, physical environment, backup strategies, metadata and workflows.  Below I will boil down the first 50 or so pages.

The FADGI standard was built using the NARA Technical Guideline for Digitizing Archival Materials for Electronic Access: Creation of Production Master Files – Raster Images which was established in 2004.  The FADGI standard for still image capture is meant to be a set of best practices for cultural heritage institutions and has been recently updated to include new advances in the field of still image capture and contains more approachable language than its predecessor. FADGI1

Full disclosure. Perkins Library and our digitization program didn’t start with any part of these guidelines in place.  In fact, these guidelines didn’t exist at the time of our first attempt at in-house digitization in 1993.  We didn’t even have an official digitization lab until early 2005.  We started with one Epson flatbed scanner and one high end CRT monitor.  As our Digital Collections Program has matured, we have been able to add equipment and implement more of the standard starting with scanner and monitor calibration and benchmark testing of capture equipment before purchase.  We then established more consistent workflows and technical metadata capture, developed a more robust file naming scheme, file movement and data storage strategies.  We now work hard to synchronize our efforts between all of the departments involved in our Digital Collections Program.  We are always refining our workflows and processes to become more efficient at publishing and preserving Digital Collections.epson

Dive Deep.  For those of you who would like to take a deep dive into image capture for cultural heritage institutions, here is the full standard.  For those of you who don’t fall into this category, I’ve boiled down the standard below.  I believe that it’s necessary to use the whole standard in order for a program to become stable and mature.  As we did, this can be implemented over time. dive

Boil It Down. The FADGI standard provides a tiered approach for still image capture, from 1 to 4 stars, with four stars being the highest.  The 1 and 2 star tiers are used when imaging for access and tiers 3 and 4 are used for archival imaging and preservation at the focus.

The physical environment: The environment should be color neutral.   Walls should be painted a neutral gray to minimize color shifts and flare that might come from a wall color that is not neutral.  Monitors should be positioned to avoid glare on the screens (This is why most professional monitors have hoods).  Overhead lighting should be around 5000K (Tungsten, florescent and other bulbs can have yellow, magenta and green color shifts which can affect the perception of the color of an image).  Each capture device should be separated so that light spillover doesn’t affect another capture device.

Monitors and Light boxes and viewing of originals: Overhead light or a viewing booth should be set up for viewing of originals and should be a neutral 5000K.  A light box used for viewing transmissive material should also be 5000K.

Digital images should be viewed in the colorspace they were captured in and the monitor should be able to display that colorspace.  Most monitors display in the sRGB colorspace. However, professional monitors use the AdobeRGB colorspace which is commonly used in cultural heritage image capture.  The color temperature of your monitor should be set to the Kelvin temperature that most closely matches the viewing environment.  If the overhead lights are 5000K, then the monitor’s color temperature should also be set to 5000K.

Calibrating packages that consist of hardware and software that read and evaluate color is an essential piece of equipment.  These packages normalize the luminosity, color temperature and color balance of a monitor and create an ICC display profile that is used by the computer’s operating system to display colors correctly so that accurate color assessment can be made. gedT013

Capture Devices: The market is flooded with capture devices of varying quality.  It is important to do research on any new capture device.  I recommend skipping the marketing schemes that tout all the bells and whistles and just stick to talking to institutions that have established digital collections programs.  This will help to focus research on the few contenders that will produce the files that you need.  They will help you slog through how many megapixels are necessary, what lens are best for which application, what scanner driver is easiest to use while balanced with getting the best color out of your scanner.  Beyond the capture device, other things that come into play are effective scanner drivers that produce the most accurate and consistent results, upgrade paths for your equipment and service packages that help maintain your equipment.

Capture Specifications: I’ll keep this part short because there are a wide variety of charts covering many formats, capture specifications and their corresponding tiers.  Below I have simplified the information from the charts.  These specification hover between tier 3 and 4 mostly leaning toward 4.

Always use a FADGI compliant reference target at the beginning of a session to ensure the capture device is within acceptable deviation.  The target values differ depending on which reference targets are used.  Most targets come with a chart representing numerical value of each swatch in the target.  Our lab uses a classic Gretagmacbeth target and our acceptable color deviation is +/- 5 units of color.

Our general technical specs for reflective material including books, documents, photographs and maps are:

  • Master File Format: TIFF
  • Resolution: 300 ppi
  • Bit Depth: 8
  • Color Depth: 24 bit RGB
  • Color Space: Adobe 1998

These specifications generally follow the standard.  If the materials being scanned are smaller than 5×7 inches we increase the PPI to 400 or 600 depending on the font size and dimensions of the object.

Our general technical specs for transmissive material including acetate, nitrate and glass plate negatives, slides and other positive transmissive material are:

  • Master File Format: TIFF
  • Resolution: 3000 – 4000 ppi
  • Bit Depth: 16
  • Color Depth: 24 bit RGB
  • Color Space: Adobe 1998

These specifications generally follow the standard.  If the transmissive materials being scanned are larger than 4×5 we decrease the PPI to 1500 or 2000 depending on negative size and condition.

Recommended capture devices: The standard goes into detail on what capture devices to use and not to use when digitizing different types of material.  It describes when to use manually operated planetary scanners as opposed to a digital scan back, when to use a digital scan back instead of a flatbed scanner,   when and when not to use a sheet fed scanner.  Not every device can capture every type of material.  In our lab we have 6 different devices to capture a wide variety of material in different states of fragility.  We work with our Conservation Department when making decisions on what capture device to use.

General Guidelines for still image capture

  • Do not apply pressure with a glass platen or otherwise unless approved by a paper conservator.
  • Do not use vacuum boards or high UV light sources unless approved by a paper conservator.
  • Do not use auto page turning devices unless approved by a paper conservator.
  • For master files, pages, documents and photographs should be imaged to include the entire area of the page, document or photograph.
  • For bound items the digital image should capture as far into the gutter as practical but must include all of the content that is visible to the eye.
  • If a backing sheet is used on a translucent piece of paper to increase contrast and readability, it must extend beyond the edge of the page to the end of the image on all open sides of the page.
  • For master files, documents should be imaged to include the entire area and a small amount beyond to define the area.
  • Do not use lighting systems that raise the surface temperature of the original more than 6 degrees F(3 degrees C)in the total imaging process.
  • When capturing oversized material, if the sections of a multiple scan item are compiled into a single image, the separate images should be retained for archival and printing purposes.
  • The use of glass or other materials to hold photographic images flat during capture is allowed, but only when the original will not be harmed by doing so. Care must be taken to assure that flattening a photograph will not result in emulsion cracking, or the base material being damaged.  Tightly curled materials must not be forced to lay flat.
  • For original color transparencies, the tonal scale and color balance of the digital image should match the original transparency being scanned to provide accurate representation of the image.
  • When scanning  negatives,  for  master  files  the  tonal  orientation  may be  inverted  to produce a positive    The  resulting image  will  need  to  be  adjusted  to  produce  a  visually-pleasing representation. Digitizing negatives is very analogous to printing negatives in a darkroom and it is very dependent on the  photographer’s/ technician’s  skill  and  visual  literacy  to  produce  a  good  image. There are few objective metrics for evaluating the overall representation of digital images produced from negatives.
  • The lack of dynamic range in a film scanning system will result in poor highlight and shadow detail and poor color reproduction.
  • No image retouching is permitted to master files.

These details were pulled directly from the standard.  They cover a lot of ground but there are always decisions to be made that are uniquely related to the material to be digitized.  There are 50 or so more pages of this standard related to workflow, color management, data storage, file naming and technical metadata.  I’ll have to cover that in my next blog post.

The FADGI standard for still image capture is very thorough but also leaves room to adapt.  While we don’t follow everything outlined in the standard we do follow the majority.  This standard, years of experience and a lot of trial and error have helped make our program more sound, consistent and scalable.

Hang in there, the migration is coming

Detail from Hugh Mangum photographs - N318
Wouldn’t you rather read a post featuring pictures of cats from our digital collections than this boring item about a migration project that isn’t even really explained? Detail from Hugh Mangum photographs – N318.

While I would really prefer to cat-blog my merry way into the holiday weekend, I feel duty-bound to follow up on my previous posts about the digital collections migration project that has dominated our 2016.

Since I last wrote, we have launched two more new collections in the Fedora/Hydra platform that comprises the Duke Digital Repository. The larger of the two, and a major accomplishment for our digital collections program, was the Duke Chapel Recordings. We also completed the Alex Harris Photographs.

Meanwhile, we are working closely with our colleagues in Digital Repository Services to facilitate a whole other migration, from Fedora 3 to 4, and onto a new storage platform. It’s the great wheel in which our own wheel is only the wheel inside the wheel. Like the wheel in the sky, it keeps on turning. We don’t know where we’ll be tomorrow, though we expect the platform migration to be completed inside of a month.

hang-in-there-baby-kitten-poster
A poster like this, with the added phrase “Friday’s coming,” used to hang in one of the classrooms in my junior high. I wish we had that poster in our digital collections.

Last time, I wrote hopefully of the needle moving on the migration of digital collections into the new platform, and while behind the scenes the needle is spasming toward the FULL side of the gauge, for the public it still looks stuck just a hair above EMPTY. We have two batches of ten previously published collections ready to re-launch when we roll over to Fedora 4, which we hope will be in June – one is a group of photography collections, and the other a group of manuscripts-based collections.

In the meantime, the work on migrating the digital collections and building a new UI for discovery and access absorbs our team. Much of what we’ve learned and accomplished during this project has related to the migration, and quite a bit has appeared in this blog.

Our Metadata Architect, Maggie Dickson, has undertaken wholesale remediation of twenty years’ worth of digital collections metadata. Dealing with date representation alone has been a critical effort, as evidenced by the series of posts by her and developer Cory Lown on their work with EDTF.

Sean Aery has posted about his work as a developer, including the integration of the OpenSeadragon image viewer into our UI. He also wrote about “View Item in Context,” four words in a hyperlink that represent many hours of analysis, collaboration, and experimentation within our team.

I expect, by the time the wheel has completed another rotation, and it’s my turn again to write for the blog, there will be more to report. Batches will have been launched, features deployed, and metadata remediated. Even more cat pictures will have been posted to the Internet. It’s all one big cycle and the migration is part of it.