We are all looking forward to a little break over the holidays, but wanted to share a book that has captured everyone’s attention in the lab this week: Edward Topsell’s History of Four-footed Beasts and Serpents from 1658. Originally published in two volumes in 1607 and 1608 (Beasts and Serpents, respectively), this is the first collected edition. It describes both real and fantastic animals, including delightful woodcut illustrations, like the camels below.
Rubenstein Library’s History of Medicine collection holds a sizable collection of anatomical flap books, which are books with illustrations featuring layers of movable paper flaps that can be lifted to reveal the layers of organs and tissues below. You can see several examples from a 2011 library exhibition here. We often get these books in the lab to correct common problems that can occur with the many layers of paper flaps: typically misfolds, tears, or detached flaps. This early 18th century work by Christoph von Hellwig, commonly known as Anatomicum vivum, came to us recently for some of those problems. During examination, something seemed a little off with the plates at the back.
Judging from the bright white wove paper and print type of the additions, it appears that in the recent past someone had glued in some modesty flaps to cover the anatomical figures. Duke acquired this volume in 2016.
The modesty flaps are supposed to look like a draped piece of cloth – but to me they just look like a cabbage leaf. So at first I thought someone was doing their own cheeky version of the “Fig Leaf Campaign“, a movement to censor classical sculpture that was carried out in the 16th century following the Council of Trent. Looking at images of other copies of the same edition, however, I have found some examples with more contemporary looking modesty flaps and some without any kind of covering flap. So now it is unclear to me how it was originally issued. Further research required.
If you are curious about the different layers in these prints, the Marion J. Siegman Archives at Thomas Jefferson University made some really great videos of a 1744 edition of this same work to demonstrate how the flaps operate. You can watch them here.
This 20th century French work of science fiction is back in the lab for evaluation for one of our imaging workflows. Published roughly 60 years after Verne’s Voyage au centre de la Terre, Creux’s novel features a ship that can drill its way into the earth – rather than the protagonists climbing down a lava tube. We just love the highly decorated cover.
The custom housing for this item was funded through our Adopt-A-Book program. Other adopted conservation treatments are currently on display in the Mary Duke Biddle room in an exhibit titled Donors Choose: Highlights from the Duke Libraries Adopt-a-Book Program. Please join us on Tuesday, October 14, 2025, from 11am to 12pm, for a gallery talk. Staff from the Conservation Services Department will be available to talk about the items on display and answer questions. We will have bookmarks and buttons for attendees!
Some treatments require a lot of coordination with our colleagues over in special collections to ensure that that they have a good permanent home in the stacks. We construct custom housing to meet the specific needs of the item for storage, but we also need to be sure that the enclosure we design will actually fit on a shelf and can moved from the stacks to the reading room. Sometimes the description and shelving location in the catalog also need to be updated if the item changes size during treatment.
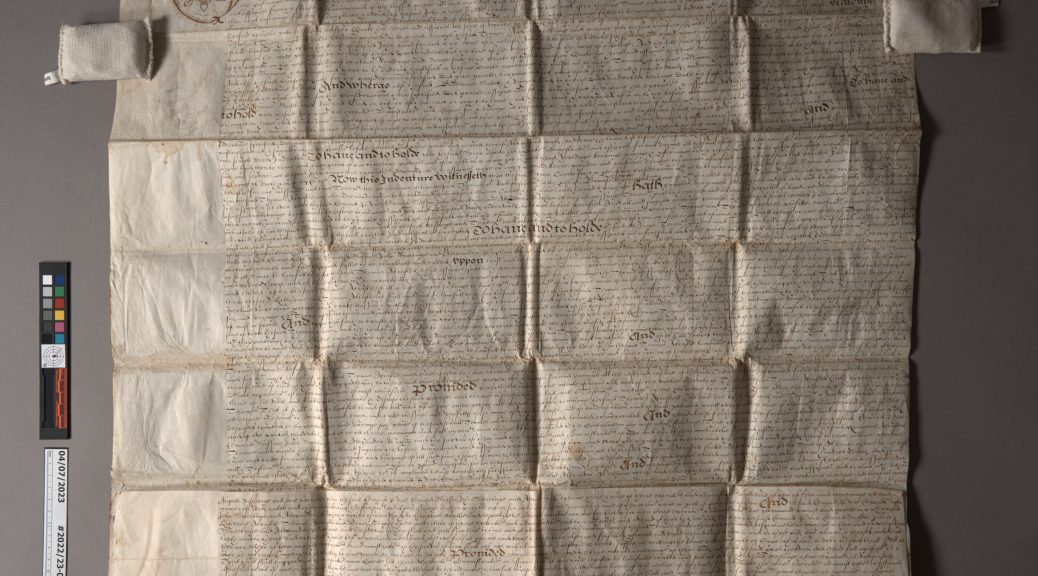
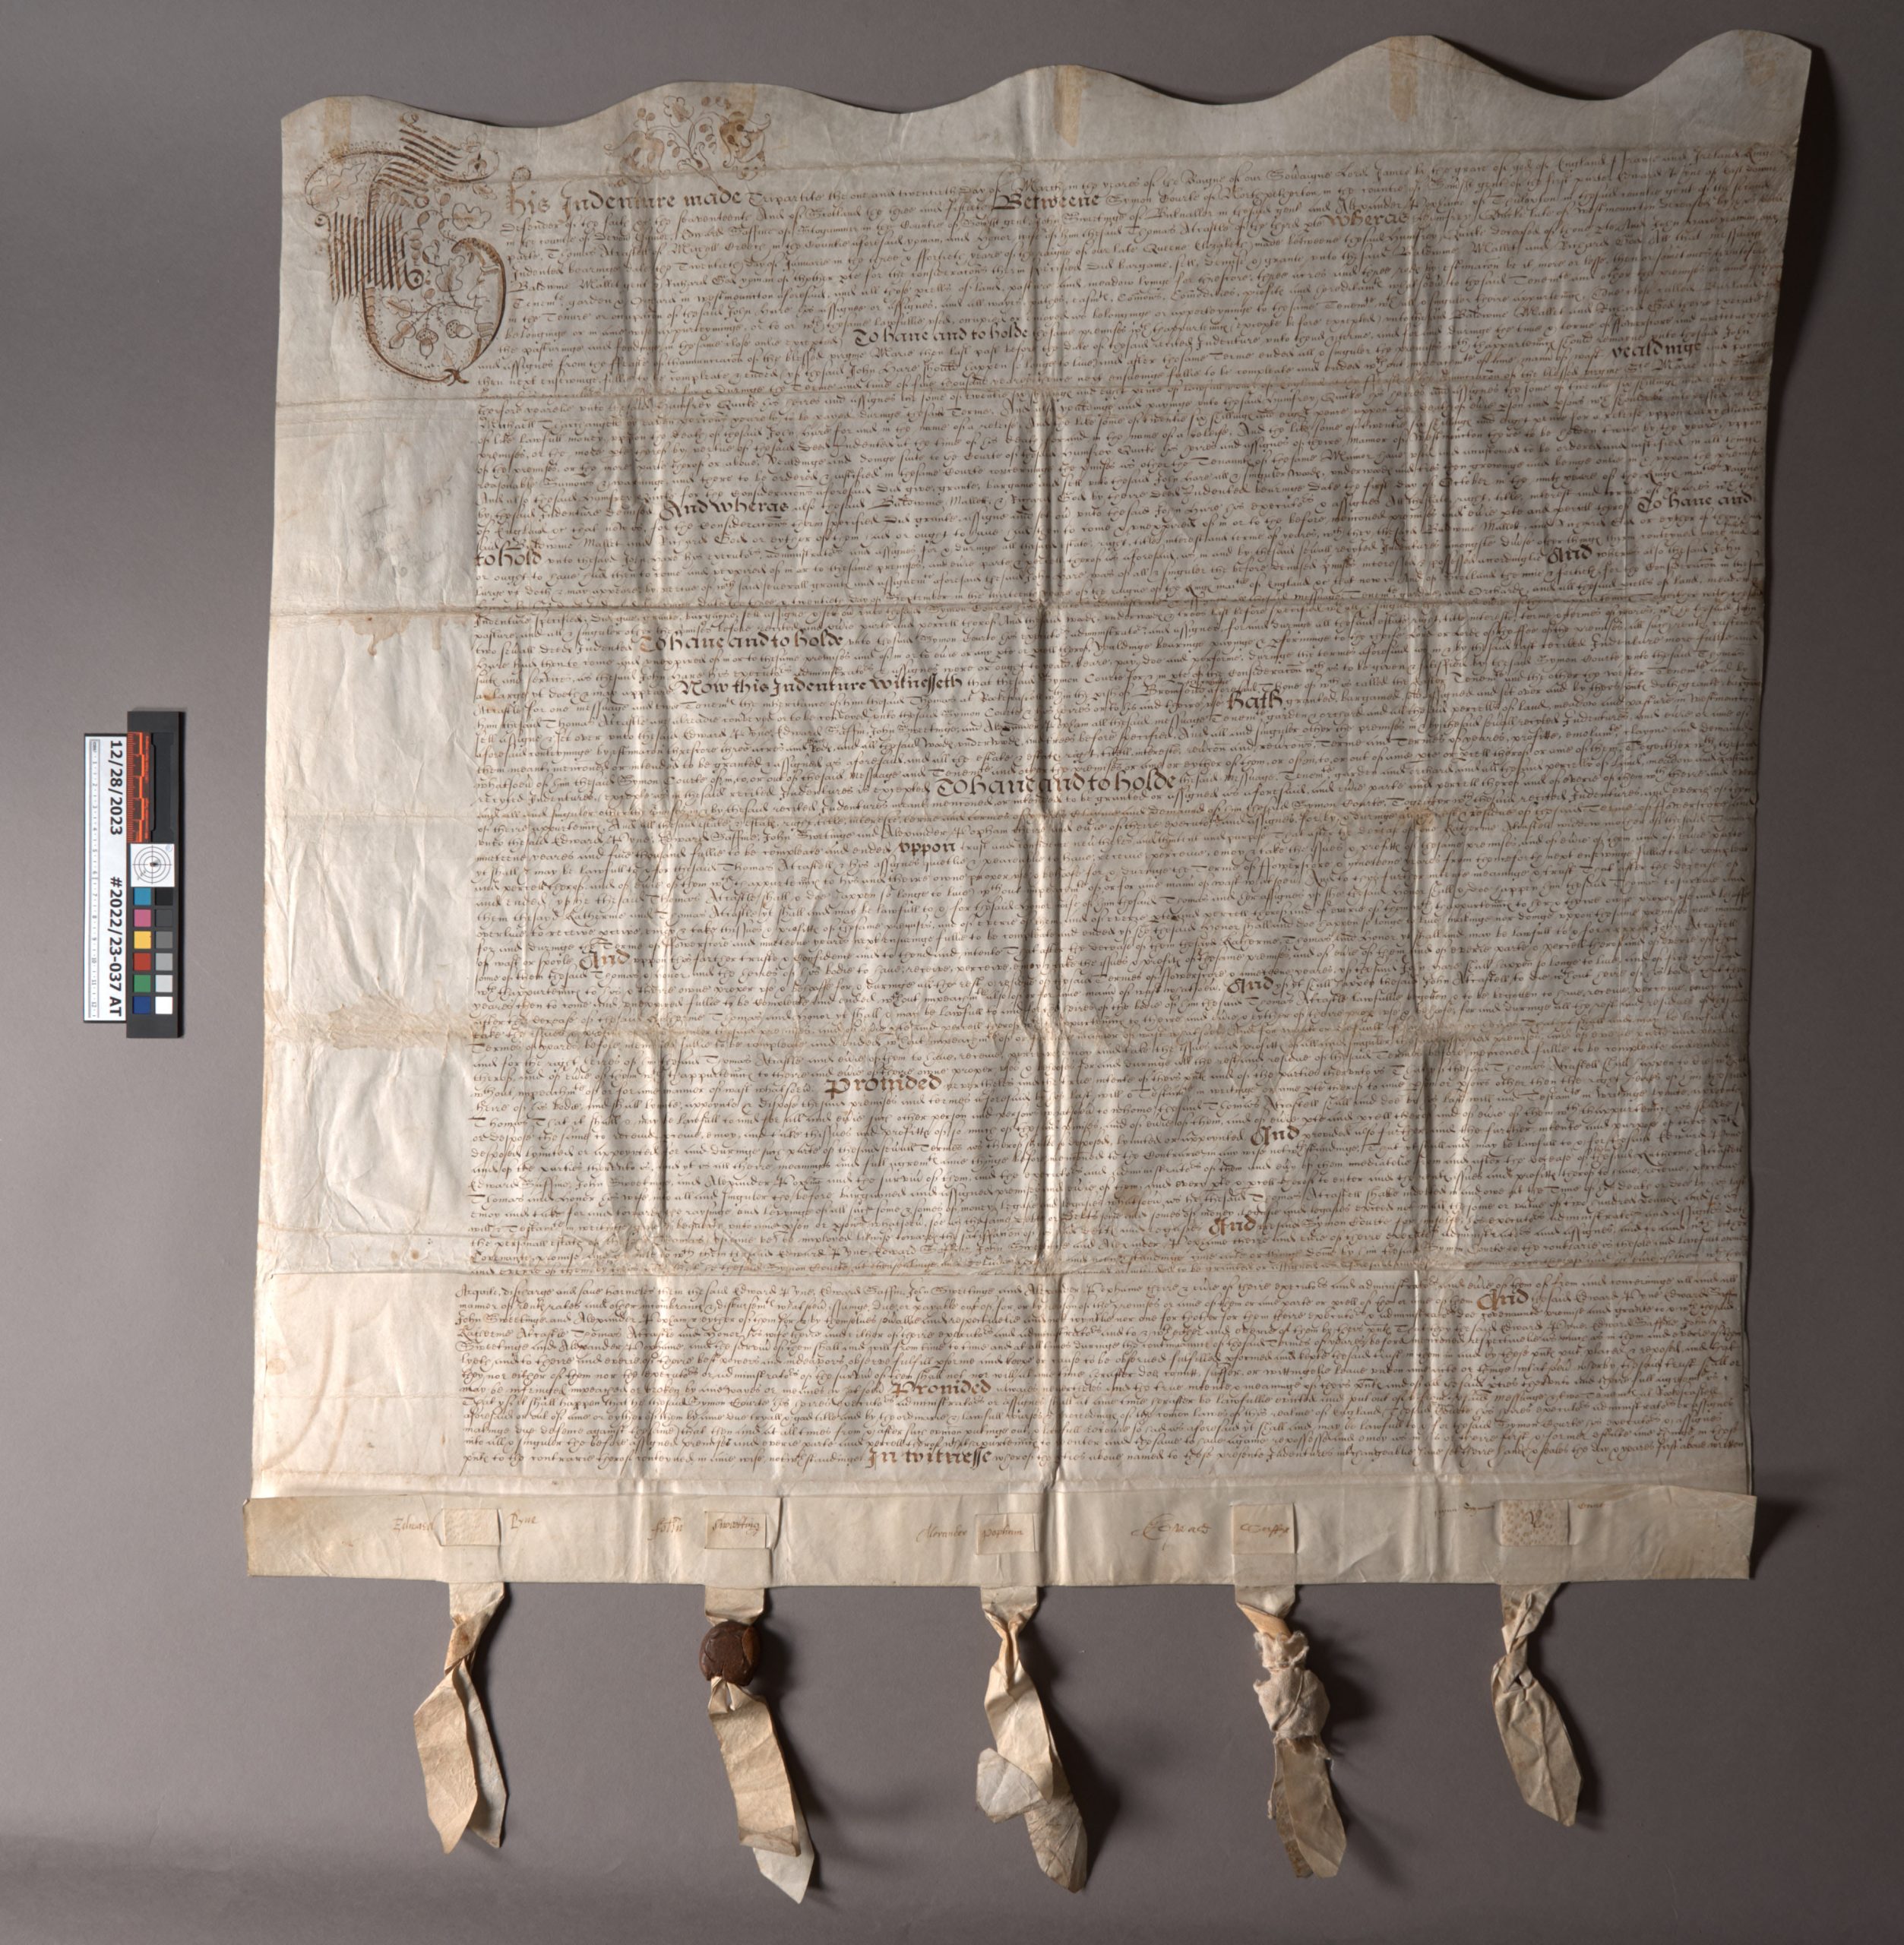
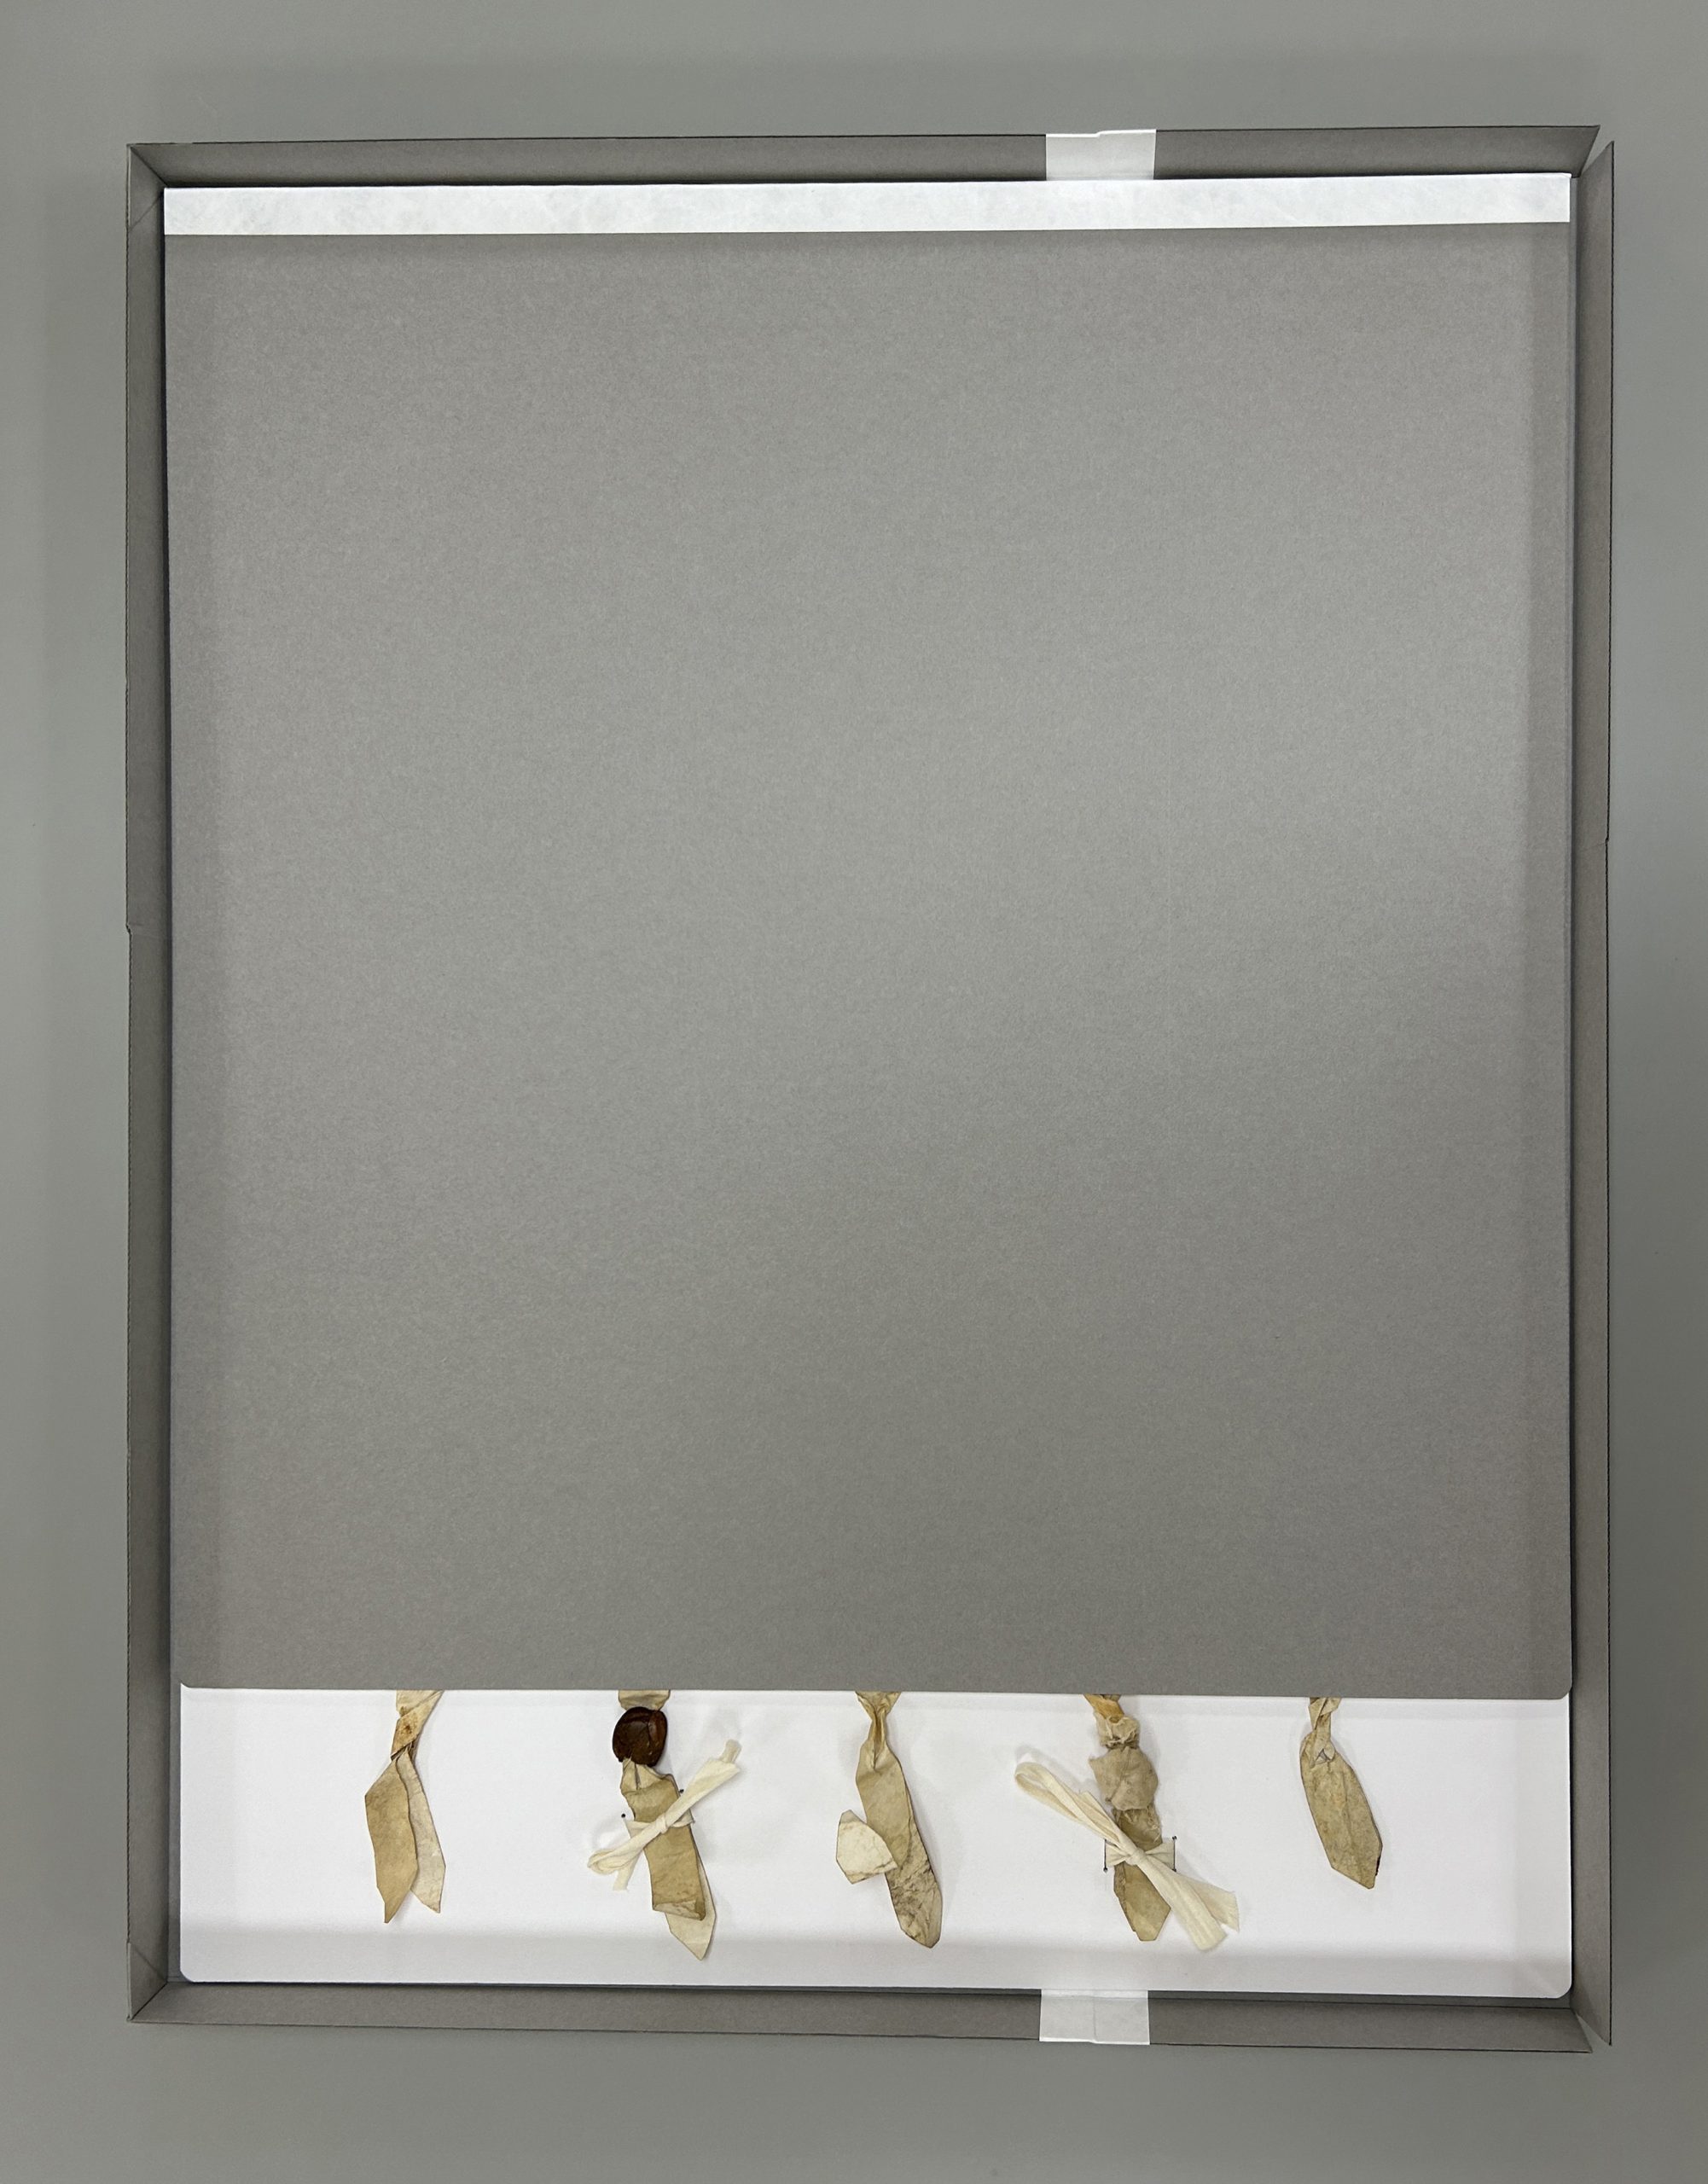
This 17th century English indenture and deed is a recent example that left the lab much larger than it arrived. It came to us folded up in a relatively small package, measuring around 7″ square. It unfolded into a pretty large (20″ x 30″) manuscript legal document, written in ink on parchment with the remains of five parchment strips and wax seals along the bottom. The earliest text dates from 1620, with five individuals (Symon Courte, Edward Pyne, Thomas Alcastle, Humfree Quicke, and yeoman John Hare) granting property rights in West Monkton to two people (Baldwine Wallet and yeoman Richard God). Additional text on the back dated 57 years later grants further inheritance of property rights to Robert Alcastle (Thomas Alcastle’s grandson and executor of his father’s estate).
Before treatment, photographed in raking light to emphasize the folds.
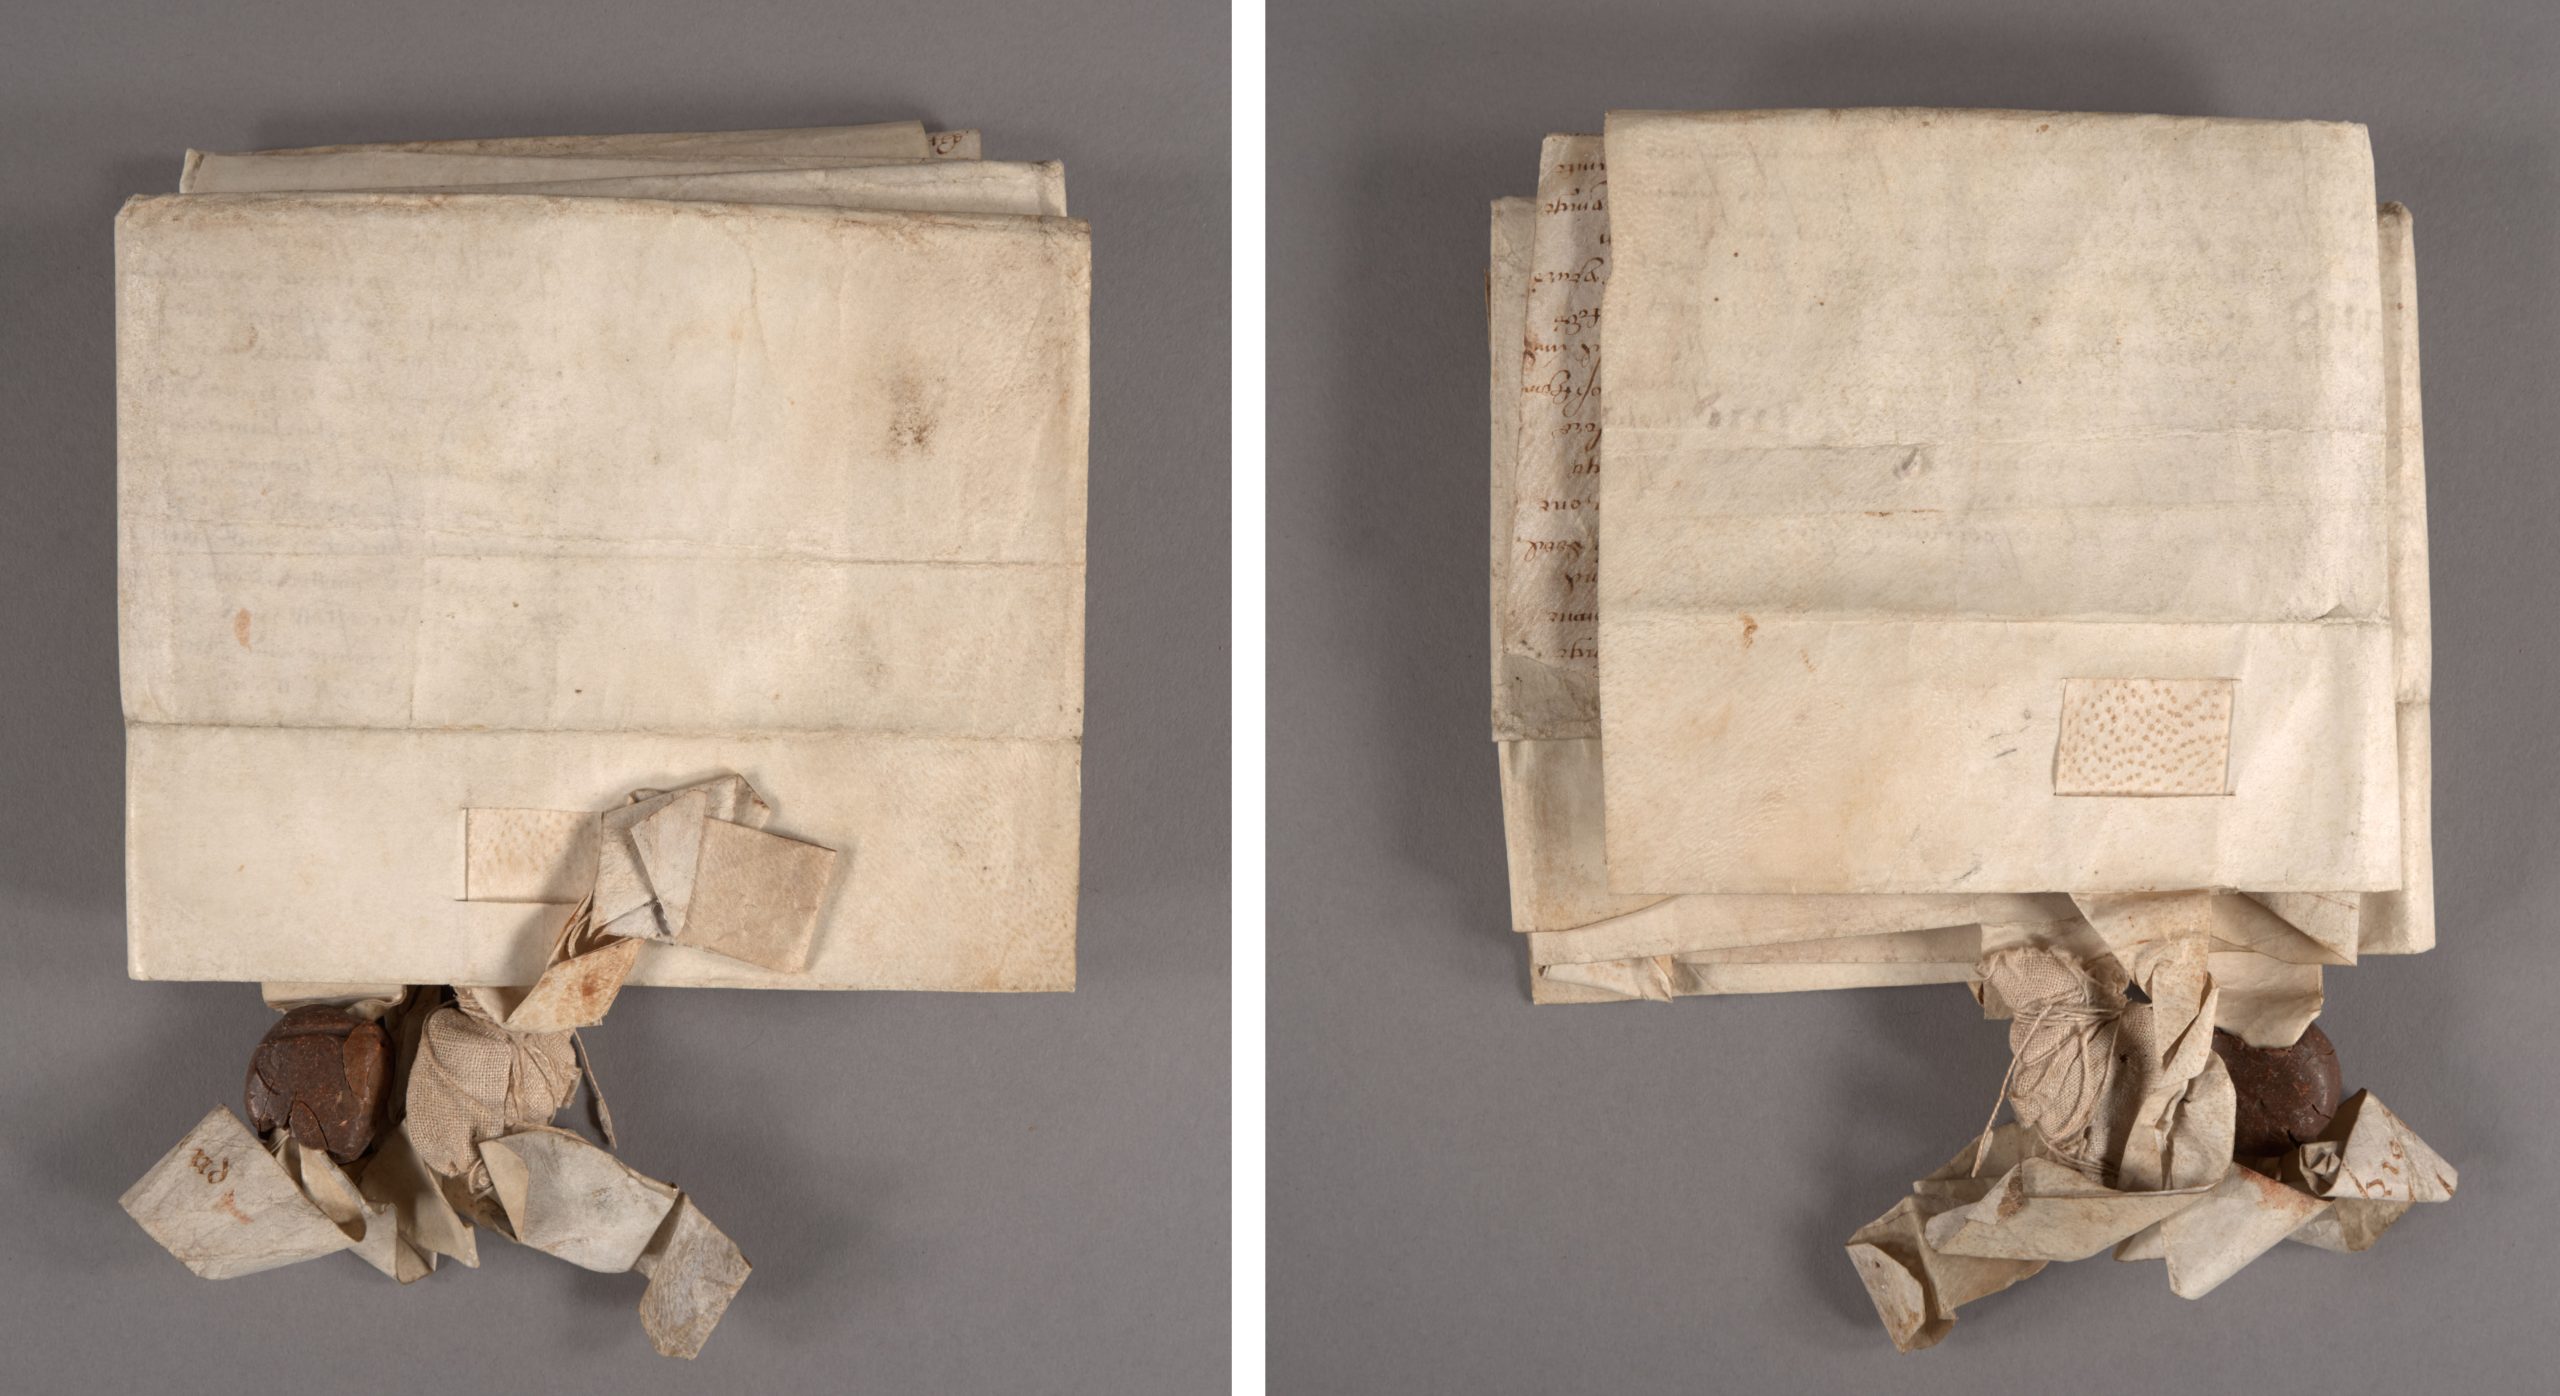
The bottom edge of the parchment is folded over so that the five parchment strips can lace through two layers and be held securely in place. The parchment strips were twisted together and rough balls of red wax were affixed to stop the strips from being removed. Some of the signatories wrote their names across both the document’s folded lower edge and the visible square of the parchment strip as an authentication or security measure.
The document was folded both vertically and horizontally several times to make storage easier, but it made opening and reading the document quite a challenge. The parchment has a strong memory and will fold back onto itself without being weighted down. Yellowed adhesive residue from pressure sensitive tape was visible along the top edge – maybe used as a previous mounting solution. The wax seals had also became quite banged up over the years, so only one of the wax balls remained intact. The broken remains of another had been wrapped in a thin textile and tied onto the parchment strip with string. Little bits of red wax would sometimes fall out of the pouch when handled.
After treatment, photographed in raking light.
After dry cleaning the front and back of the parchment and removing as much of the tape residue as I could, I performed some minor flattening of the parchment sheet. My goal was to flatten it enough that the document would lay open on its own, while still retaining the evidence of how it was folded up for storage. I didn’t want any more fragments of the broken wax seal to be lost, so I took the remains out of the textile pouch and wrapped them in a little pleated package of soft Japanese paper, adhered closed with wheat starch paste. This seamed like a better solution than sealing them in some kind of stable plastic, like polyethylene, since the paper doesn’t crinkle so loudly. I tucked the package back inside the textile wrapping and secured it closed with some small stitches thin linen thread, toned to match.
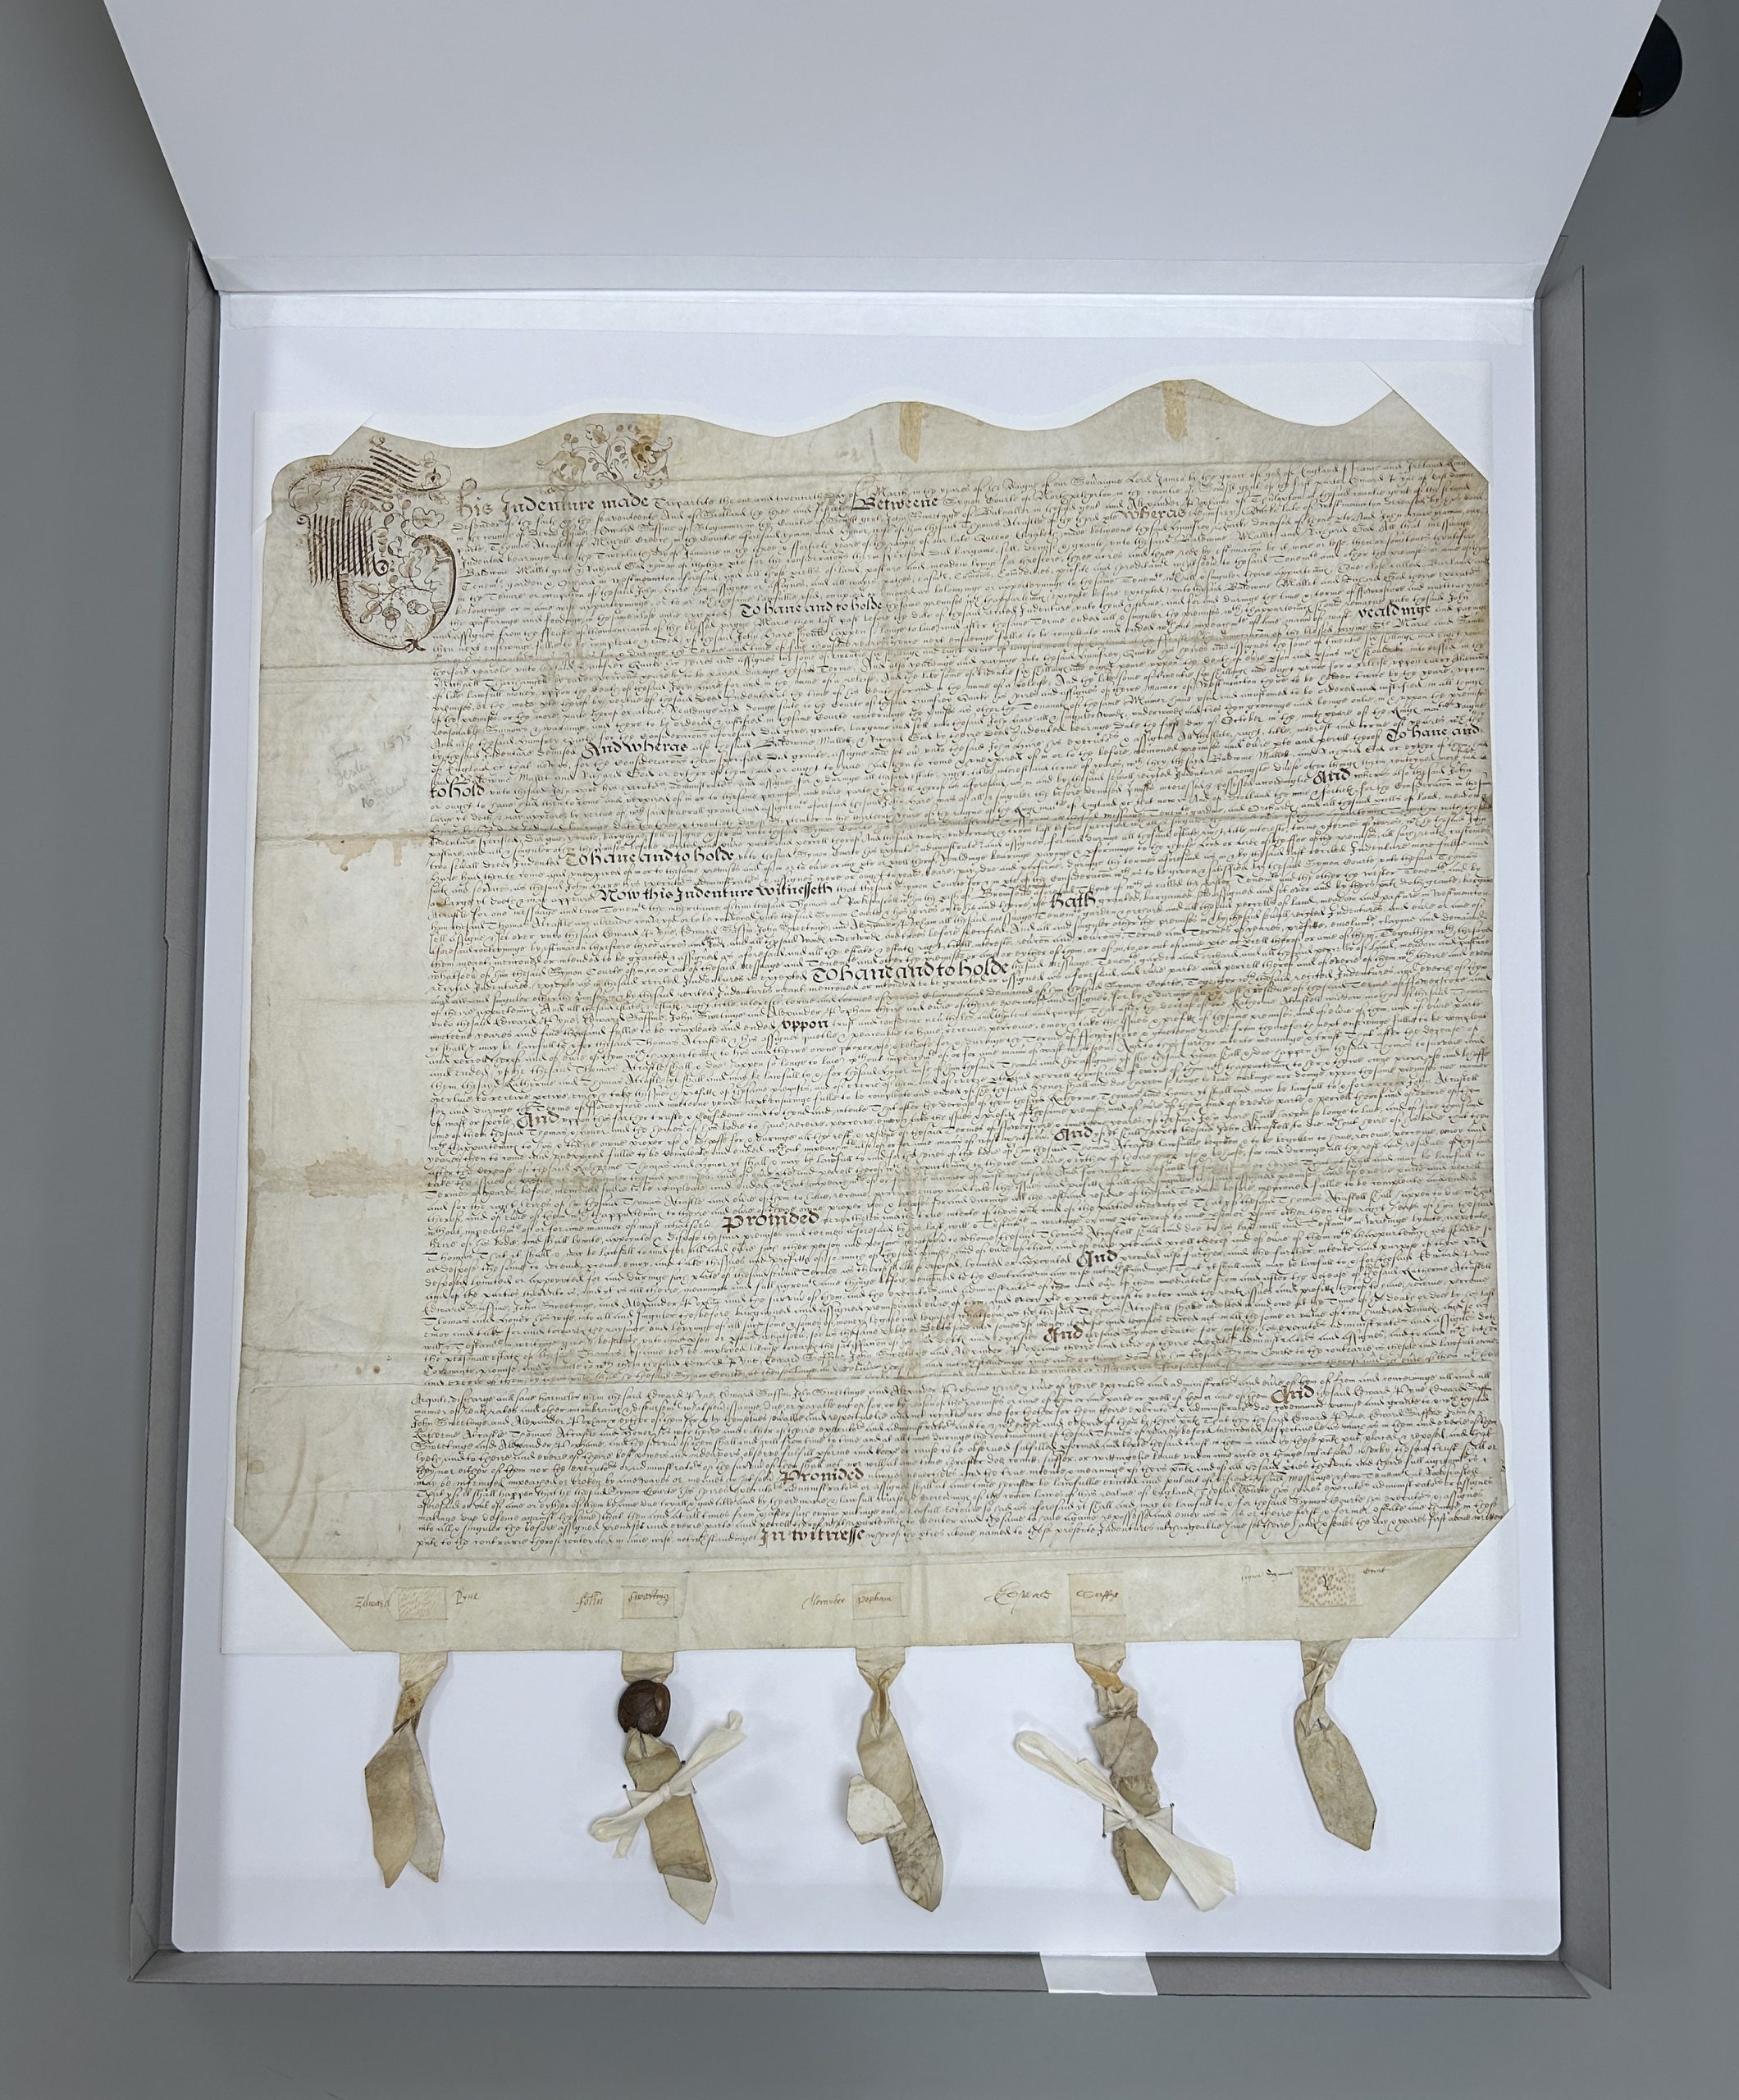
My goal for the enclosure design was to protect all the different parts of the document, and also to help hold it flat should there be any changes in relative humidity. Boxes for parchment covered books often use of a restraining flap, so I thought something similar could be employed here with a rigid portfolio.
I knew this enclosure would be stored flat on the shelf, but I still didn’t want the document to move around too much inside – to protect the surface from abrasion, but also so as not to risk further damage to the parchment strips and wax. I cut a sheet of paper just a bit bigger than the dimensions of the document, then affixed wide paper corners to hold it in place. This was mounted to a sheet of matboard, which also had a sheet of E-flute corrugated board laminated to the back. This makes the matboard stiffer without adding much weight. Soft twill tape was laced through the board around where the two remaining wax seals were hanging, so they could be tied down and would not bounce around inside the box when it is served to a patron in the reading room.
The portfolio top flap is also made of laminated sheets of matboard and blue corrugated, with a Tyvek tape hinge along the top edge that attaches it to the bottom board. All of the corners were rounded and the bottom edge of the top flap’s matboard was sanded to take off the hard edge.
The custom sized portfolio ended up being larger than any of our standard metal edge boxes, so I created a custom fit telescoping lid box out of corrugated to hold it. Unfortunately we also don’t stock corrugated sheets large enough – so I had to join two sheets together with tyvek tape to make either the base or the lid. A third piece of corrugated was glued to the outside of both the lid and the base to stop the tape join from flexing when the box was lifted or tilted. The enclosure got a photo label at the bottom corner to help with identifying it on the shelf.
Removing the document from this enclosure to examine both front and back is fairly easy. After untying the twill tape, the parchment can be gently lifted out from under two of the paper corners, and then you can fully slide the document out. It actually requires two people to flip it over, since it is so large. While making this enclosure, I made sure to check that it wasn’t too large for the bigger shelves in the stacks and that it could fit through a standard-width door while resting on a cart.
Preservation Week Panel Discussion on Public Digital Collections of Conservation Treatment Documentation
For Preservation Week 2024, Duke University Libraries will host a virtual panel discussion about Public Digital Collections of Conservation Treatment Documentation on Thursday May 2 at 11 am EDT. Conservation representatives from four institutions (The British Museum, The Preservation Lab (Cincinnati, Ohio), Duke University Libraries, and Stanford Libraries) will share their experiences in building and sharing their institutions’ digital collections of conservation treatment documentation. Panelists will introduce their collections and discuss topics such as digital preservation of treatment records, metadata creation, linking to catalog records and finding aids, and potential privacy and copyright issues.
Details:
Cost is free but registration is required
Thursday, May 2, 2024
11:00 a.m. to 12:30 pm EDT (Starts at 10:00 Central, 8 am Pacific Daylight Time, 4 pm British Summer Time)
The panel will be recorded and the video will be shared with registered attendees upon request.
Louisa Burden, Head of Conservation, British Museum
Ashleigh Ferguson Schieszer, Book and Paper Conservator, Co-Lab Manager, (she/her)
Erin Hammeke, Senior Conservator for Special Collections, Duke University Libraries (she/they)
Ryan Lieu, Conservation Operations Coordinator, Stanford Libraries (he/him)
When we noticed there was condensation around our freezer’s door, we called our awesome repair tech, Jeff McLean. Little did we know this would be a multi-day effort that involved removing the door and the heating mechanism around it, which are both under a bunch of foam insulation. It may look bad now, but Jeff will have this up and running today.
Virginia Woolf’s writing desk has been an important fixture in the library’s exhibit suite since it opened after the renovation in 2015. The standing desk with an angled writing surface was designed and commissioned by Virginia Woolf in the early 1900s and resided first in Asheham, then in Monks House. In the 1920s the desk was painted by Woolf’s nephew, Quentin Bell, and the legs were later shortened by his wife, Olivier. The plinth on which the desk now rests restores the writing surface to its original height.
The desk has been a focal point of the Michael and Karen Stone Family Gallery, a smaller gallery space positioned at the back of the suite of three rooms. Recently, Woolf’s desk has been relocated to a more prominent home: the window alcove between Rubenstein Library’s Photography Gallery and Reading Room.
This space is the perfect size for the desk and will allow more visitors to safely experience and learn about this important object.
Prior to moving the desk, we spent a couple of months monitoring the environment inside the alcove. We have been carefully looking at the environmental conditions inside each of the exhibit galleries for a long time, so we have a good understanding of the intervals and degree of change in temperature and relative humidity in those spaces. The Stone gallery is very stable, being positioned behind doors and the other exhibit rooms. The photography gallery experiences more fluctuations due to its proximity to exterior doors. Longtime readers may recall our 2018 experiment to monitor the environment inside frames.
We have environmental data from the center of the reading room, but none from the alcove itself. It seemed best to position one of our Onset HOBO MX1101 data loggers right at the height of the desk, rather than on the floor and I didn’t want to cause any damage to the wood paneling on the walls. The MX loggers have magnets on the back, which are extremely useful for deploying them in the stacks, but no metal surfaces are available nearby. Luckily I was able to find some plastic hooks that could be used to attach the HOBO directly to the glass.
The hook pivots and, as you rotate it down into position, creates additional suction inside the cup. The manufacturer indicates these hooks can hold up to 5lbs, so they are strong enough to hold a data logger. The suction does diminish over time, however. I found that they failed after about 2 months, so I did have to reset the hook about half-way through the monitoring period.
The MX data loggers have built in mounting loops, but they weren’t big enough to fit the end of the hook – so I created a short chain with textile tapes to put them in the right orientation. Anticipating that photo gallery visitors or researchers inside the reading room might be curious about a small device hanging on the glass, I attached small labels on either side of the data logger to explain its purpose.
After collecting environmental data for the space for several months, we were assured that the alcove was a good space for the desk to live. We hope that more visitors to the library can enjoy this important piece of literary history.
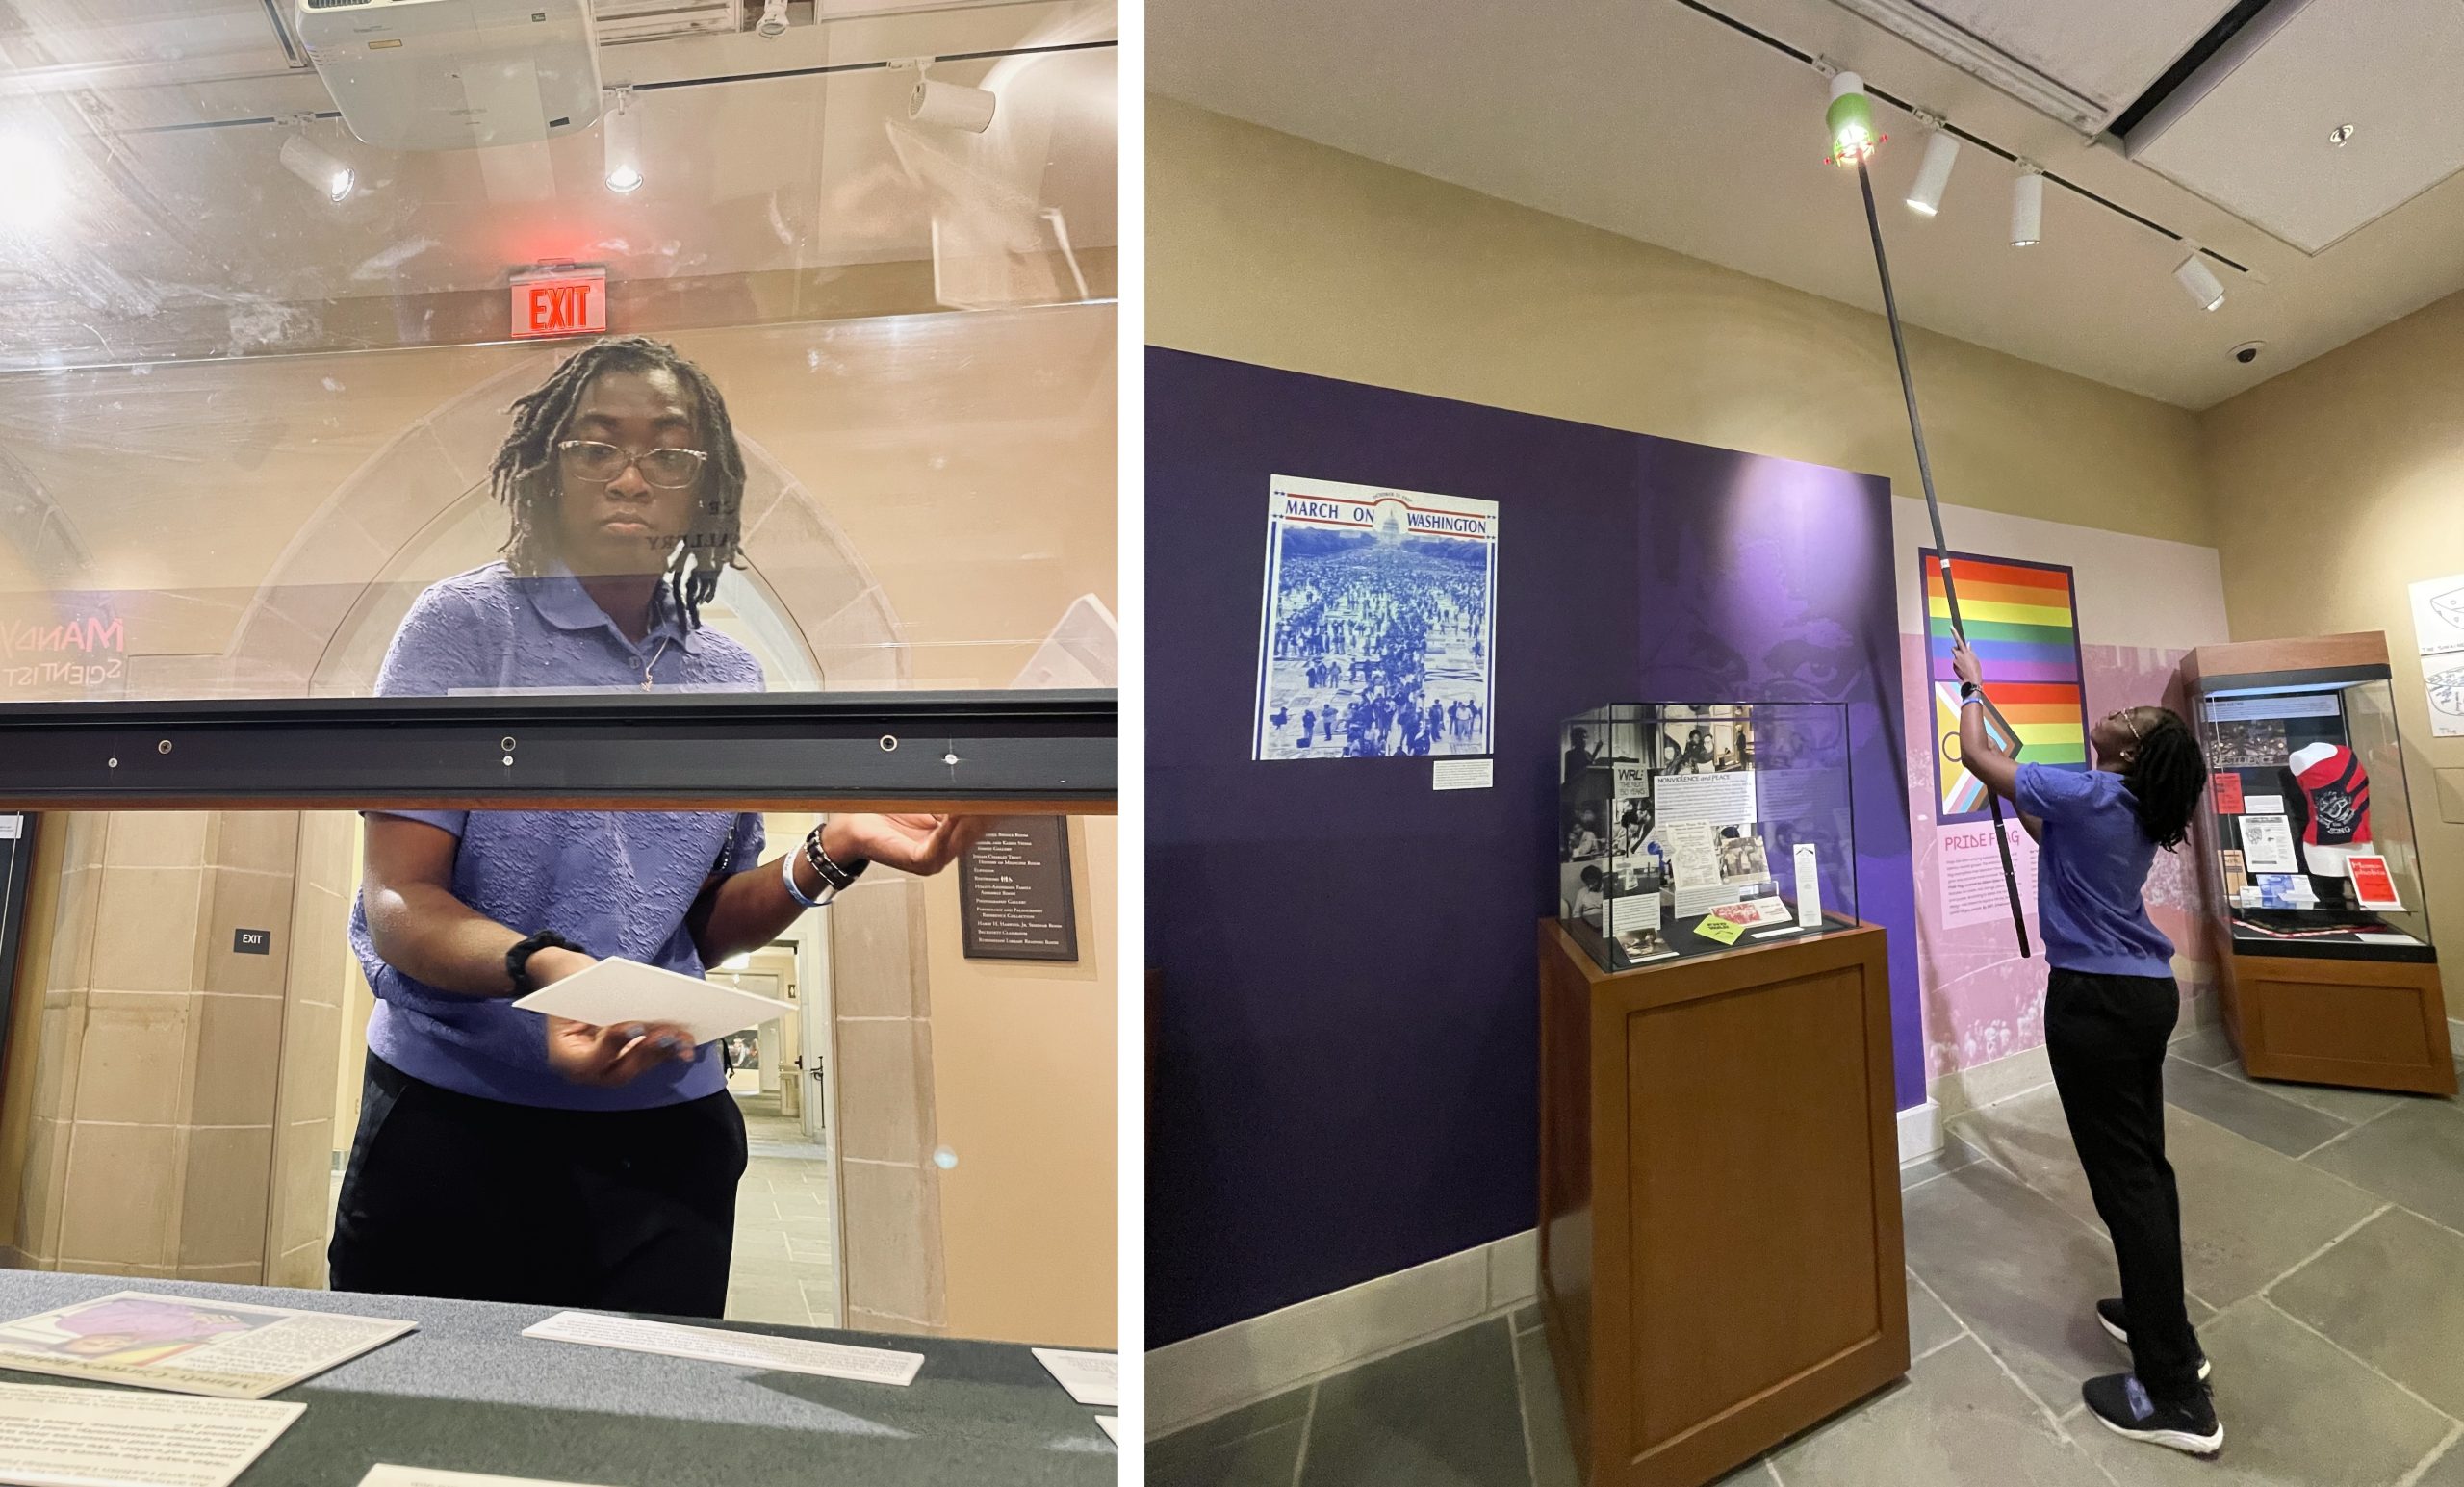
We are delighted to welcome our sixth HBCU Library Alliance intern, Angela Nettles, to Duke Libraries. Angela is a rising senior at Bennett College where she is studying Africana Women’s Studies. She is also one of eight students studying preservation this summer through the University of Delware/HBCU-LA internship program. As a part of the program, she will spend four weeks with us learning everything from binding pamphlets to conducting condition surveys.
After two years of presenting this program online, it’s refreshing to have our intern onsite again. So far, this first week has been a busy one. In addition to her bi-weekly cohort meetings, Angela has dived right into work here at Perkins Library.
From left to right: Meg Brown (Head of Exhibition Services), Angela Nettles, and Yoon Kim (Senior Library Exhibition Technician) after working on the Mandy Carter exhibitPlacing case labels and adjusting exhibit lights.
As you can imagine, there was a lot to be done. Regardless, Angela was up to the many tasks at hand. From sanding the walls to setting up exhibit cases, she eagerly took part in every step of the process.
Left: Sanding the walls to prep them for the new Phototex graphics that were going up. Right: Meg Brown showing Angela how they measure light in exhibitions for preservation purposes.
Additionally, the second half of the week was spent introducing Angela to my work in the conservation lab. She learned about how we make treatment decisions for general collections, and has already started doing treatments herself.
Angela finishing her first pocket (left) and binding music scores into pamphlet binders (right).
So far she is a quick study and has already picked up how to do tip-ins, pockets, and pamphlet bindings.
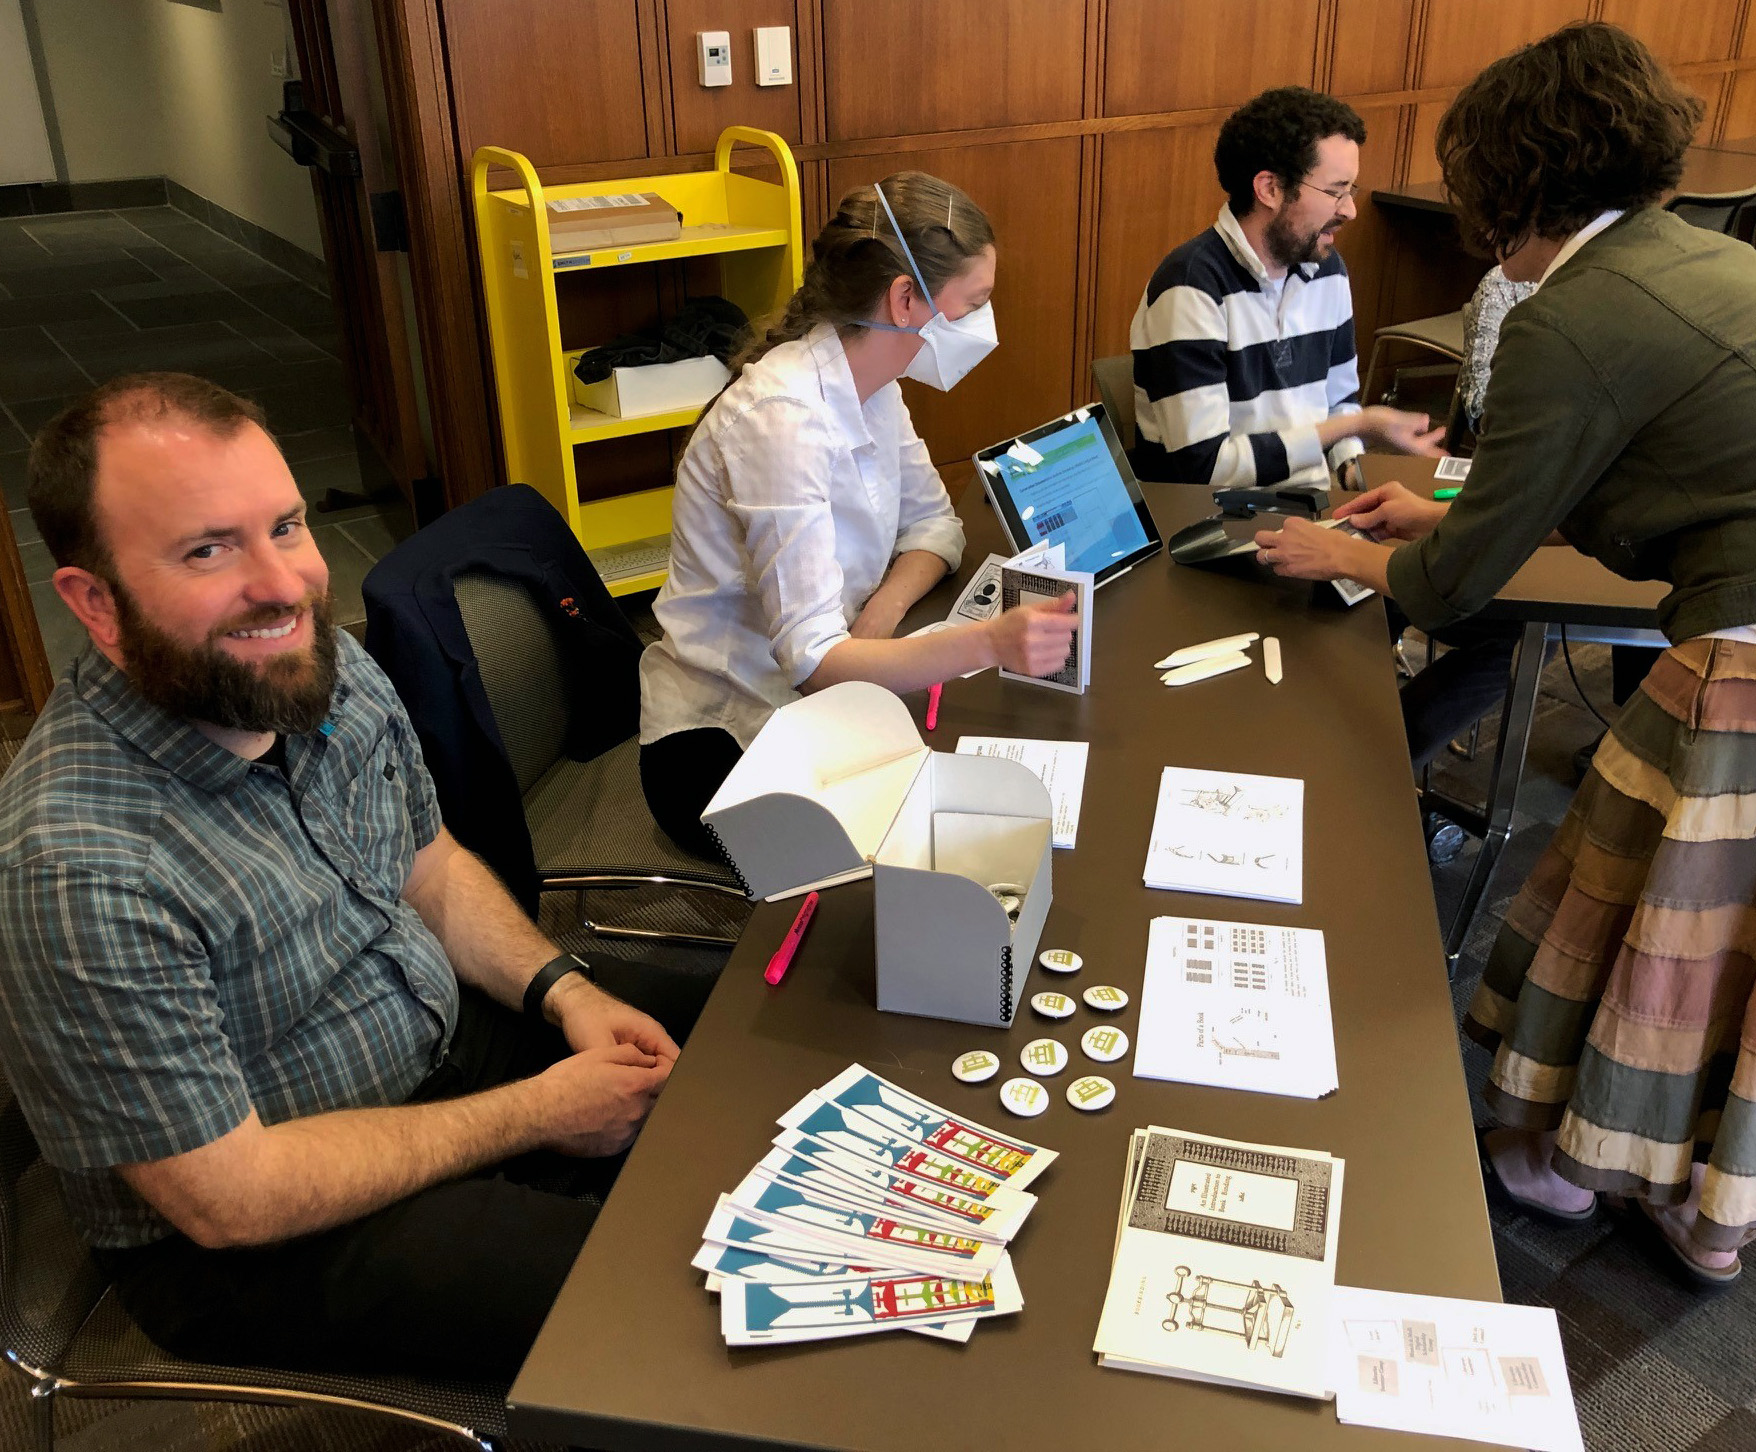
On Tuesday, Libraries Assembly put together a really great passport event for staff to learn more about the different departments and groups within our organization. Eighteen groups volunteered to set up a table with information and activities:
Adopt-a-Highway Team
Center for Data and Visualization Sciences
Conservation Services
Data and Reporting Learning Group
DivE-In Council
Divinity Library
East Campus Libraries (Lilly and Music)
Family History and Genealogy Research Guide and the Genealogy@Duke Team
Ford Library (Business)
Knitting Club
Law Library
Libraries Assembly
Libraries Summer Camp
Medical Center Library and Archives
Munch & Mull Digital Scholarship Group
Where in the World am I from (International Area Studies)
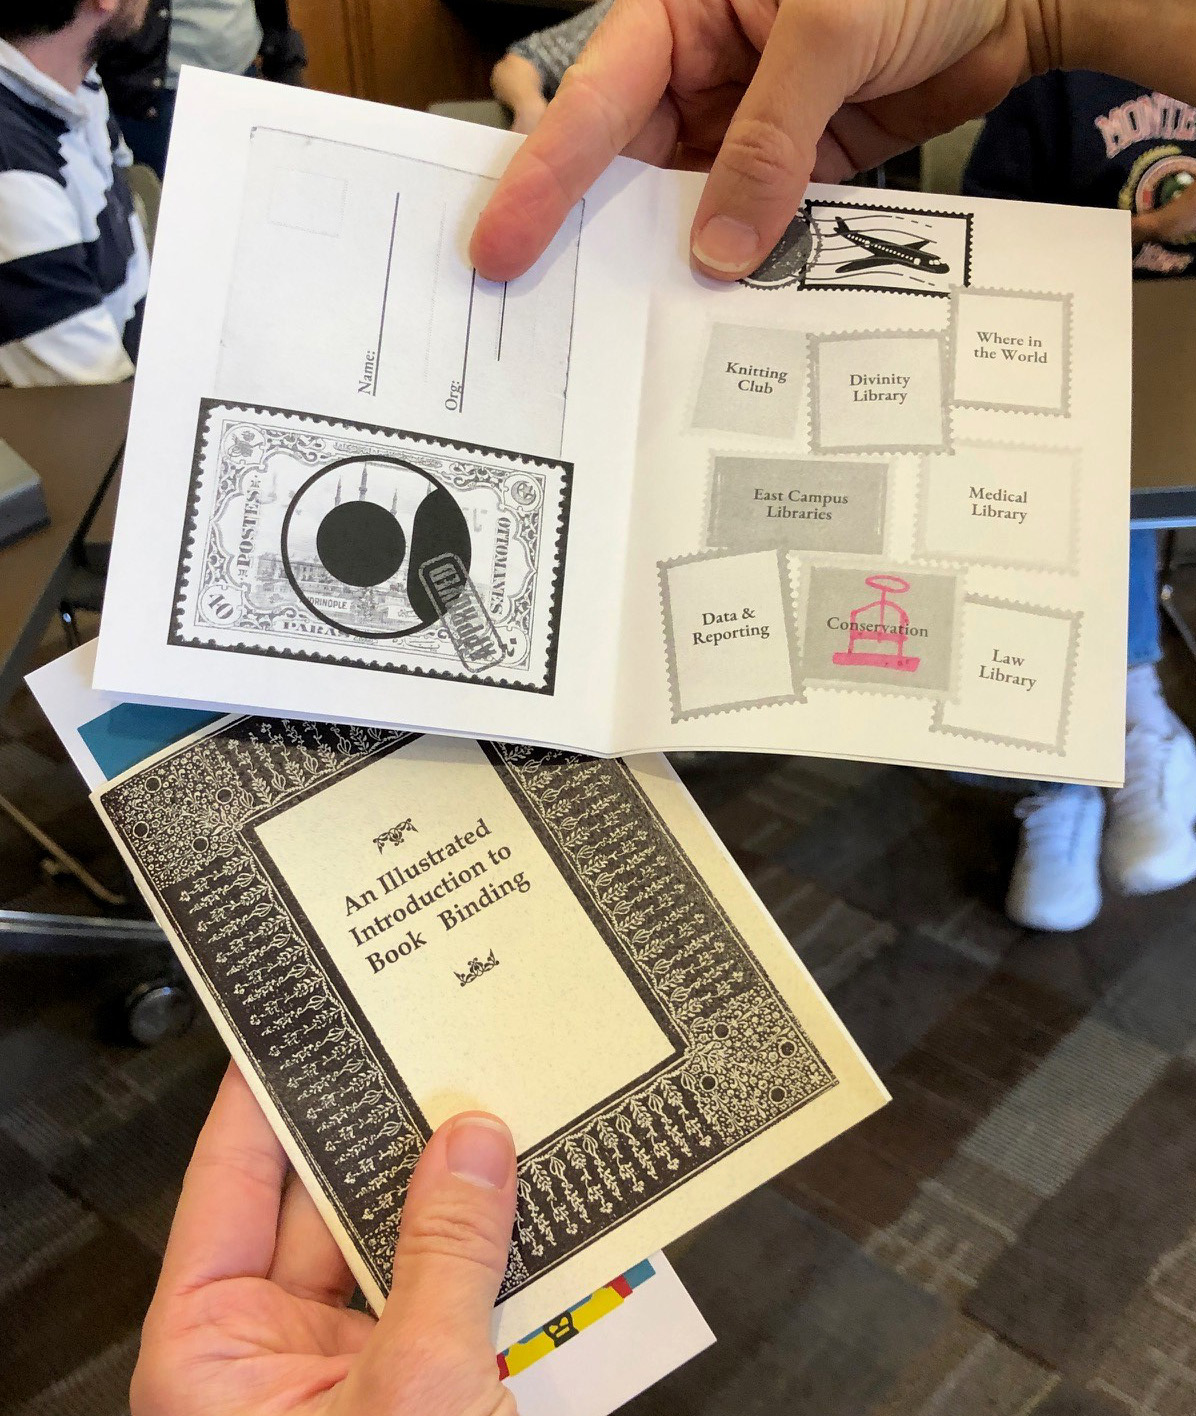
We were there to distribute our new bookmarks, branded buttons, and instruct visitors in simple pamphlet binding.
The library staff who attended were given a passport with space for each group to stamp (or in our case draw a little doodle in highlighter). They were then able to enter their completed passport for prizes in a raffle.
It was a really great way to spend an hour and interact with our peers. We have welcomed many new staff over the last year, so it was nice to meet some of the new folks. It was also a great opportunity to catch up with colleagues from all of the different libraries around campus. Hopefully this will become an annual event!
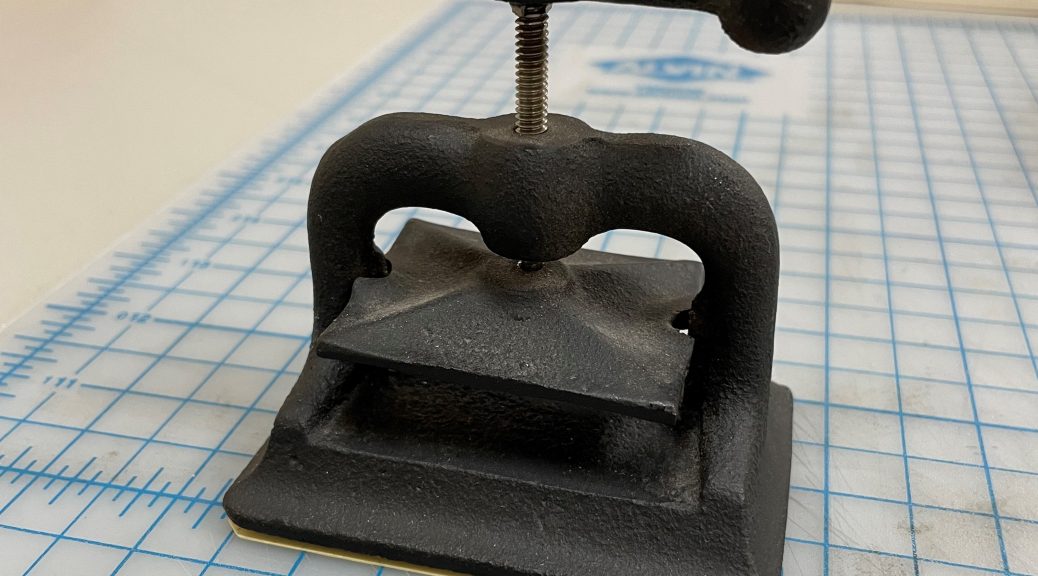
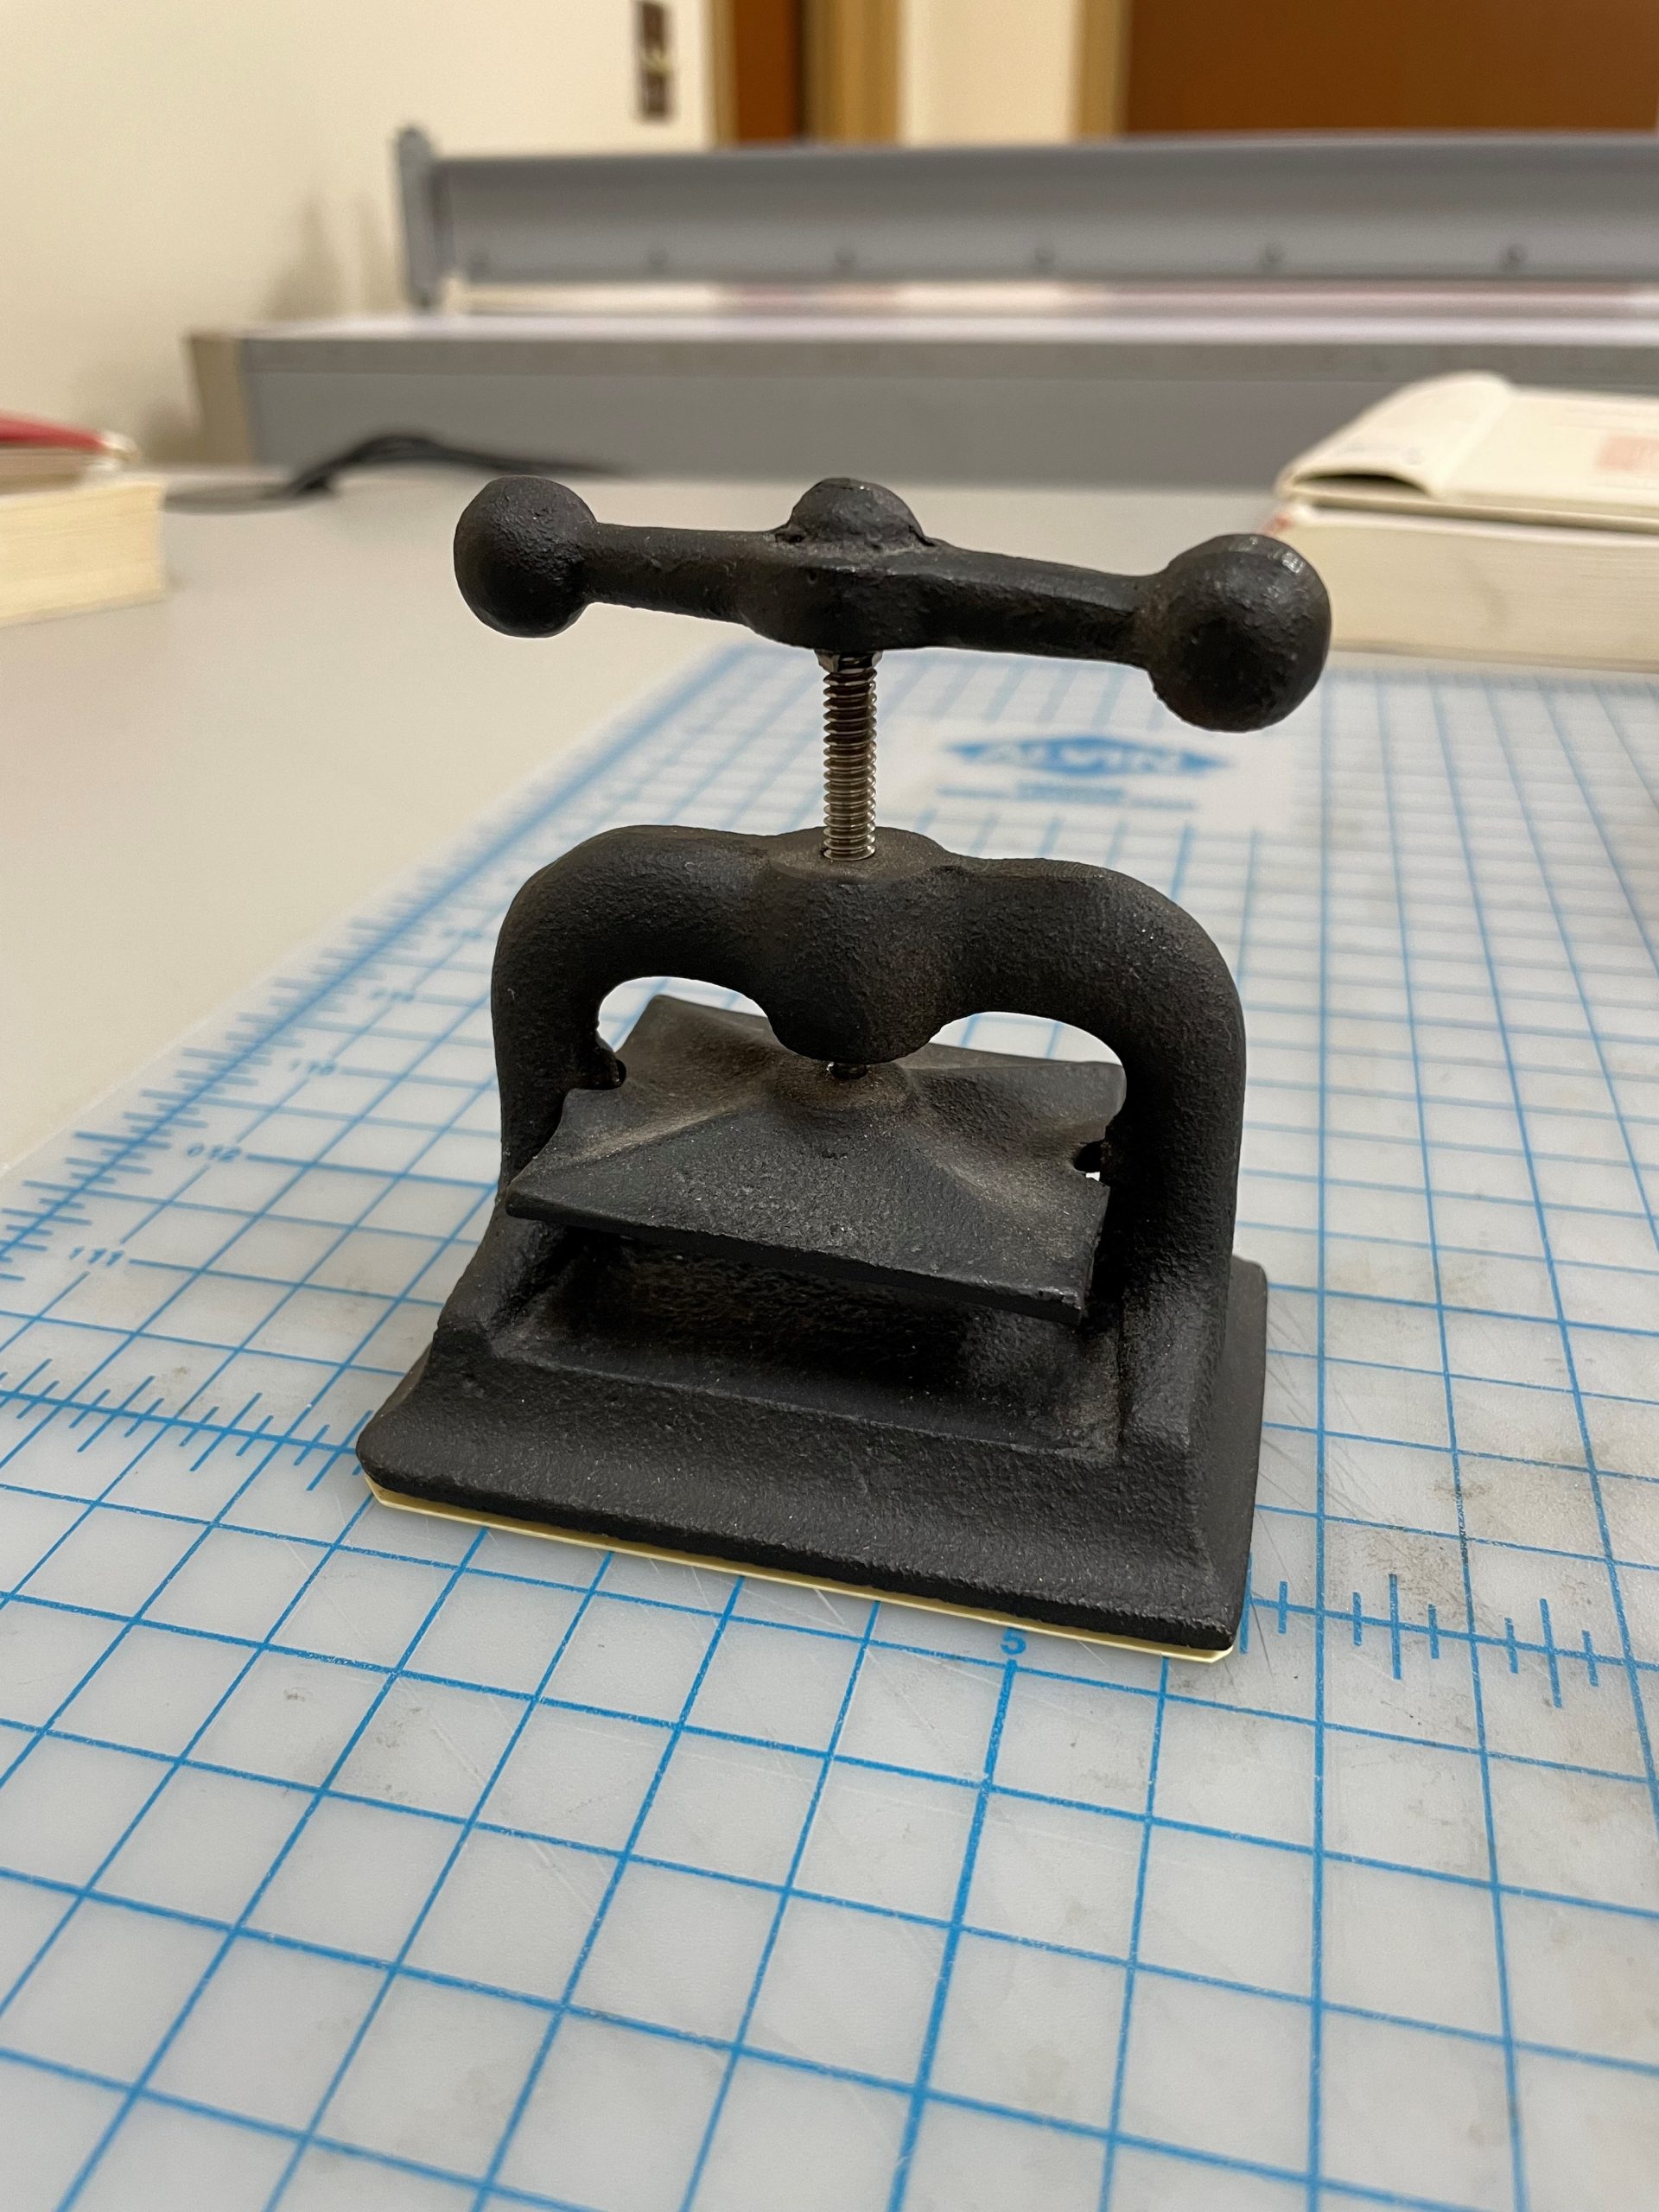
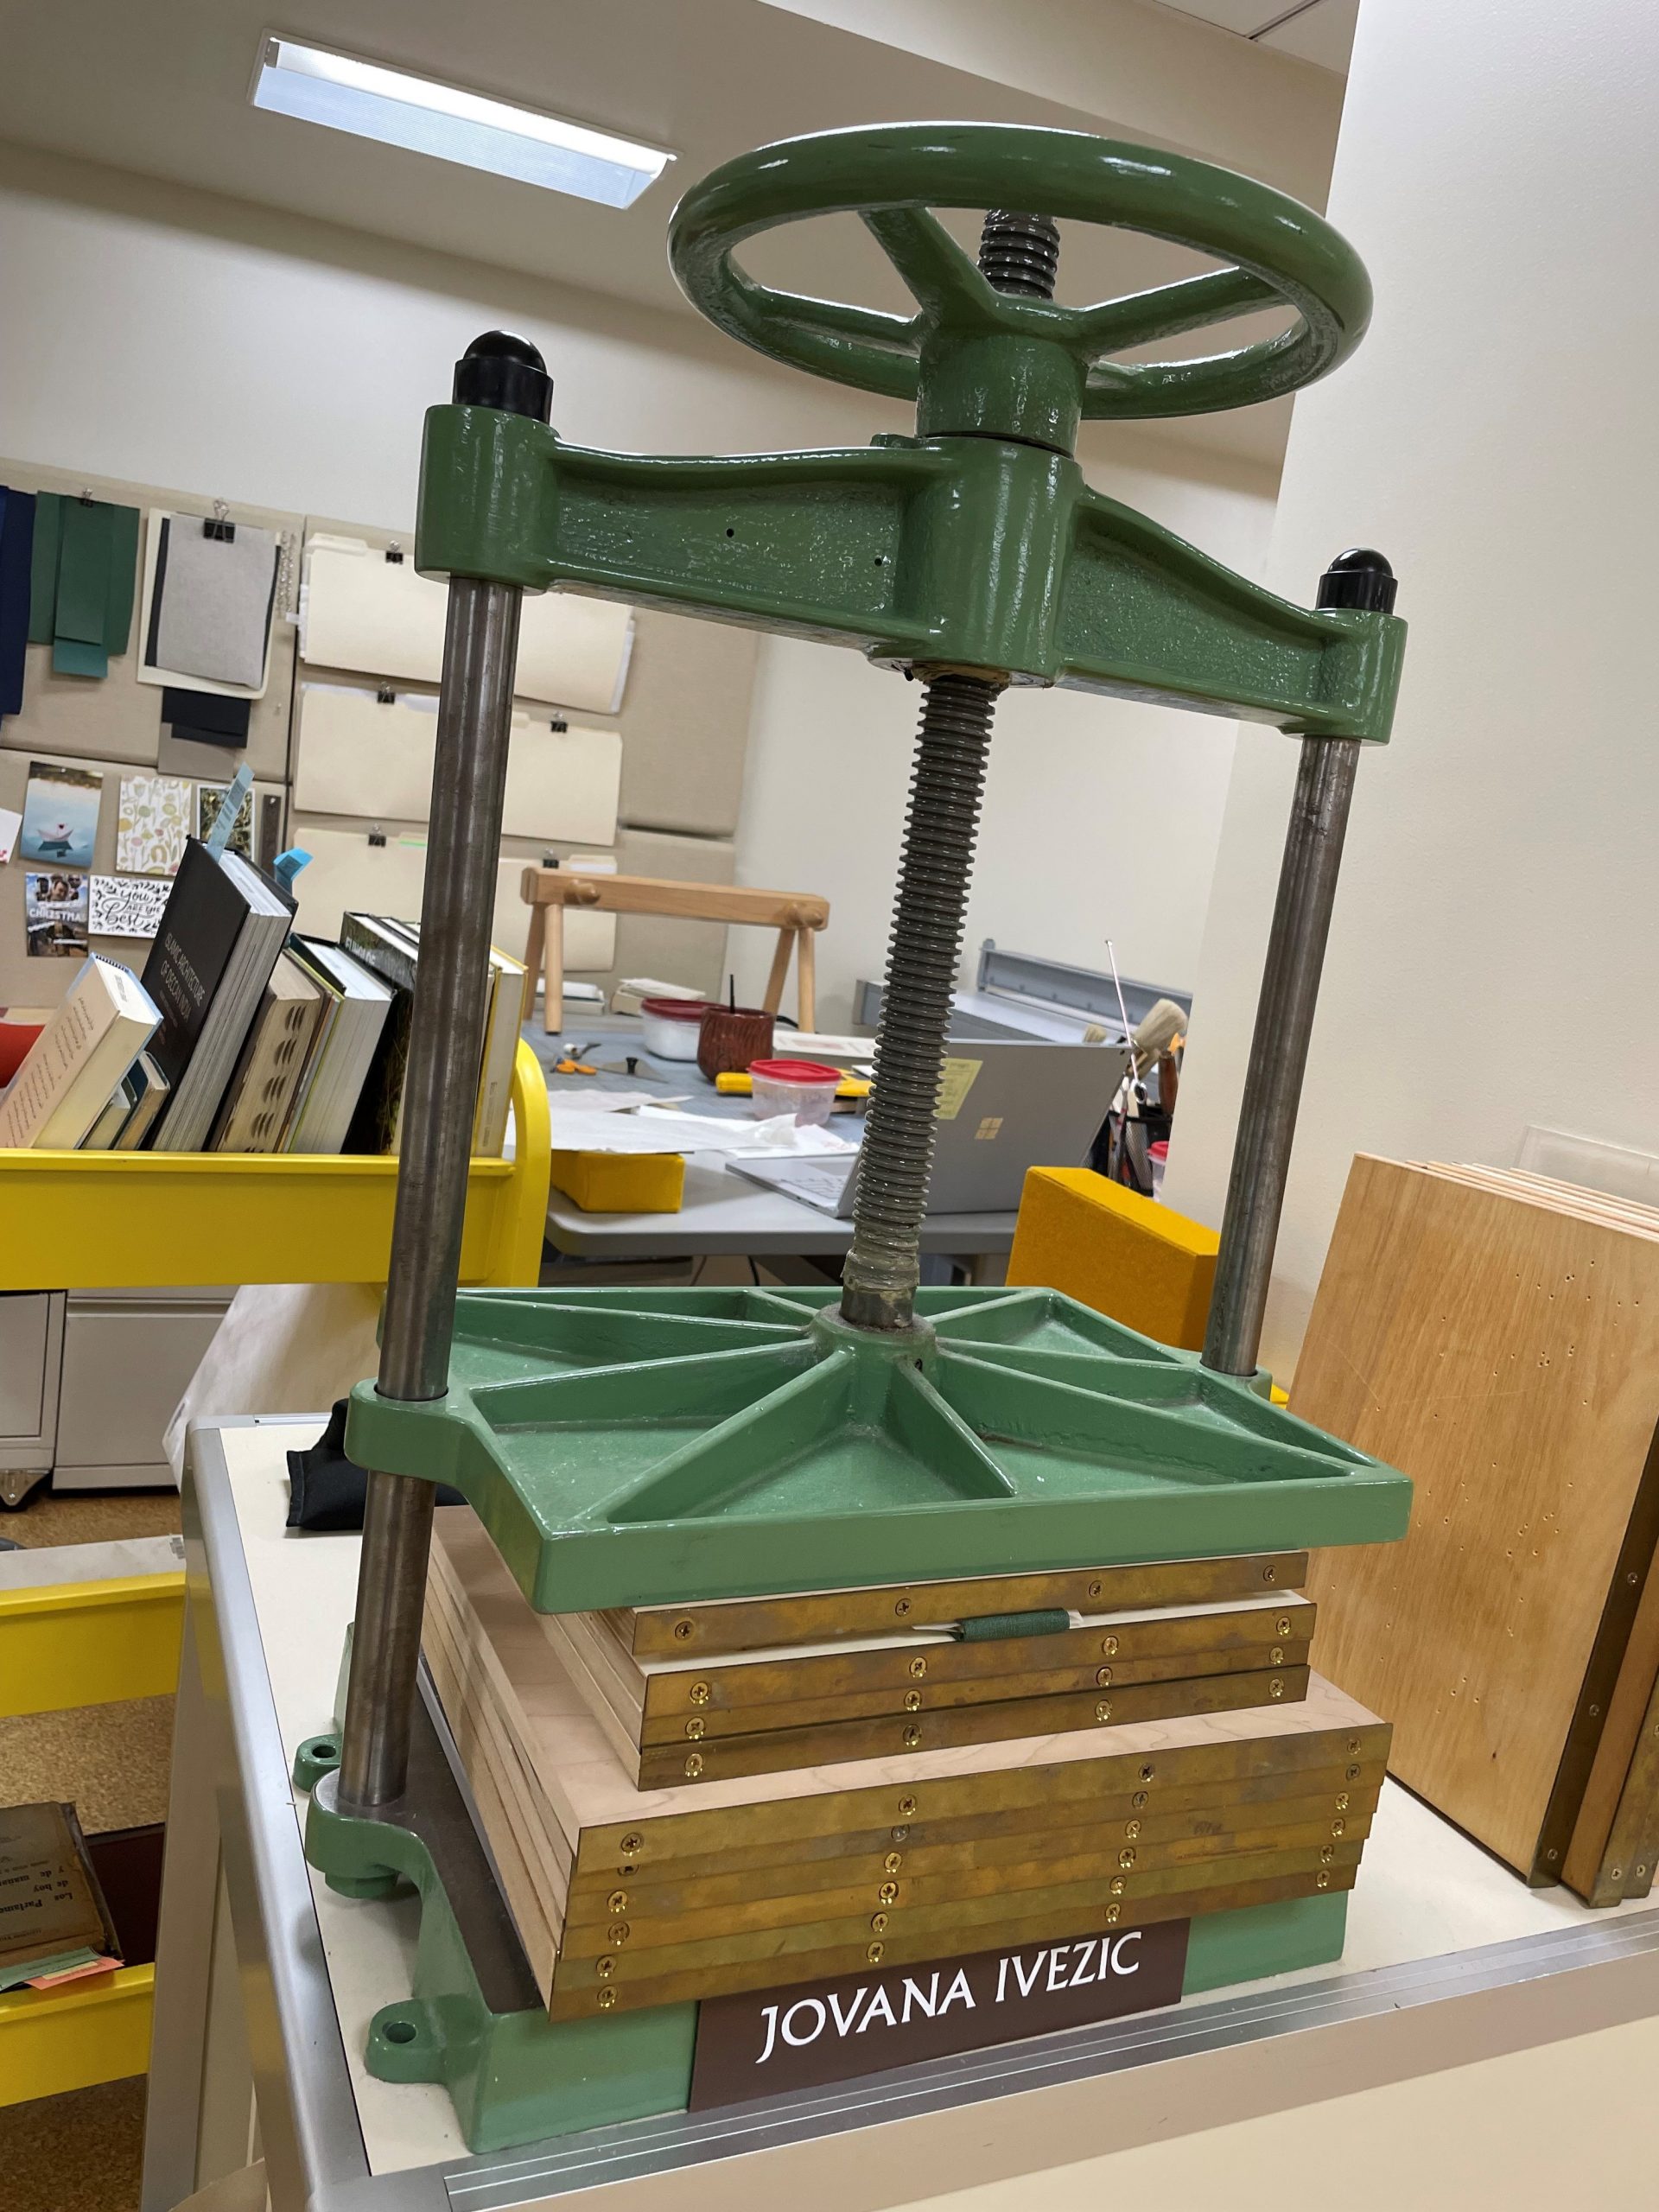
Over the past year, I’ve been working on an exhibit revolving around the work I do in Conservation Services and the Collection Services Division as a whole. As luck would have it, Beth has this wonderful miniature book press that fit perfectly into the display case I was in charge of designing.
But what is a book press without a book to press? With that in mind, I took this opportunity to make my first miniature book.
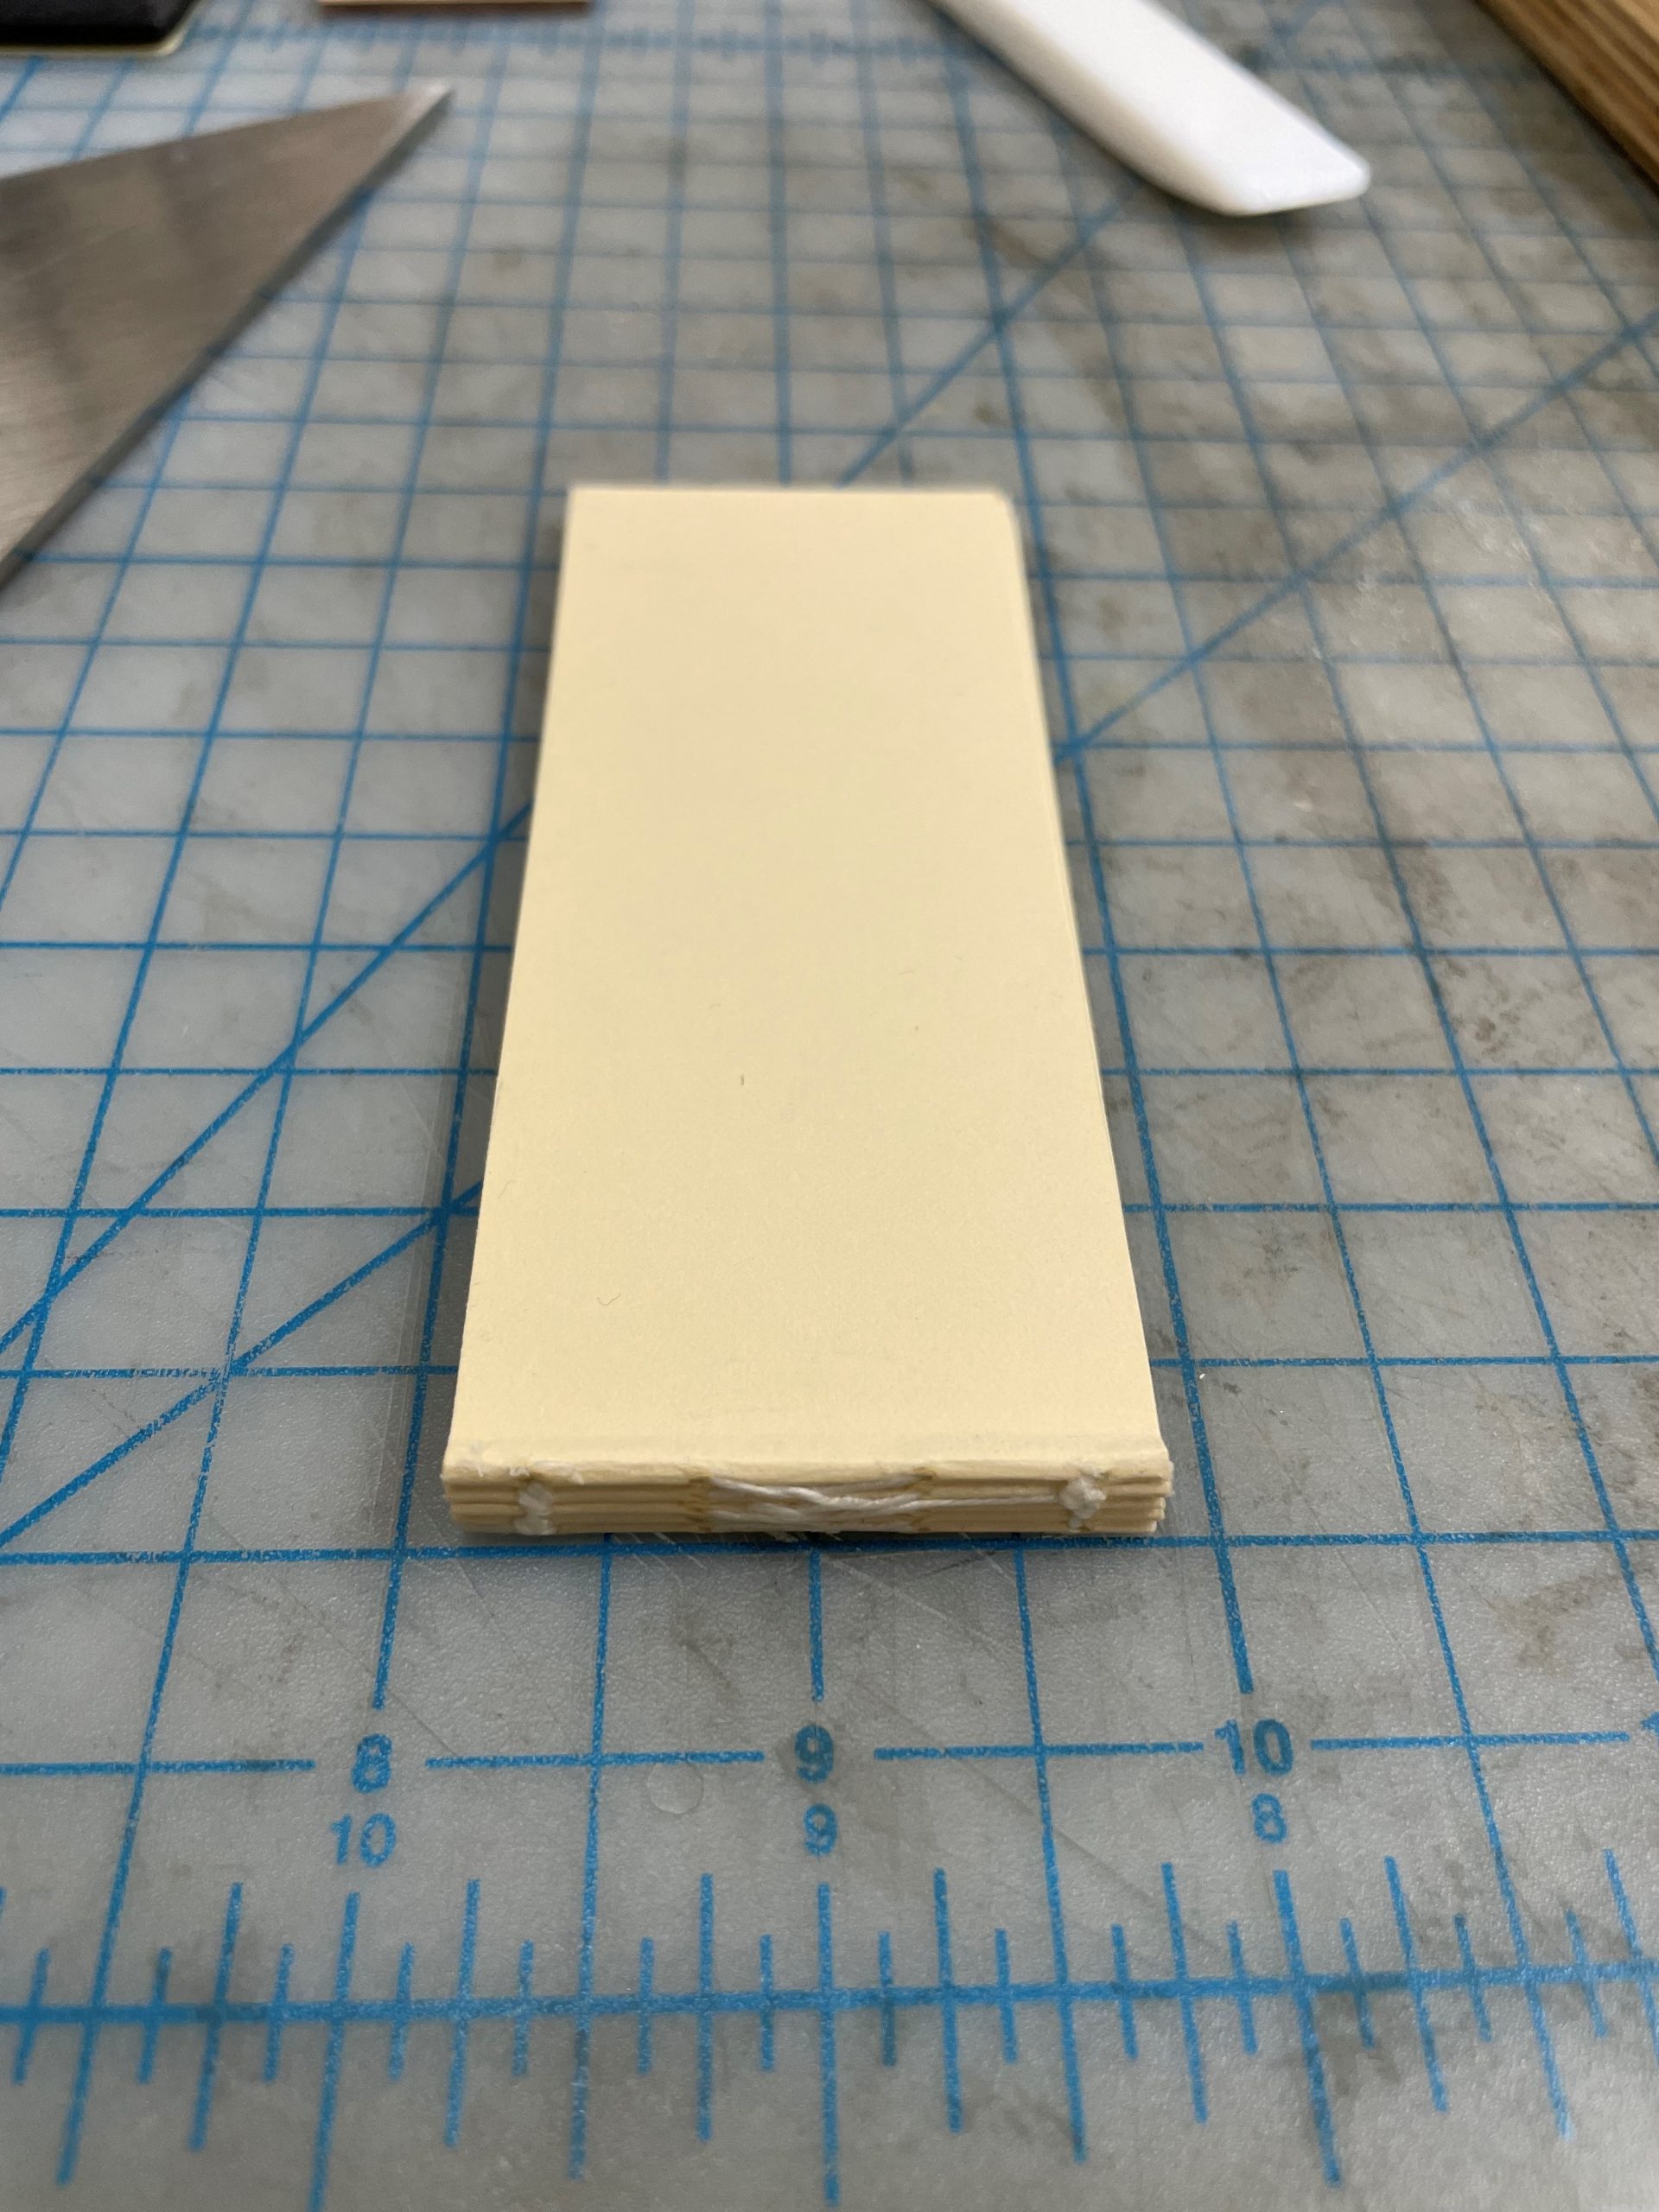
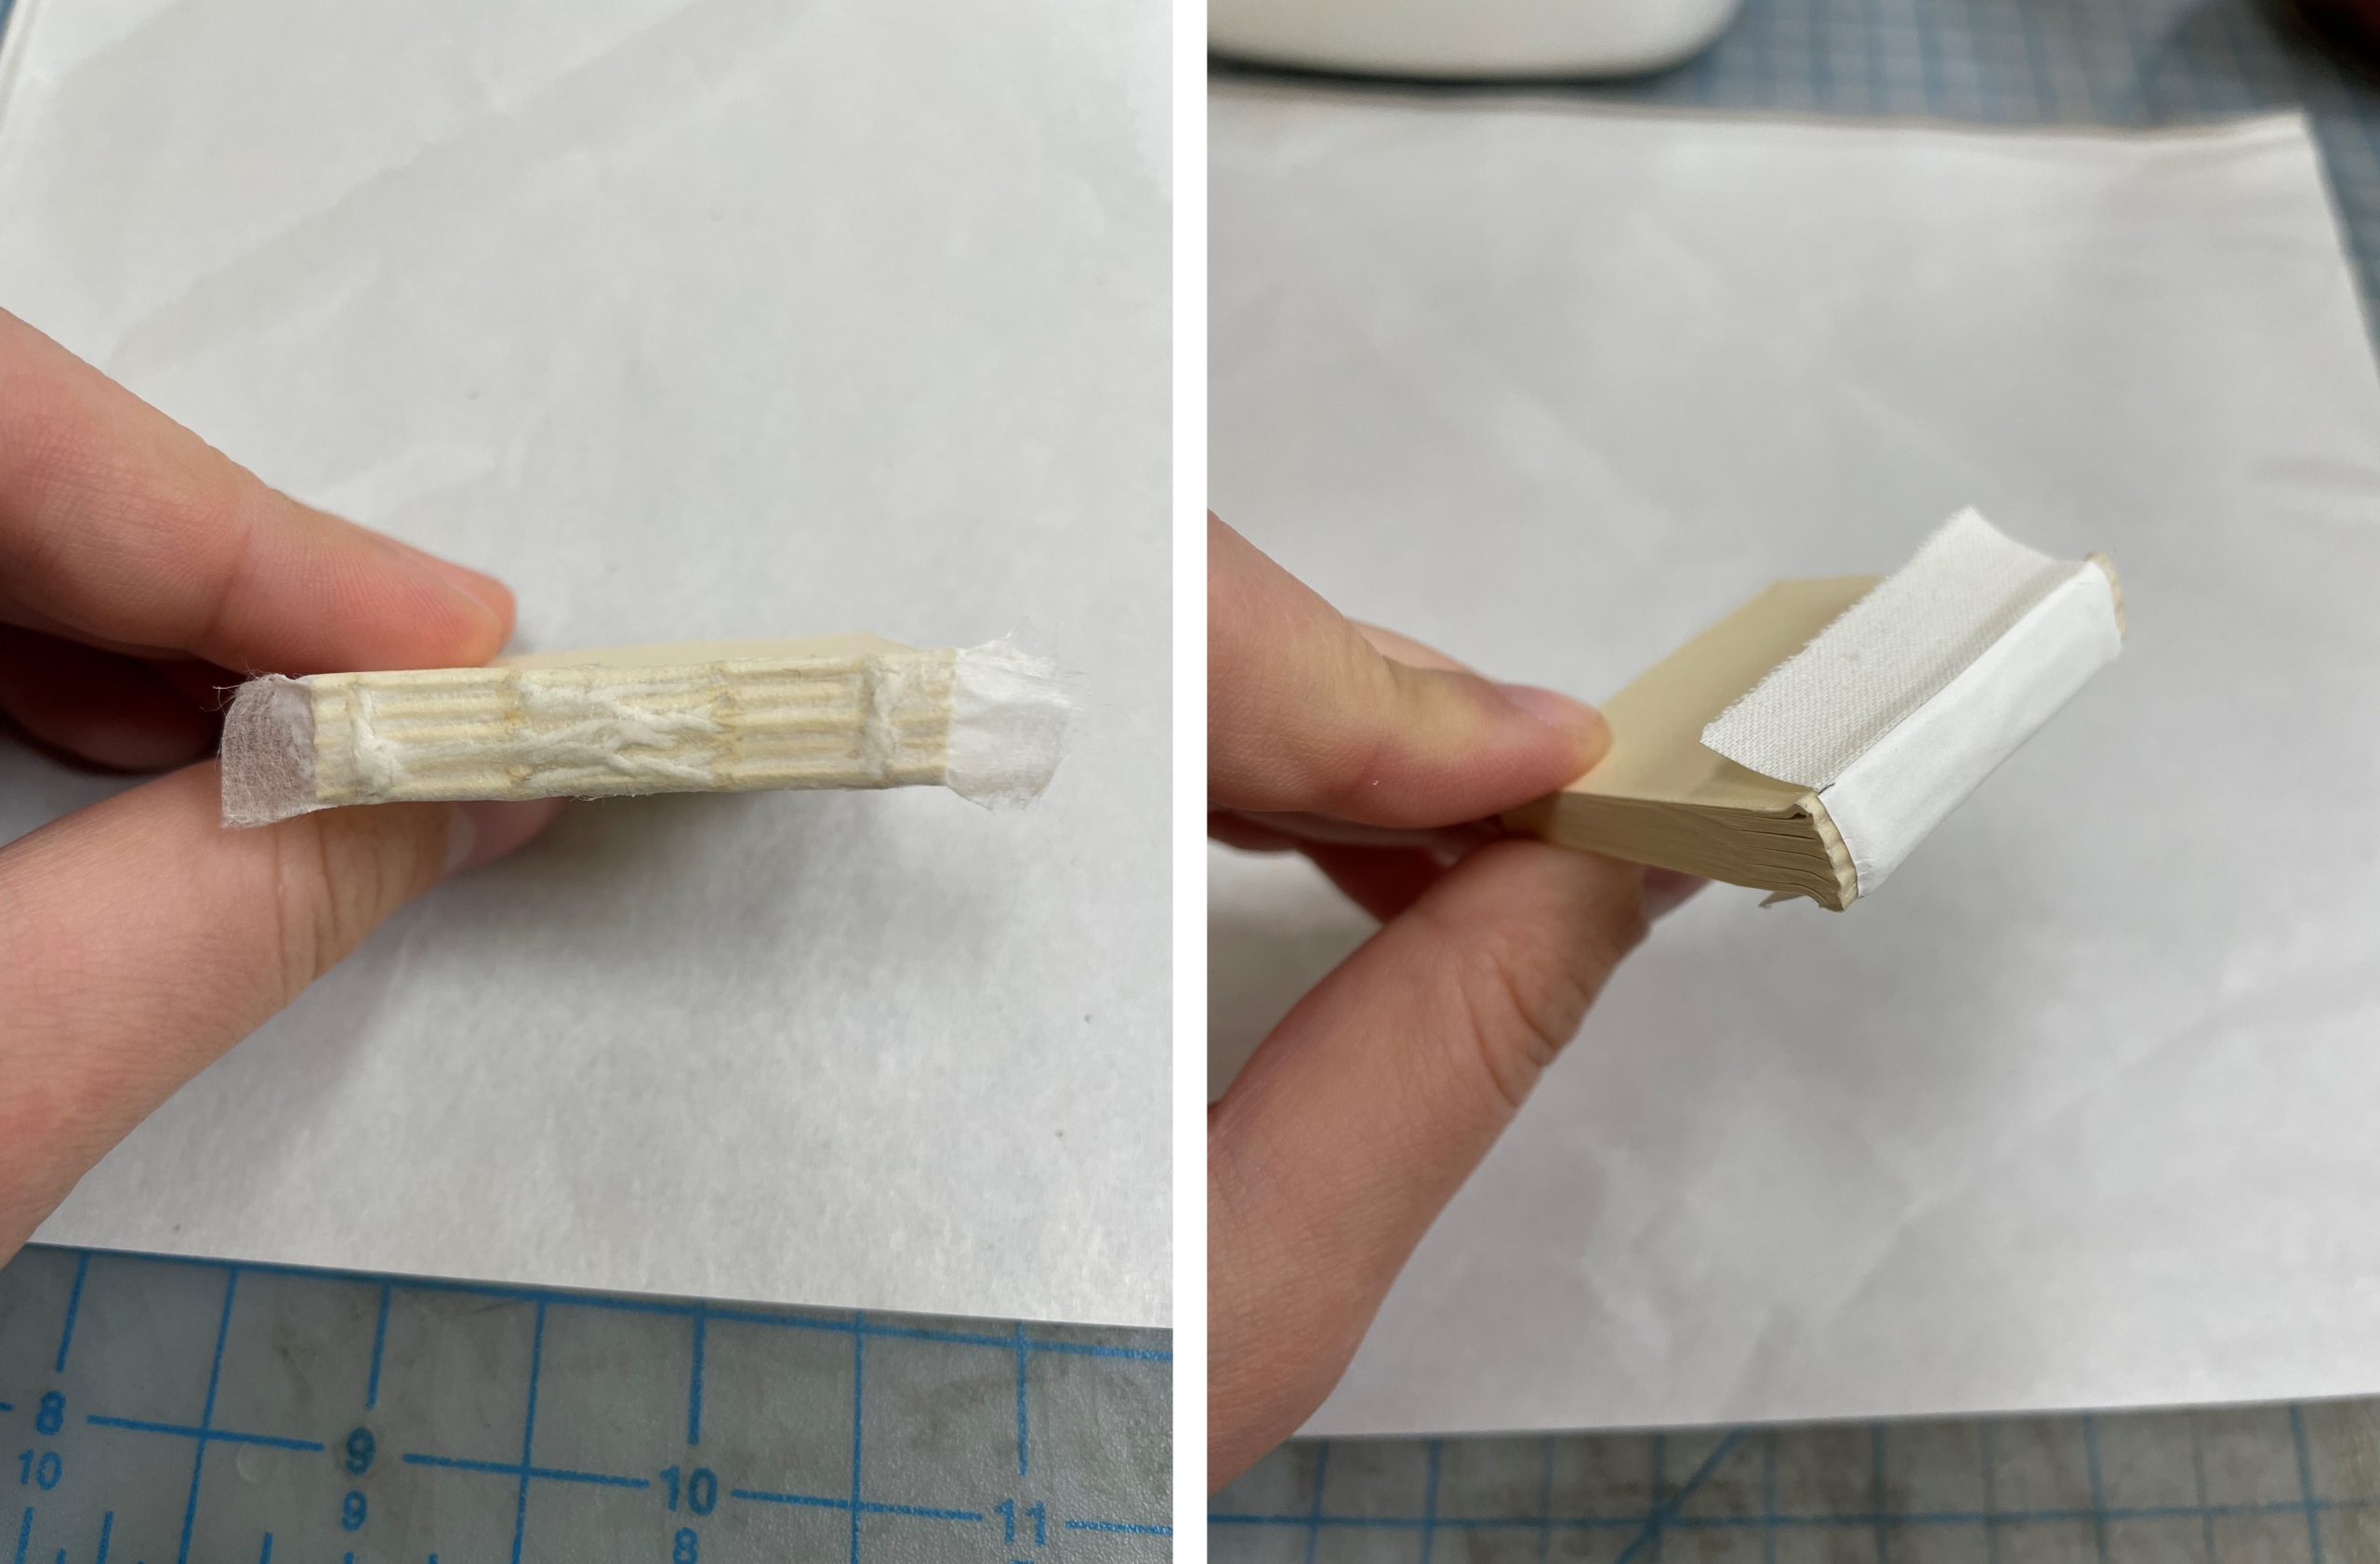
First, I made a tiny book block.
I left the paper longer than it needed to be so that I could weigh the pages down while I sewed it all together. Once that was done, I decided it would be nice to try and round the spine. This proved to be a bit difficult with the normal tools we use for rounding.
I felt I was more likely to just crush the entire spine with the hammer than actually round it. A Teflon folder made for a safer option for this tiny spine.
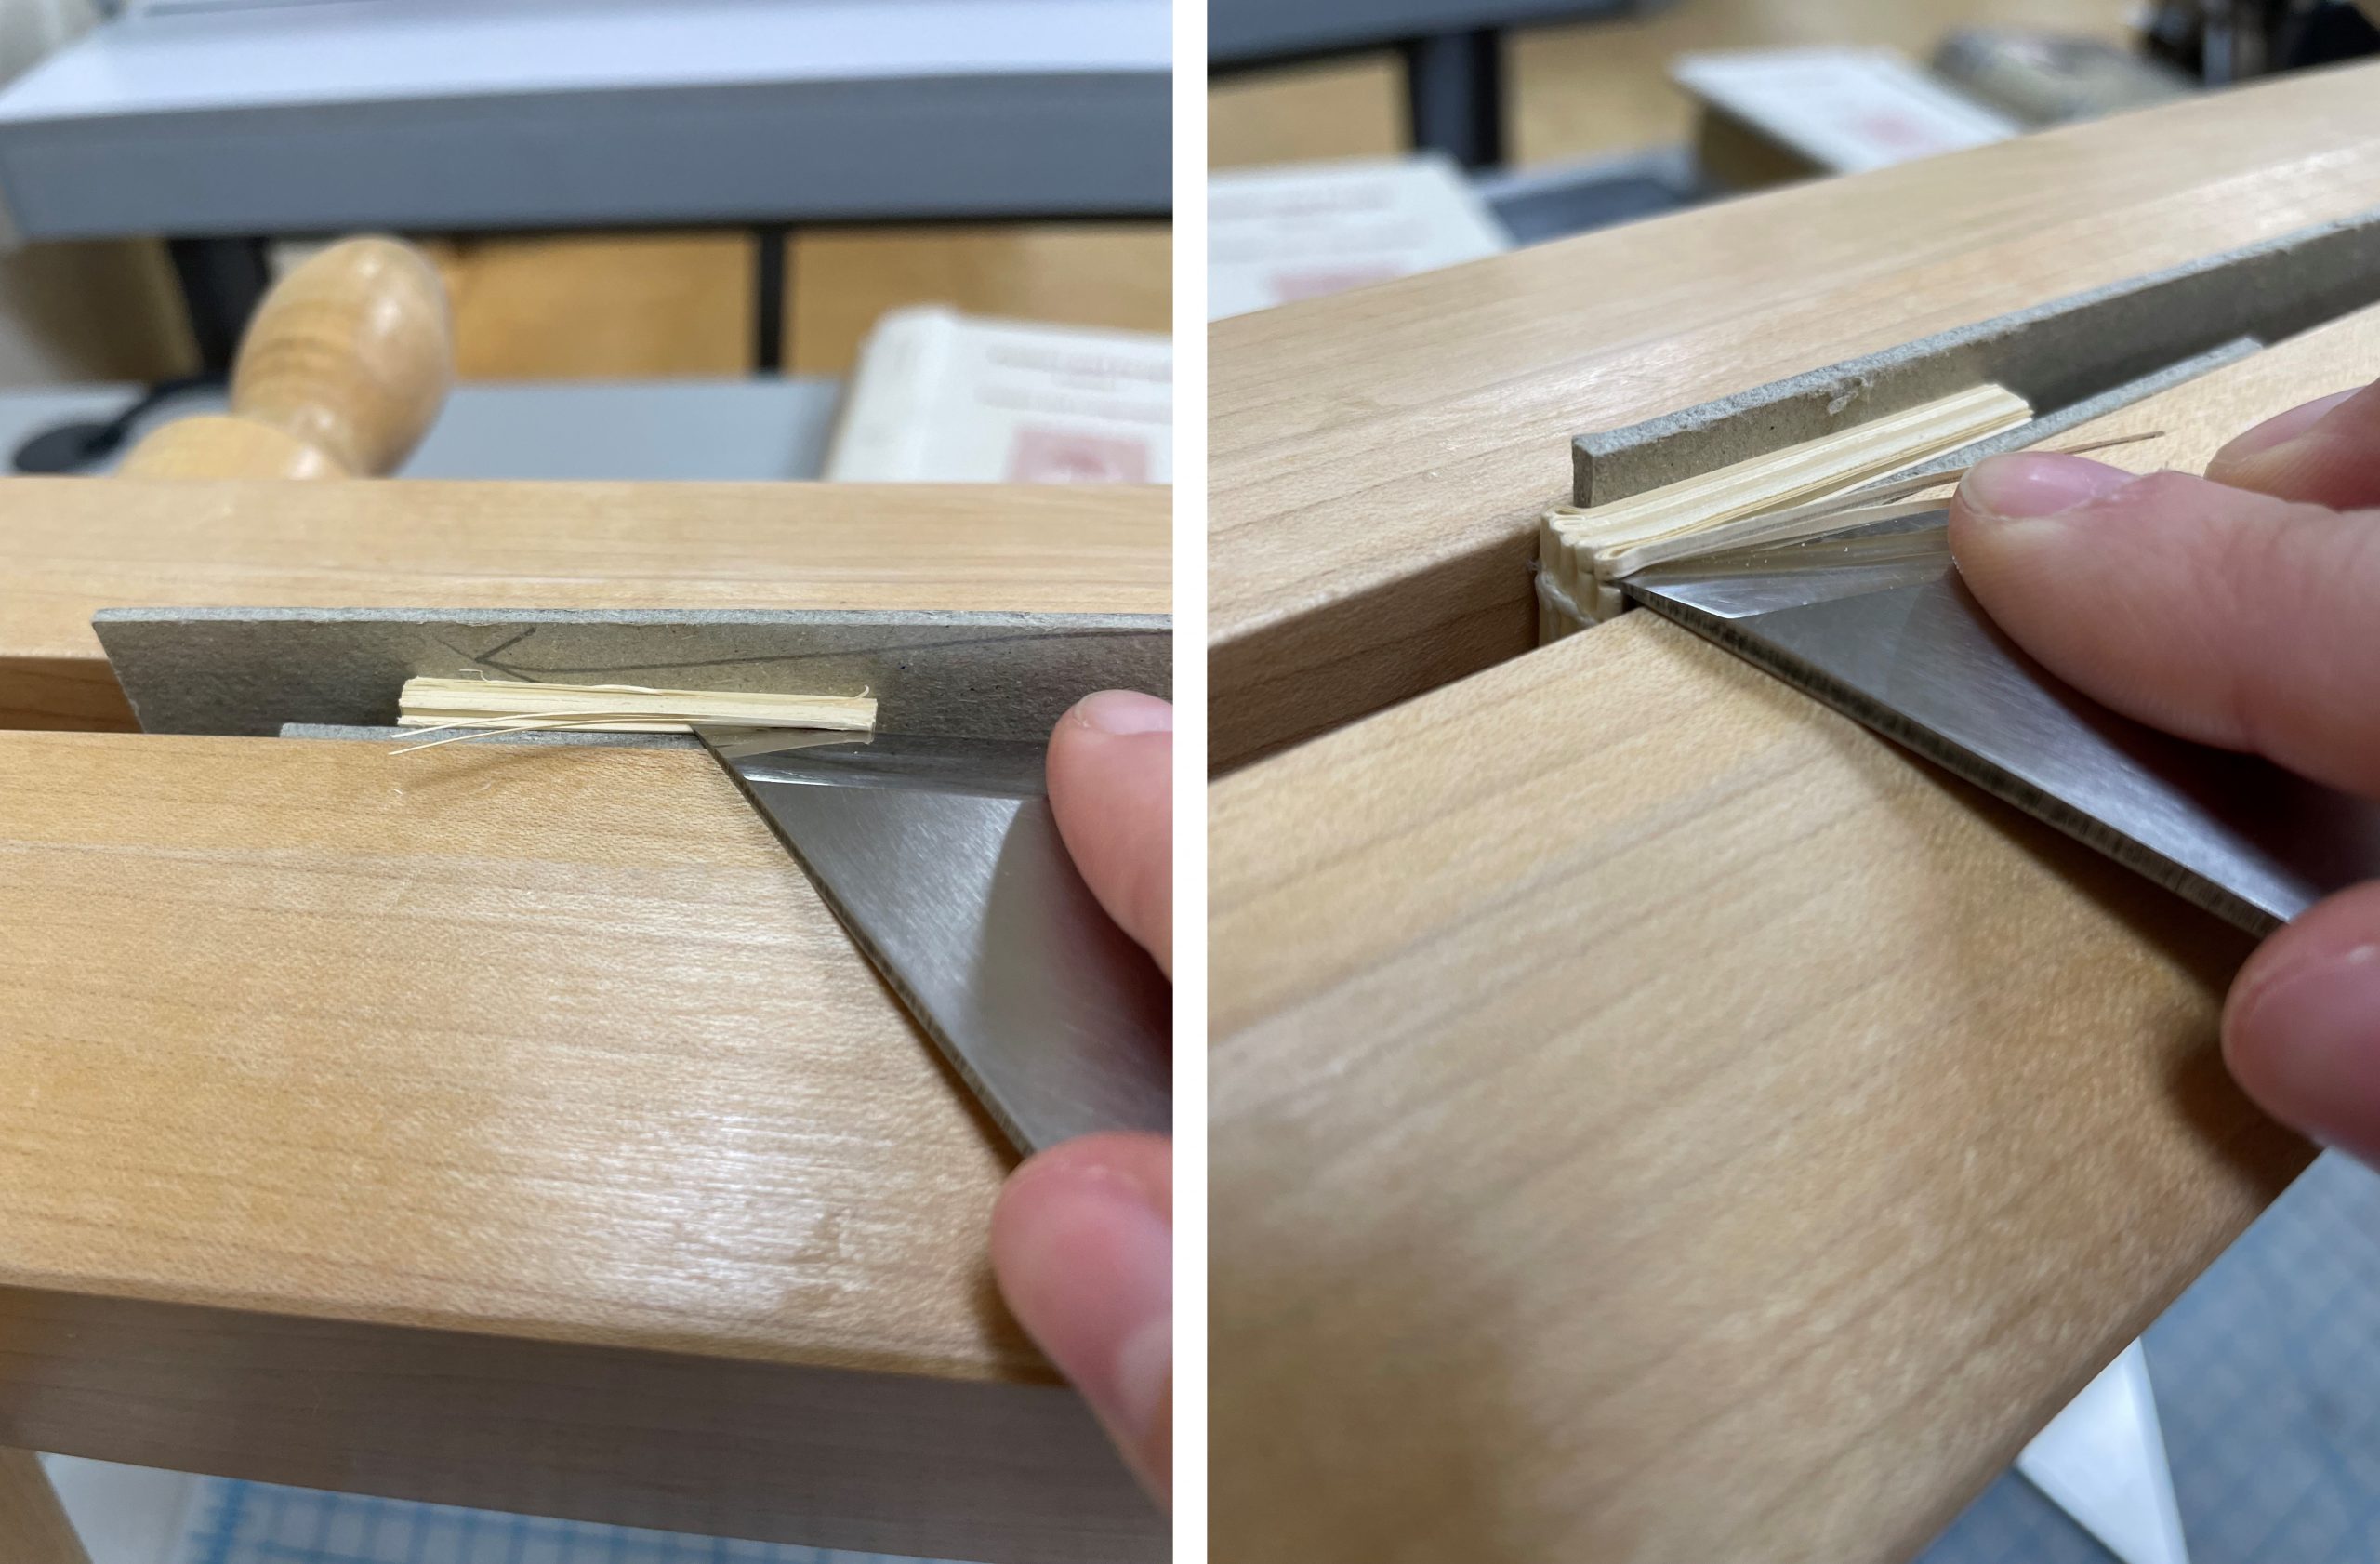
Next, I needed to trim the book block to a more appropriate size. I started to cut it with just a scalpel and a ruler, but as you can see that wasn’t really going well or looking particularly nice.
I decided instead to try to trim the book in a more traditional method. This meant placing the book block into a press and using a sharp, flat blade to cut across the pages evenly.
This was much more successful and I ended up with a nice and neat book block.
After that, I covered the spine with a Japanese tissue for strength. Then I added a textile spine lining as well as a paper lining for additional support.
Now I could make the covers, which ended up being the easiest part of this whole process.
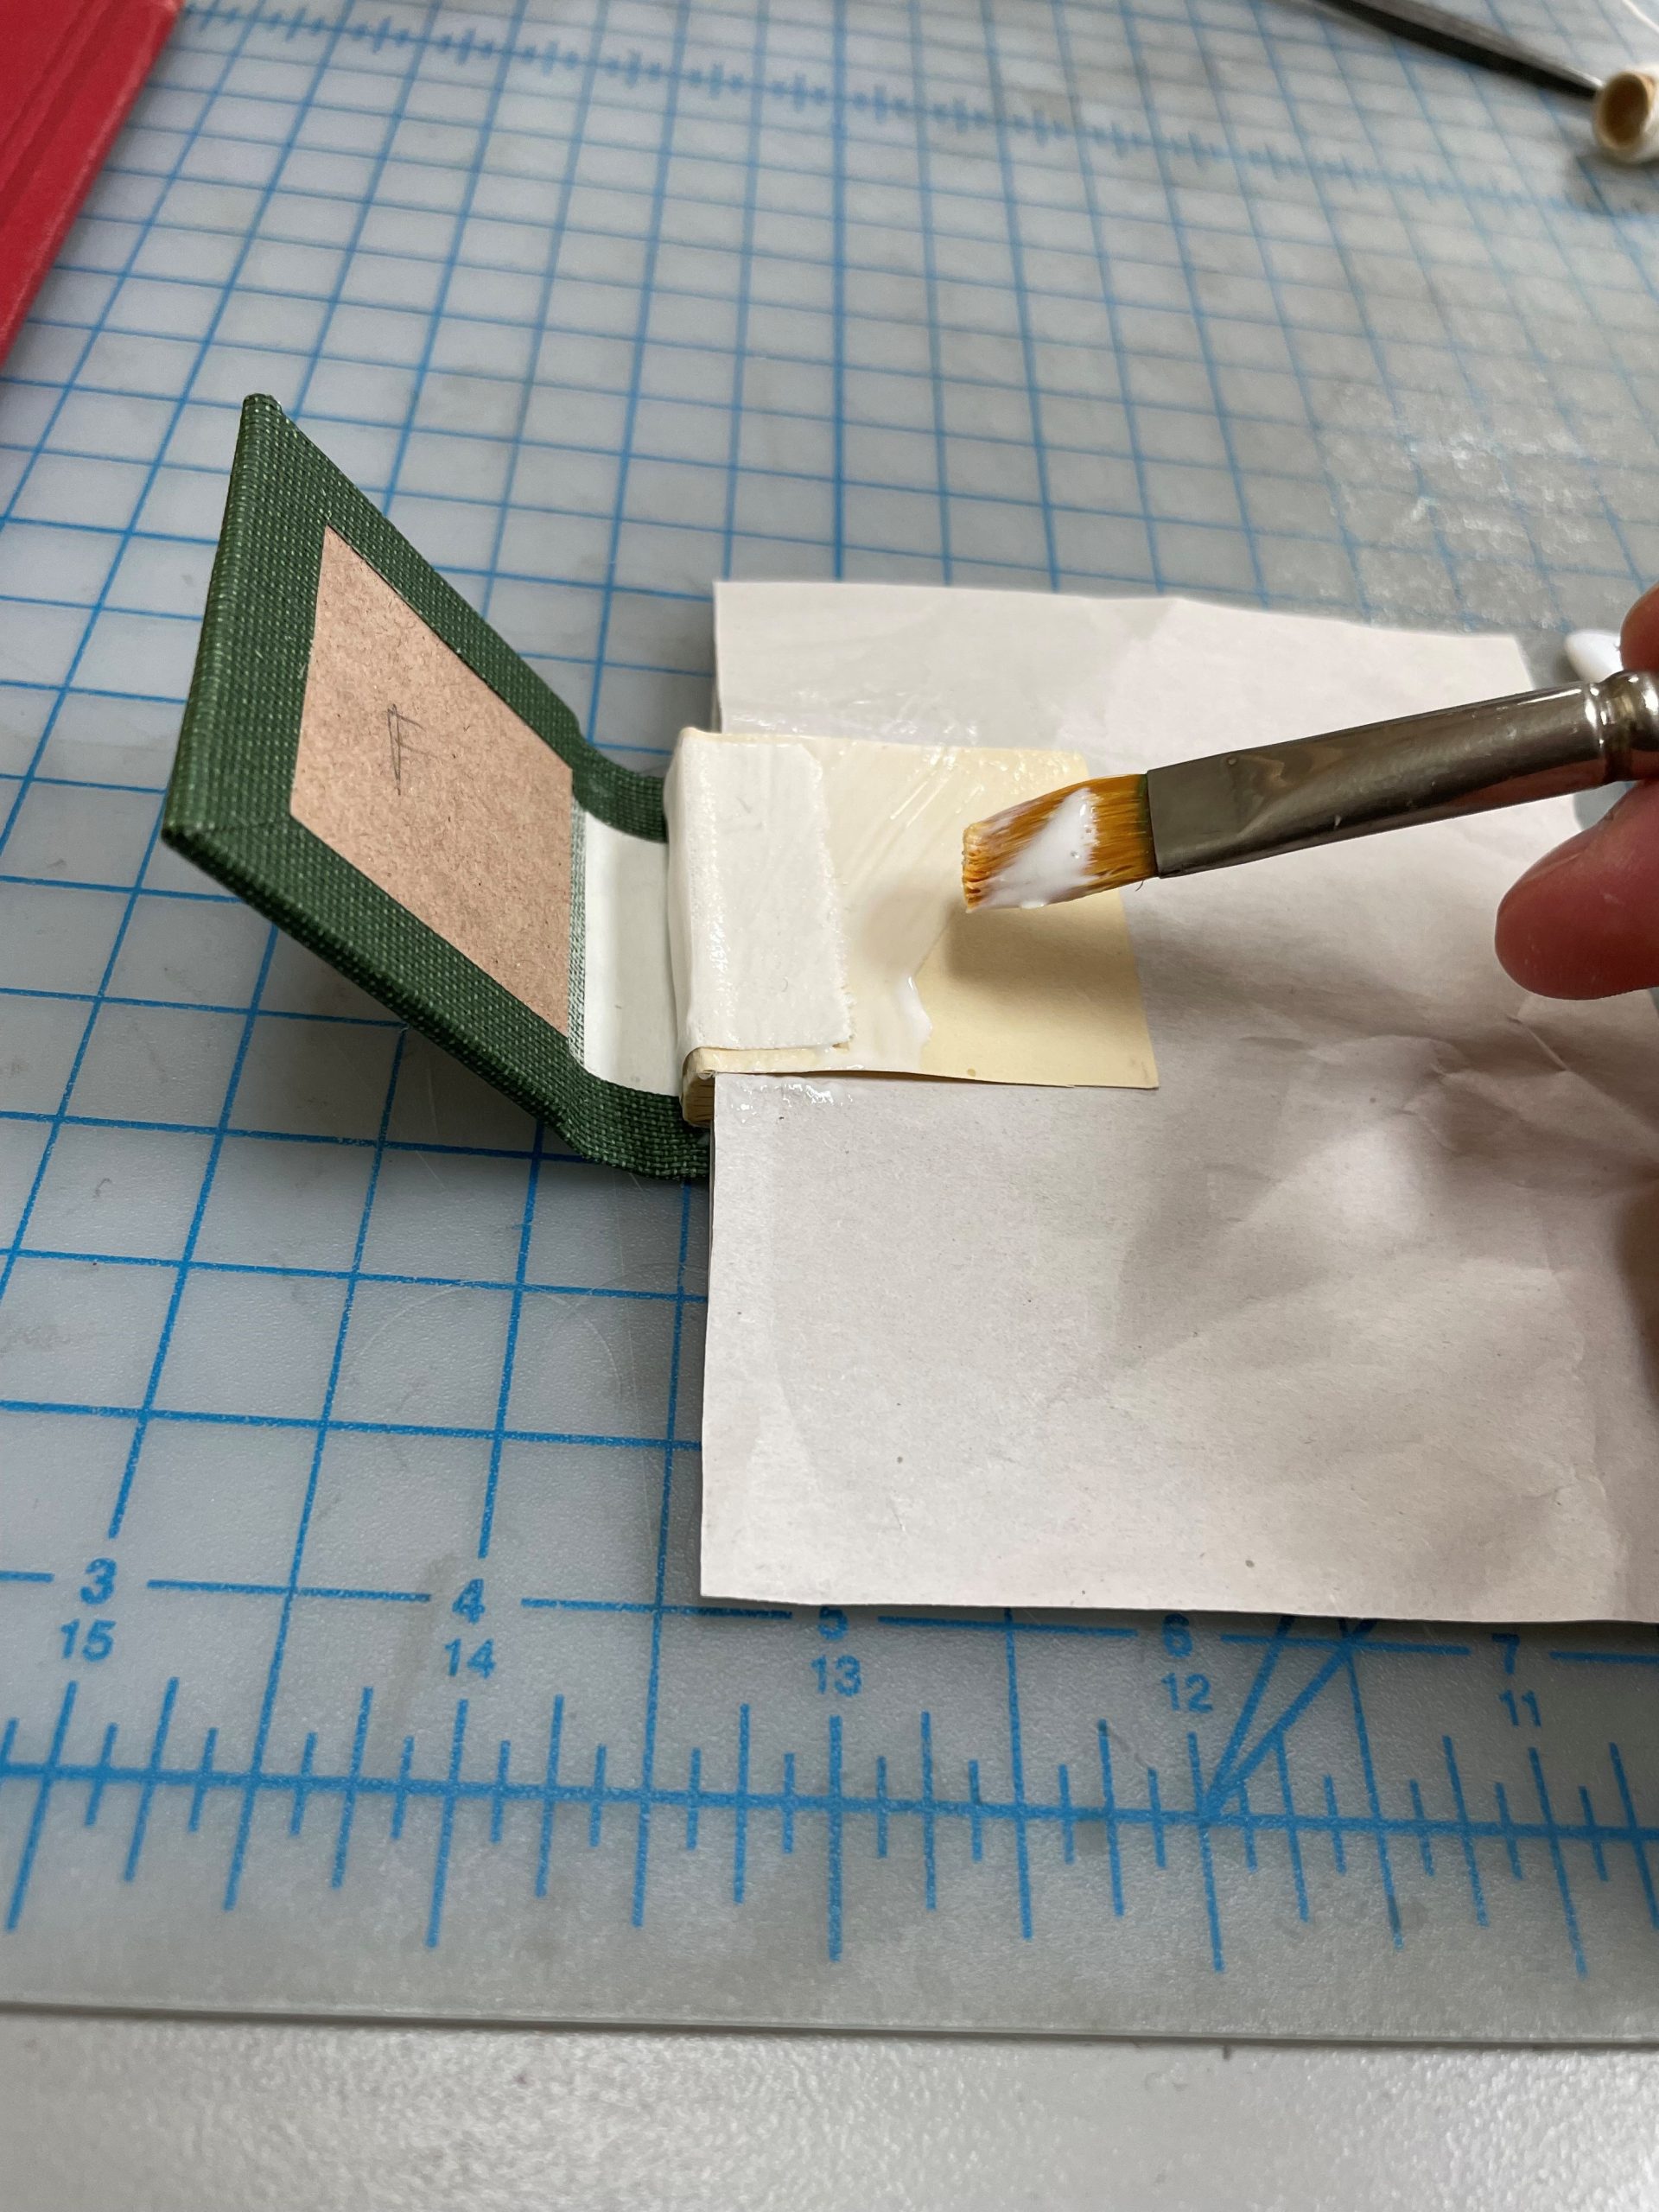
The hardest part came next, which was casing the book block into the covers. Because the book is so tiny, it was difficult to make sure the book didn’t move out of place as I glued up the paper that would connect the book block to the covers.
I eventually managed to figure it out and put the book in a press to dry flat.
I have to say it looks a bit silly in the full-sized press.
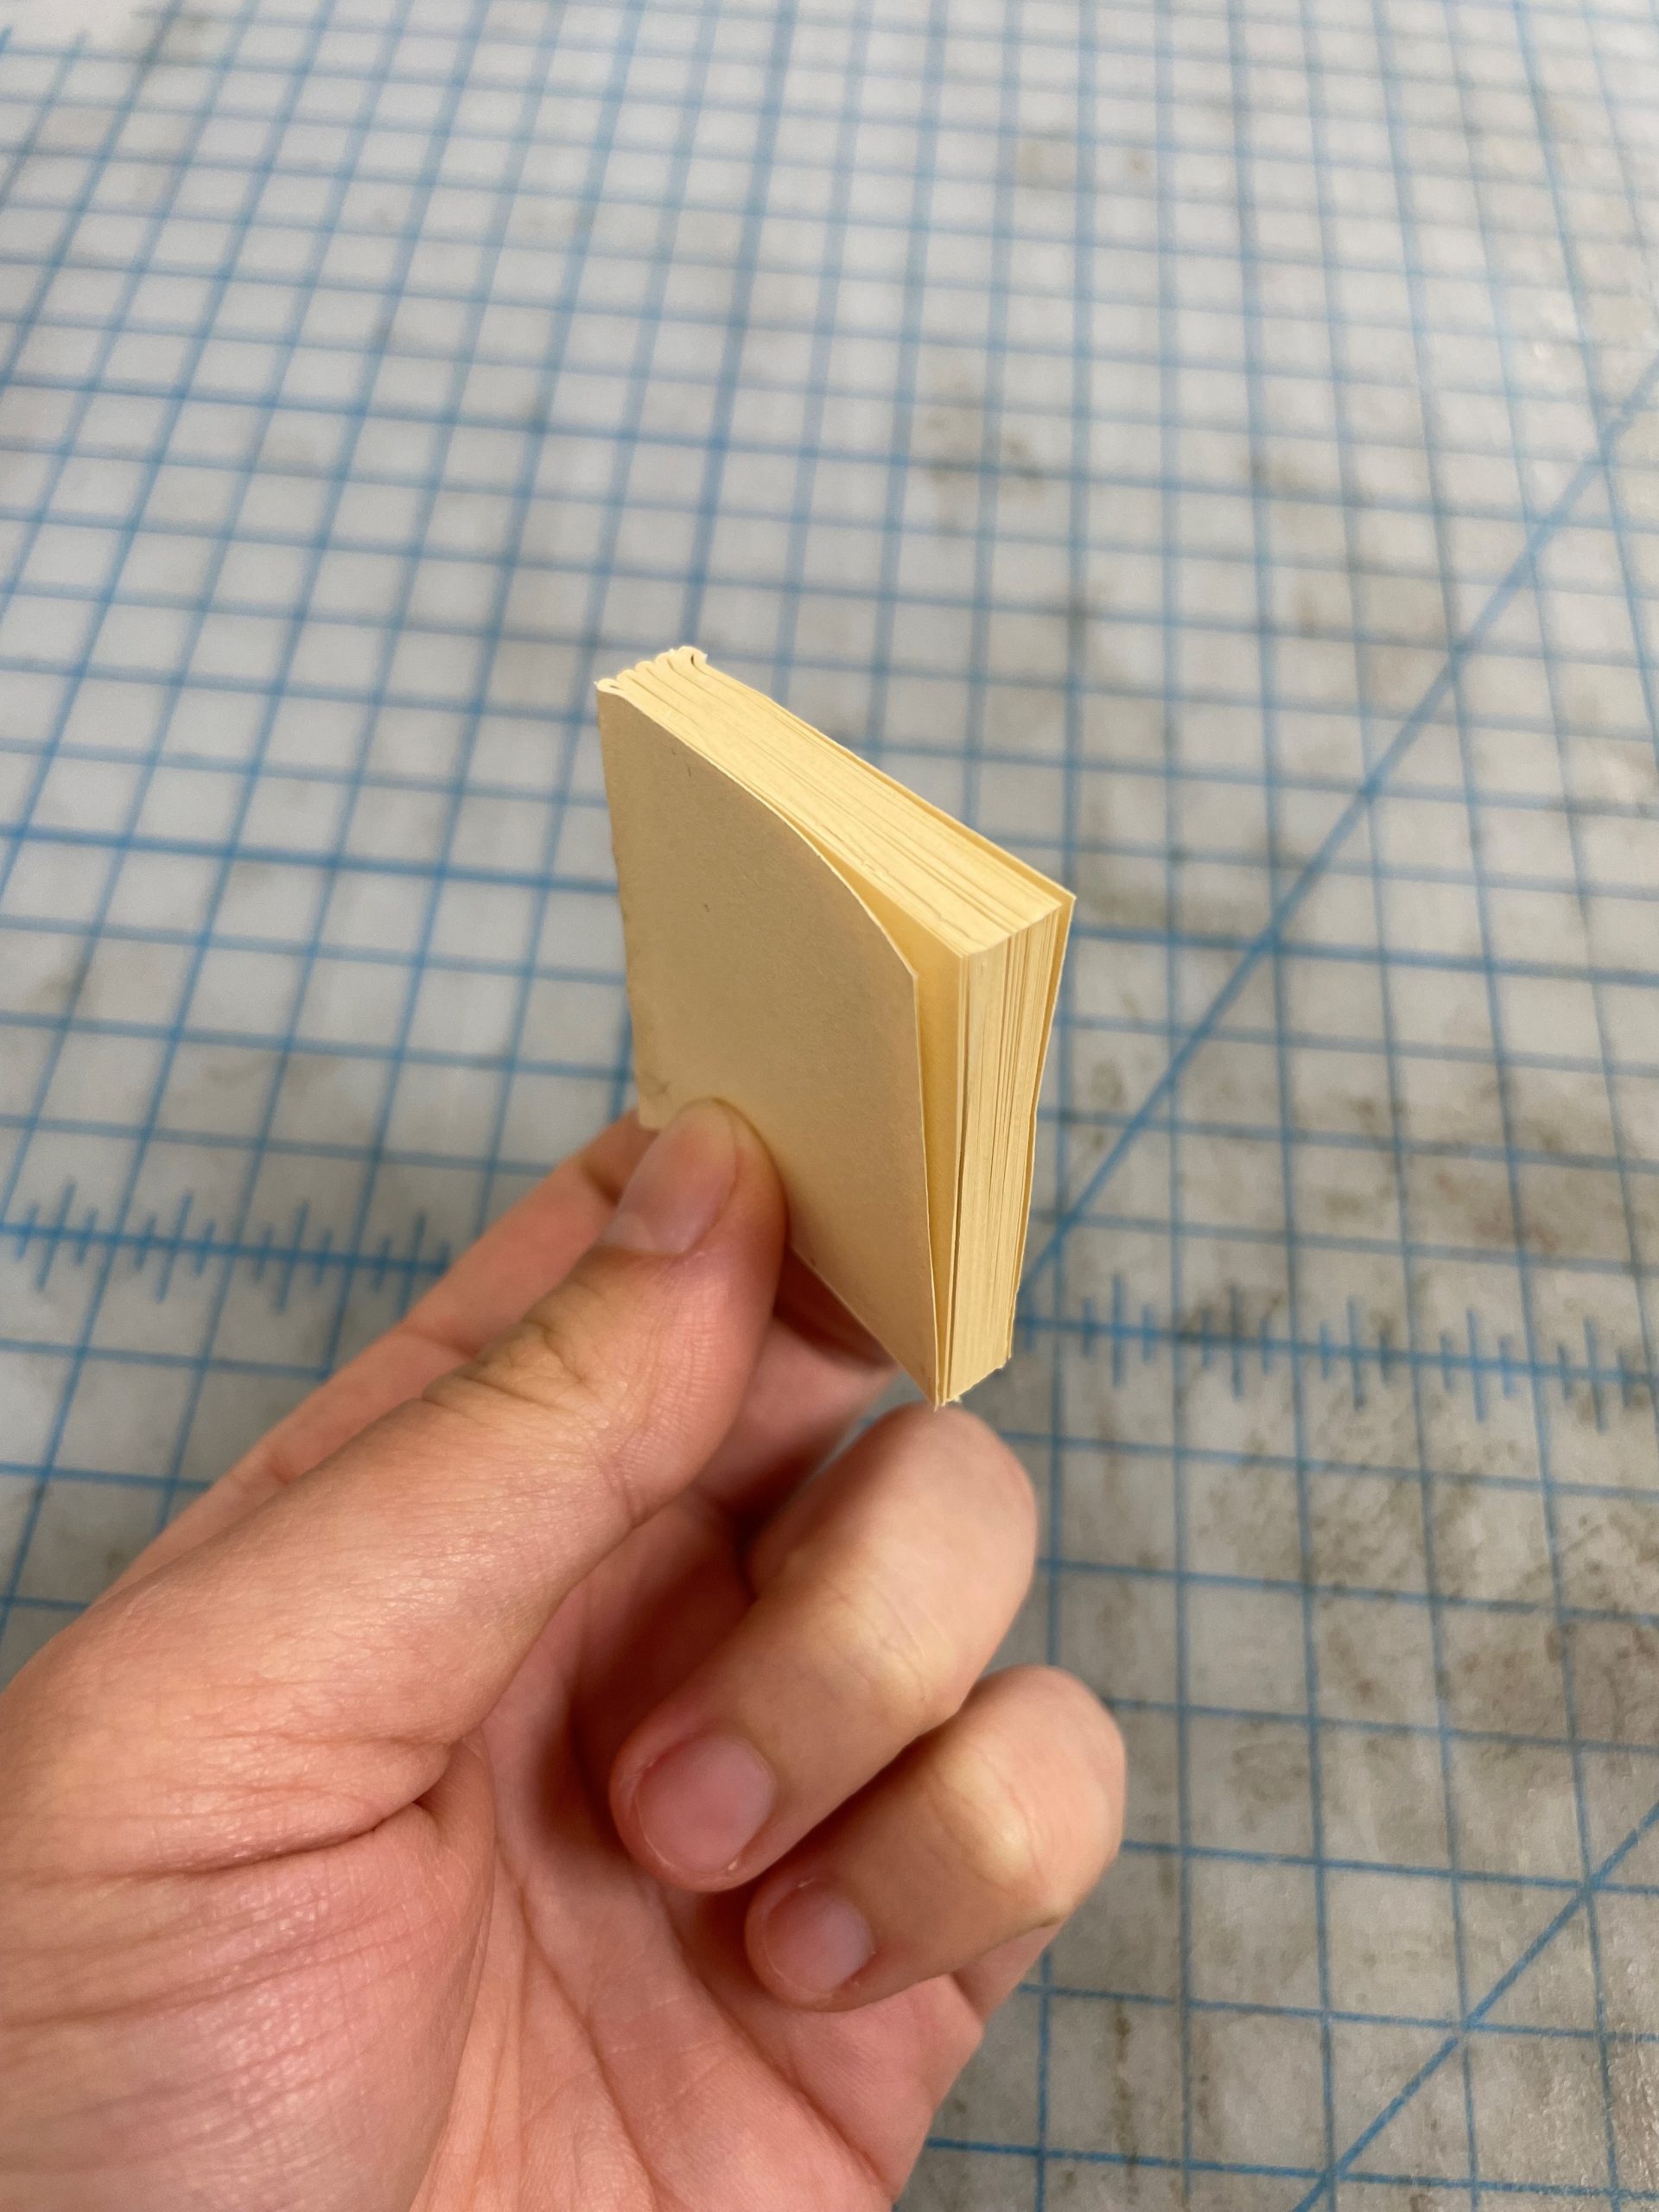
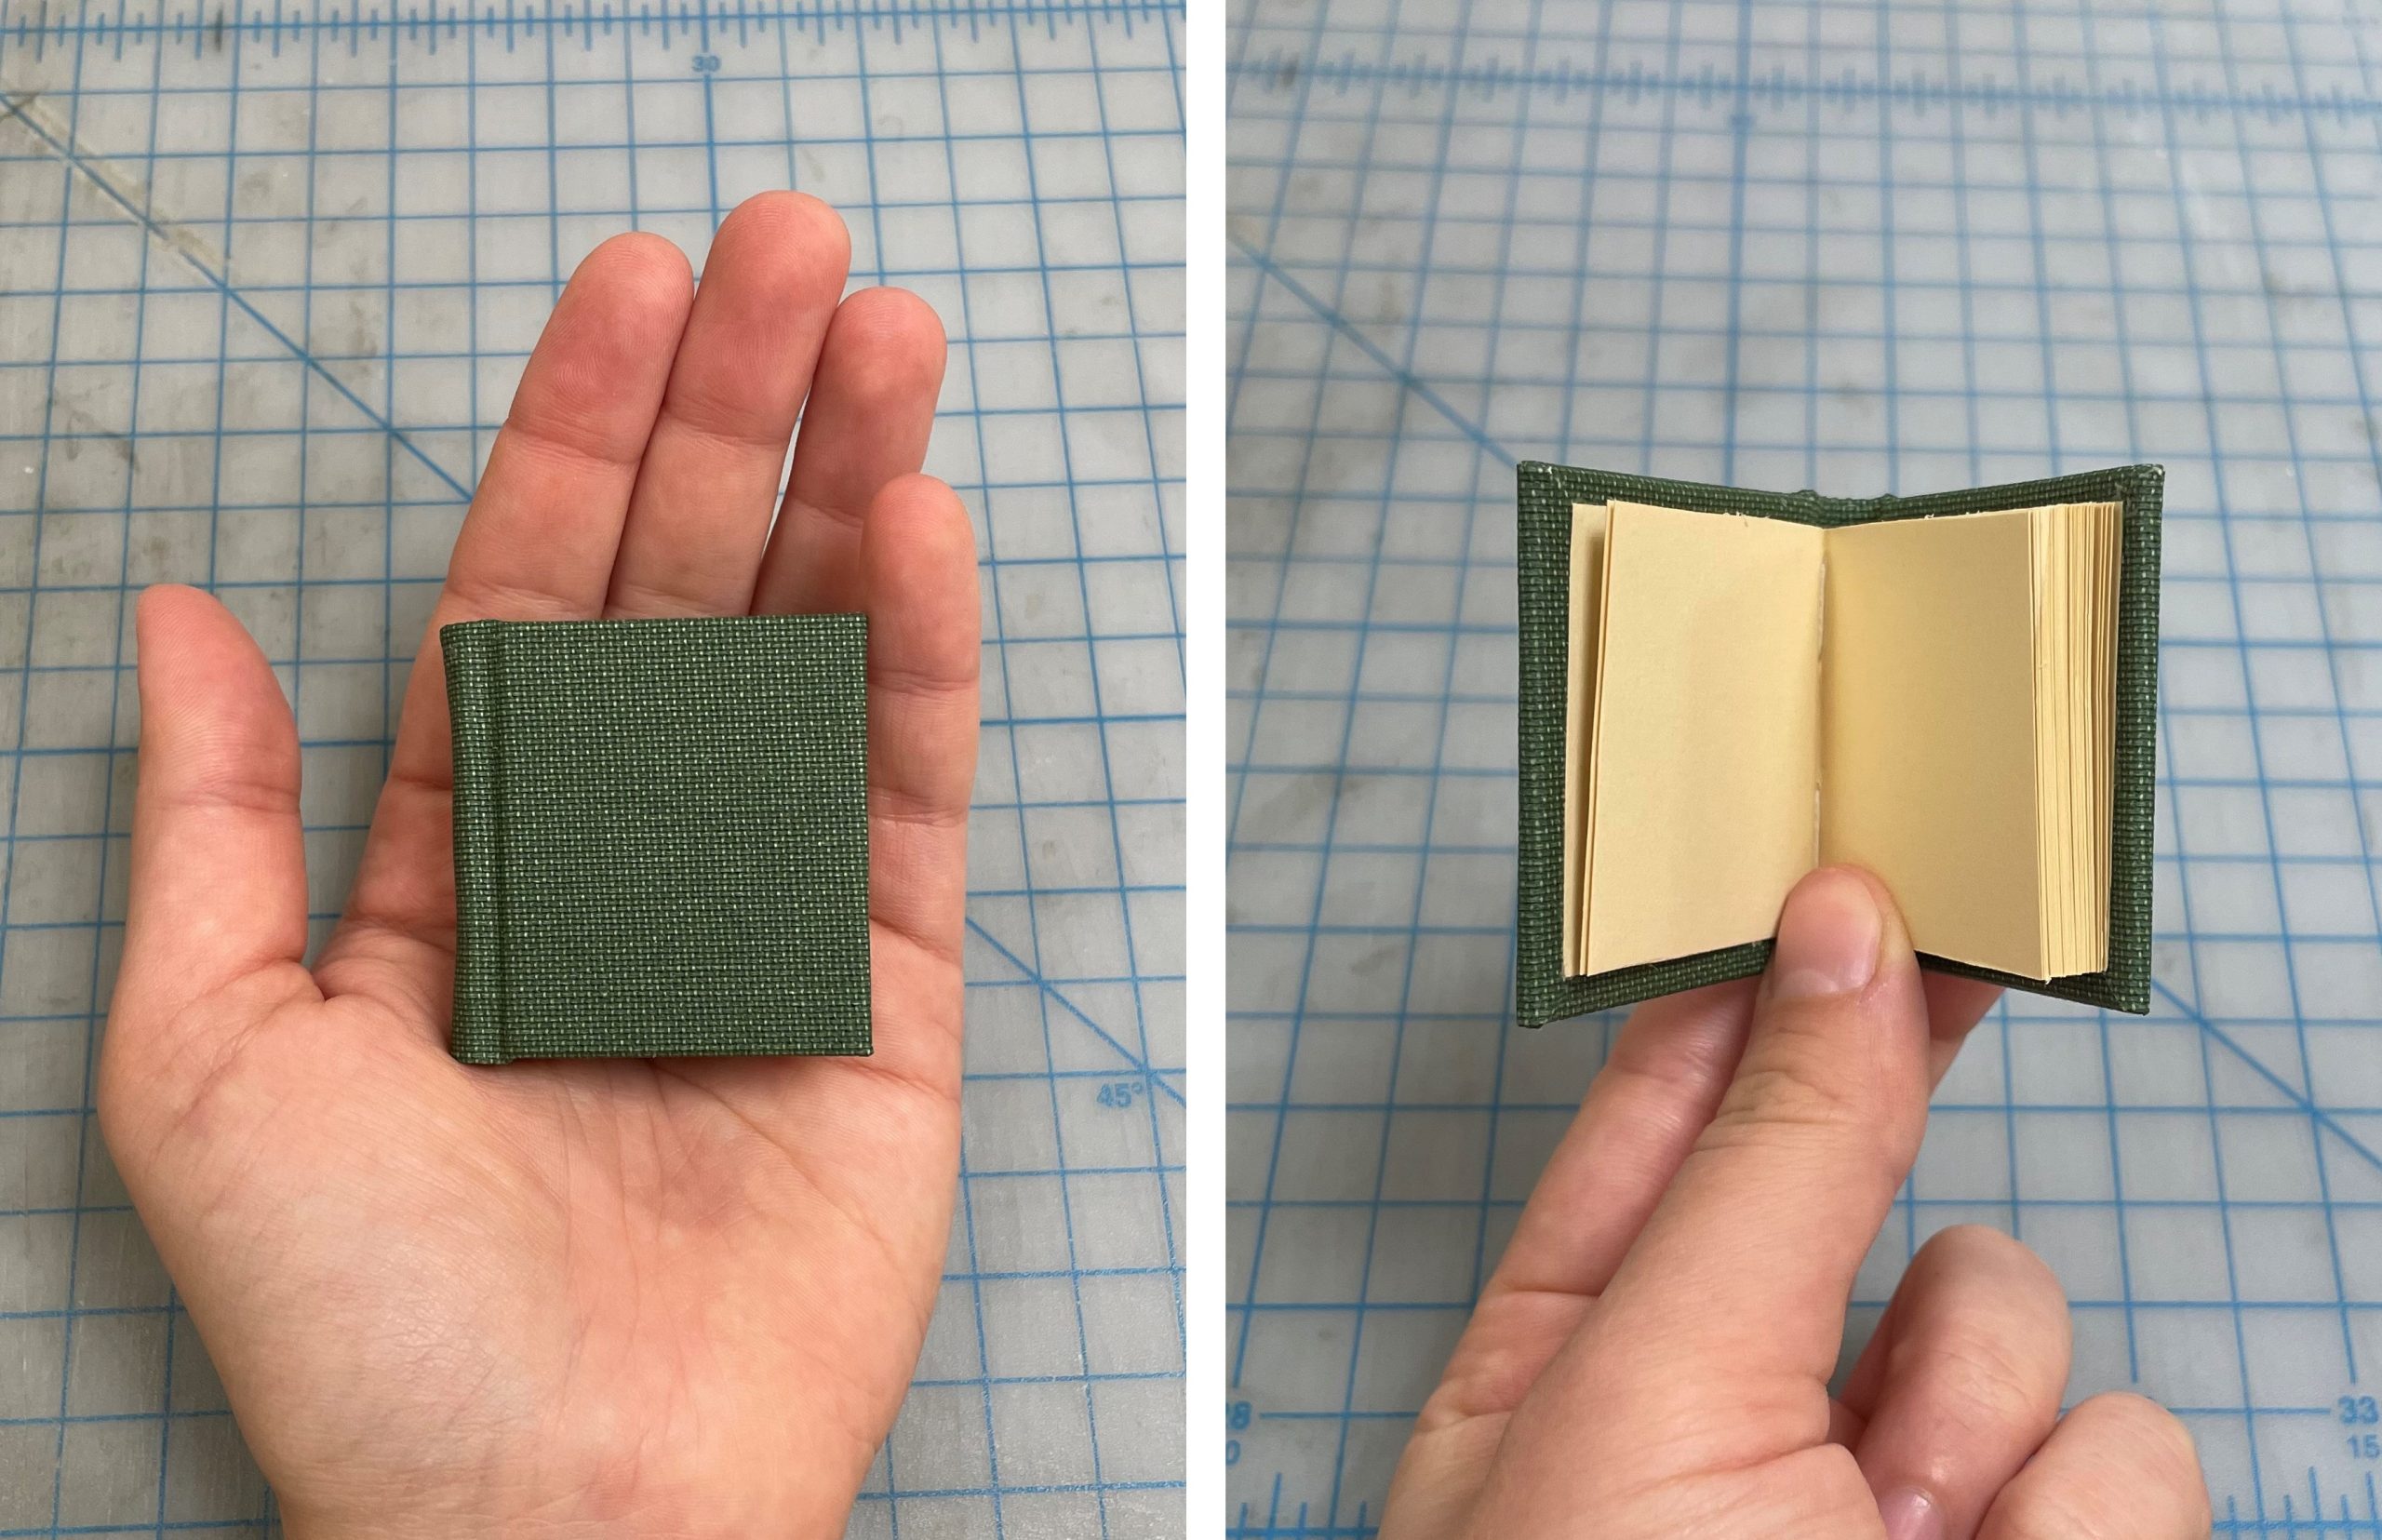
But once it was dry, the book was done!
It certainly fits in much better with a press its own size.
You can check out this tiny press with its tiny book, along with the rest of the great displays my colleagues put together, in the exhibit The Library Uncovered: Behind the Scenes with Collection Services that is currently open to the public in the Jerry and Bruce Chappell Family Gallery in Perkins.