Category Archives: What’s In The Lab

An Artist Book in a Conservation World

Here at Duke University Libraries, we’re fortunate to have a stunning collection of artist books from all over the world. Just like a regular book, artist books can come in a range of shapes and sizes. Some, however, come in more unusual shapes than most, which in turn can pose some interesting conservation questions.

One such book is the “Oubey: Mindkiss” book.

The Art

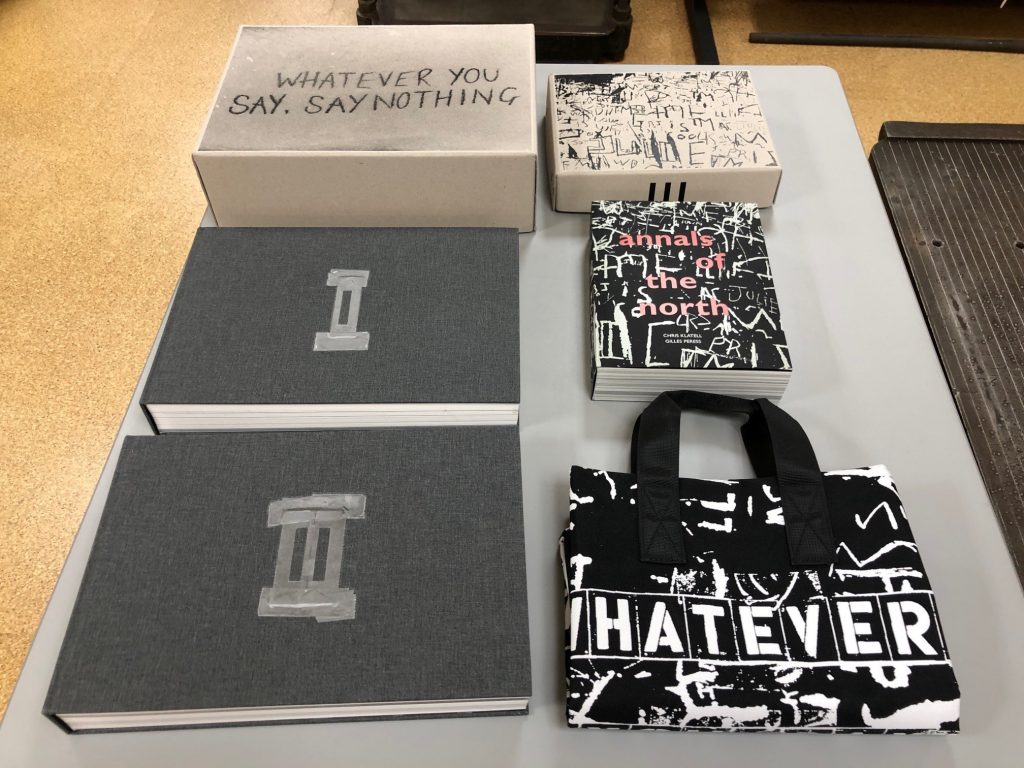
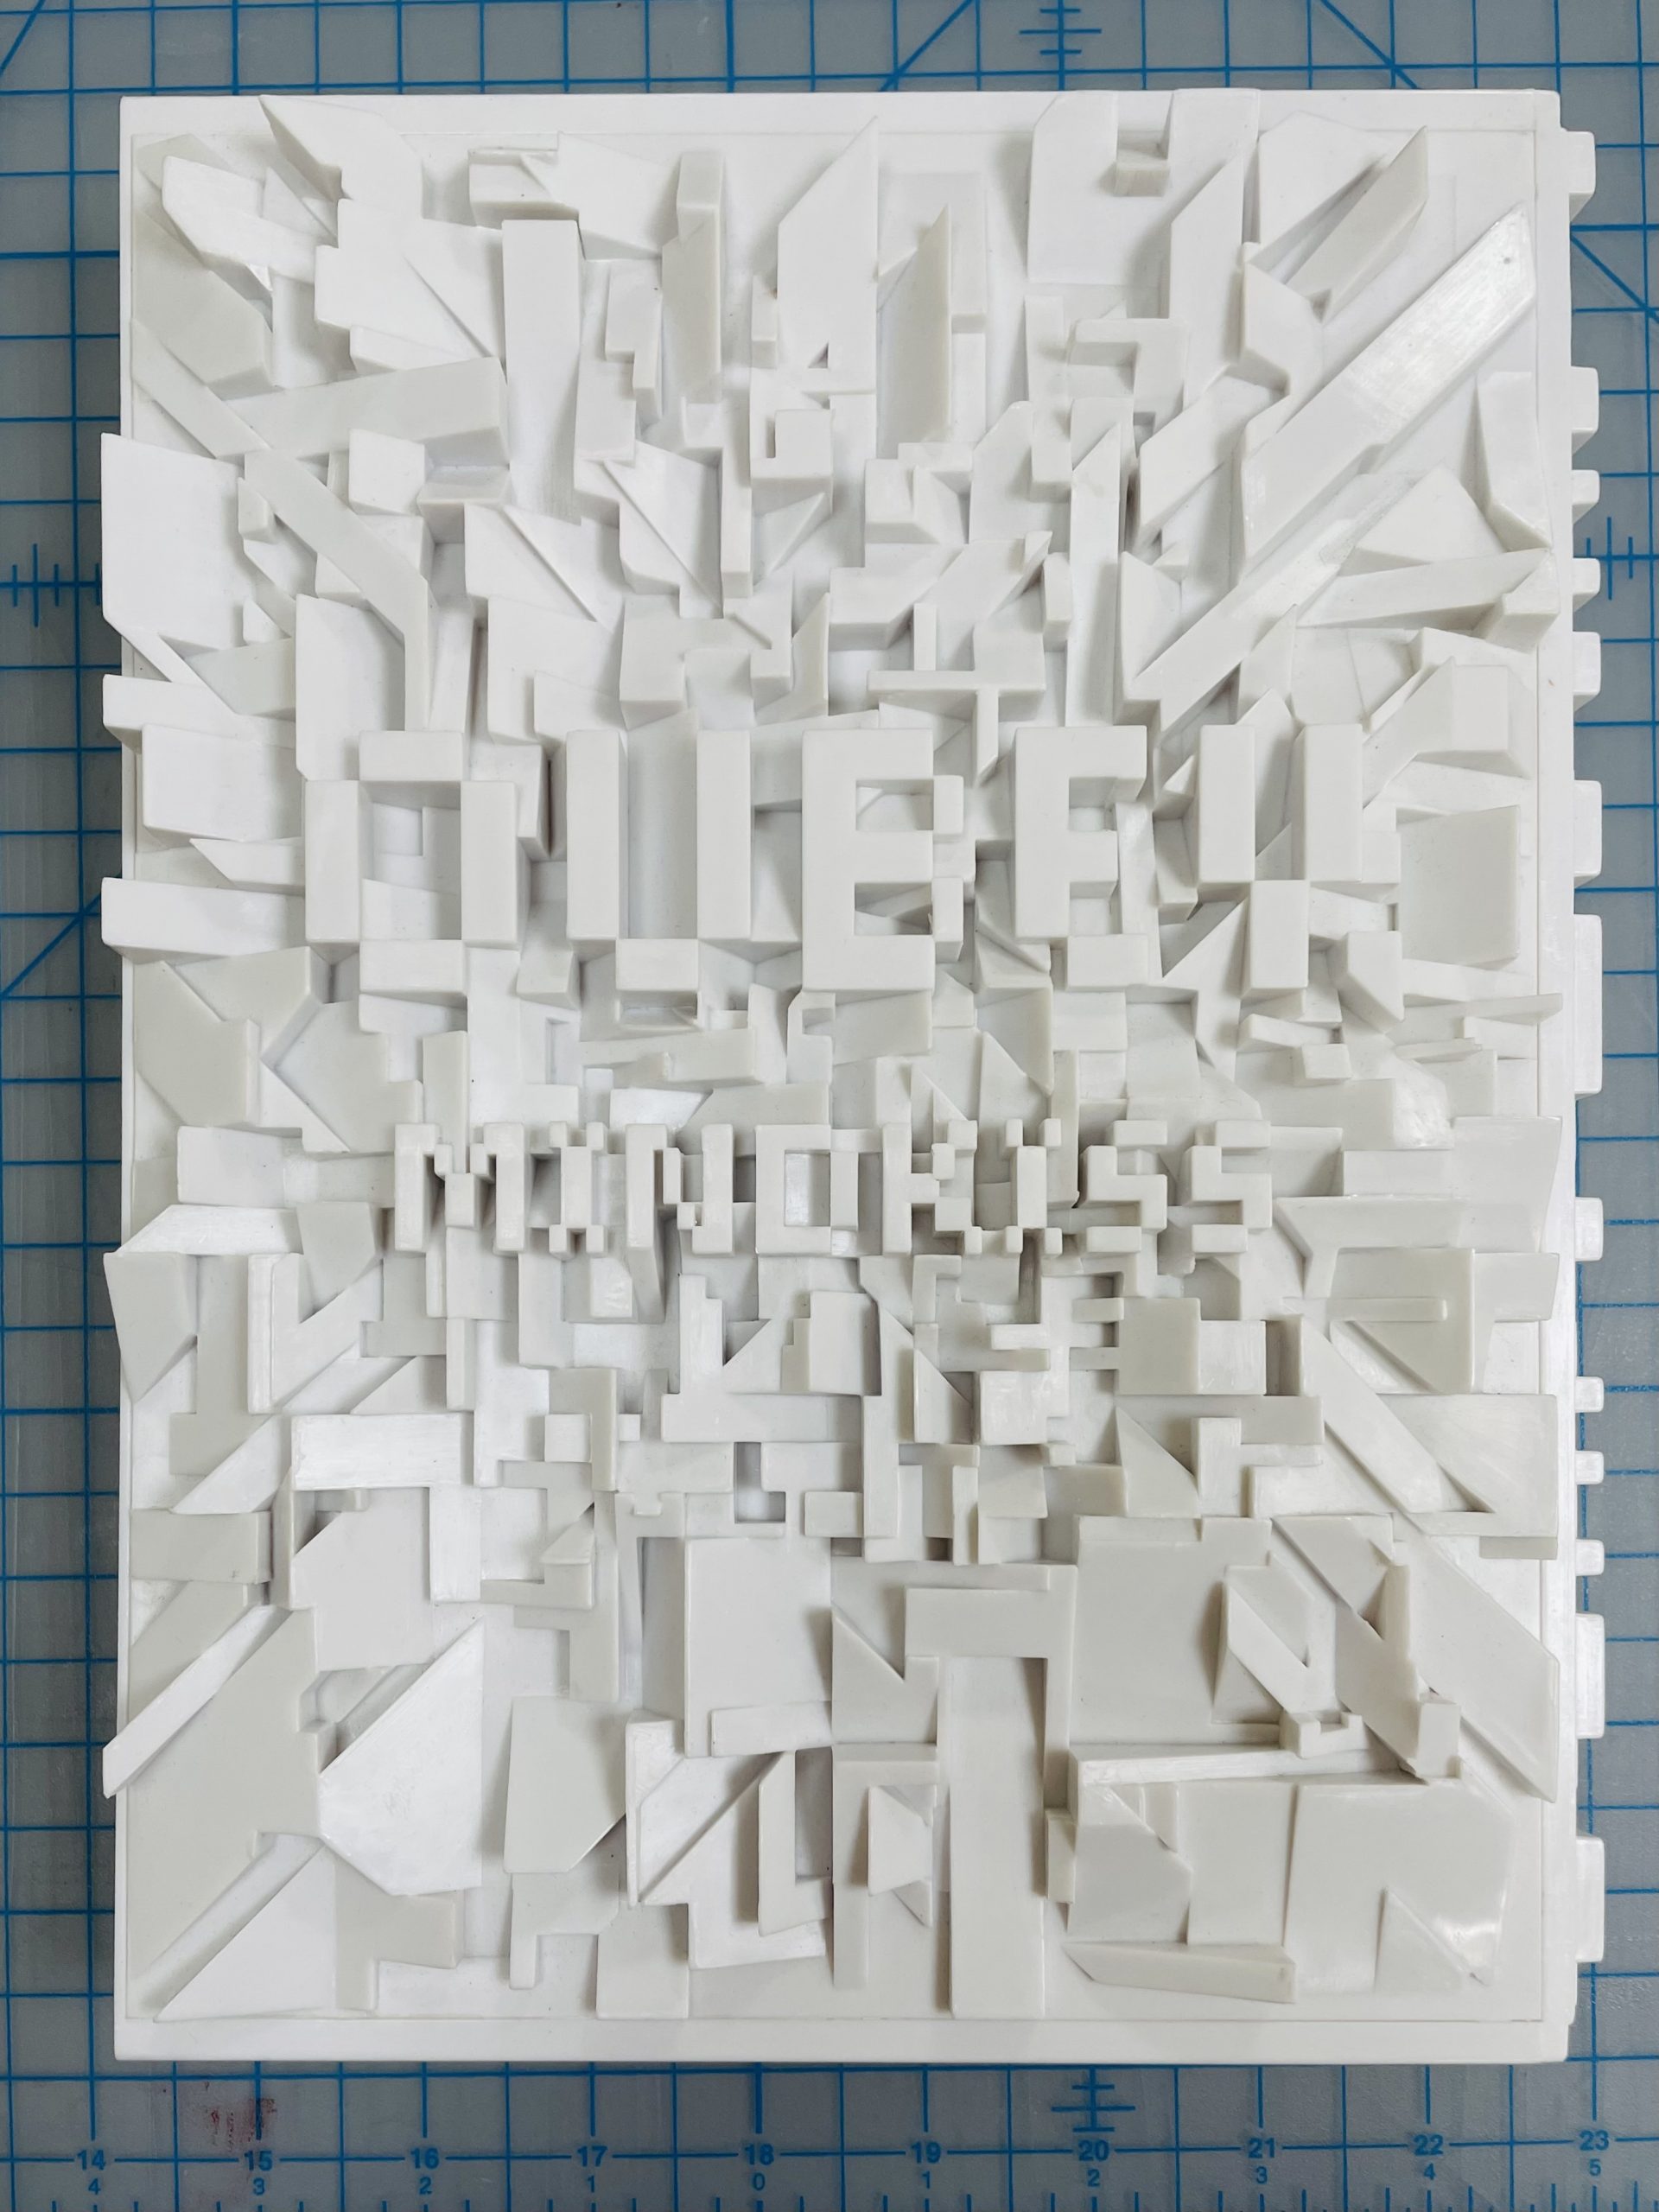
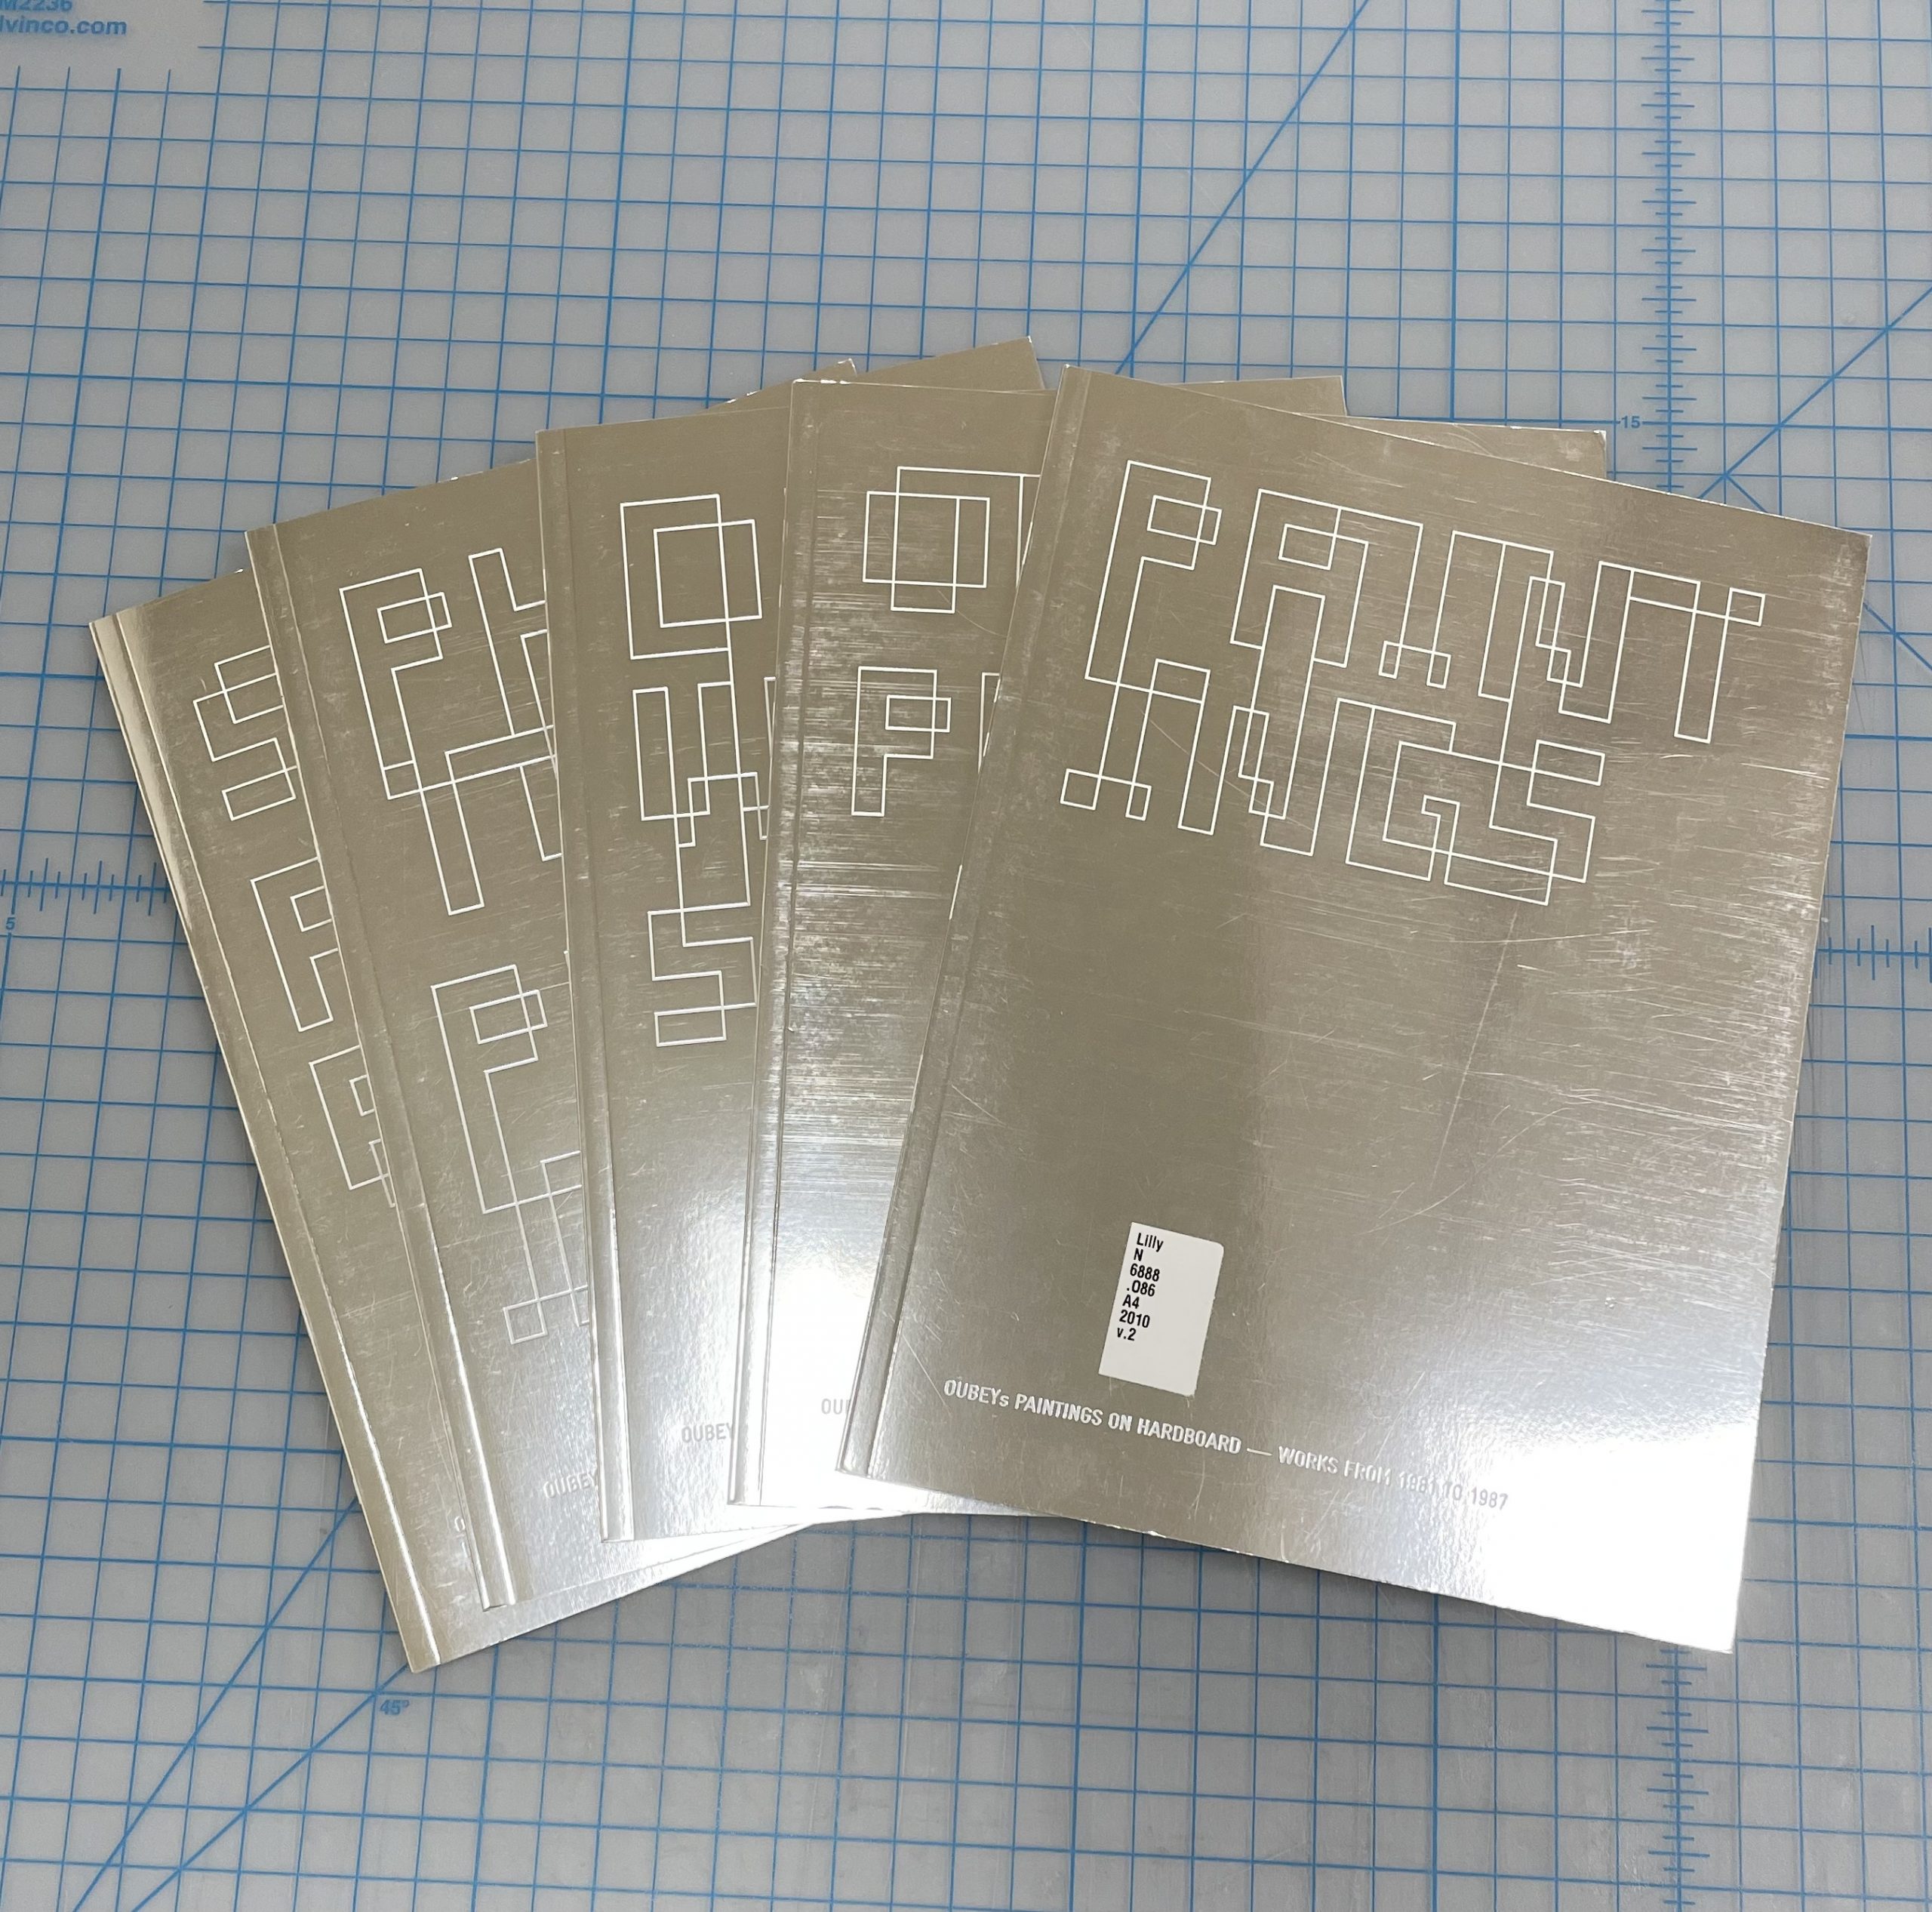
As you’ve probably noticed, this is not simply a book. “Oubey: Mindkiss” is made up of a sculptural slipcase containing five separate books.

Each book is devoted to the work of t late artist Oubey and is organized by the medium of the work or the time period the work was made.


The piece is clearly a work of art in itself. This is all the more evident by the fact that it has won multiple awards for its design. However, there are features of this item that have to be addressed from the view of a conservator, rather than one of an artist.

The Concerns

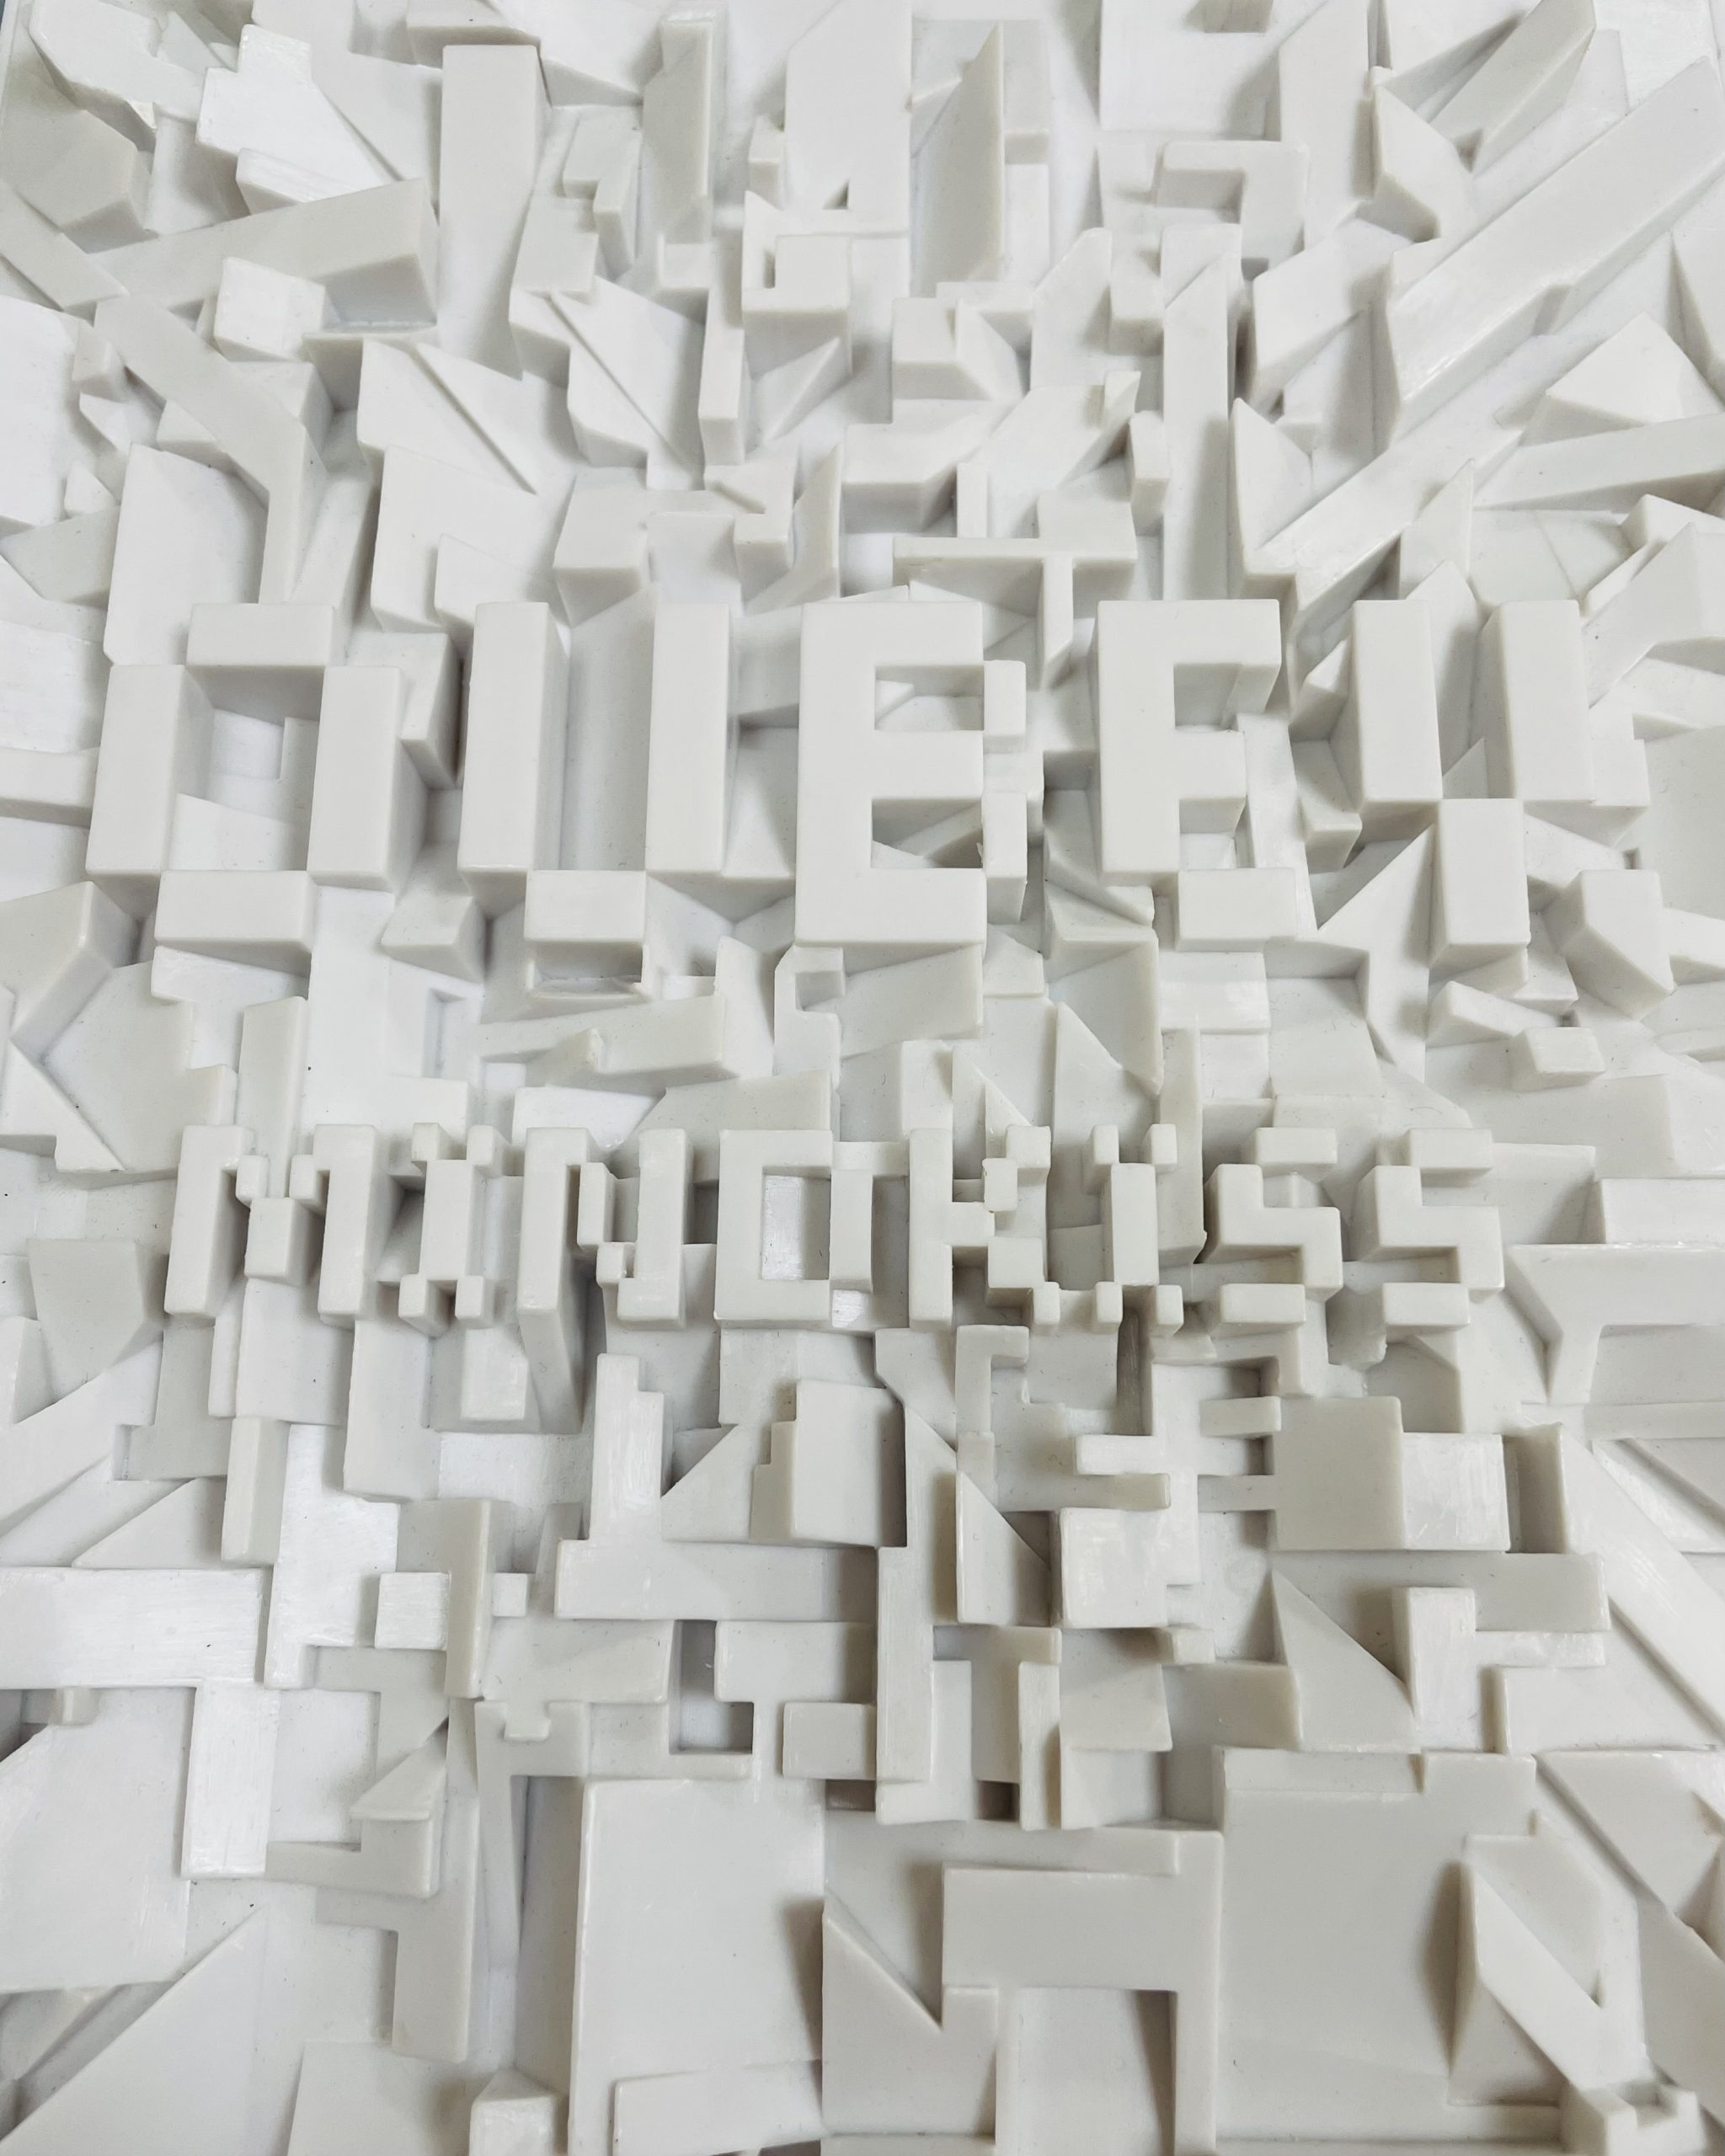
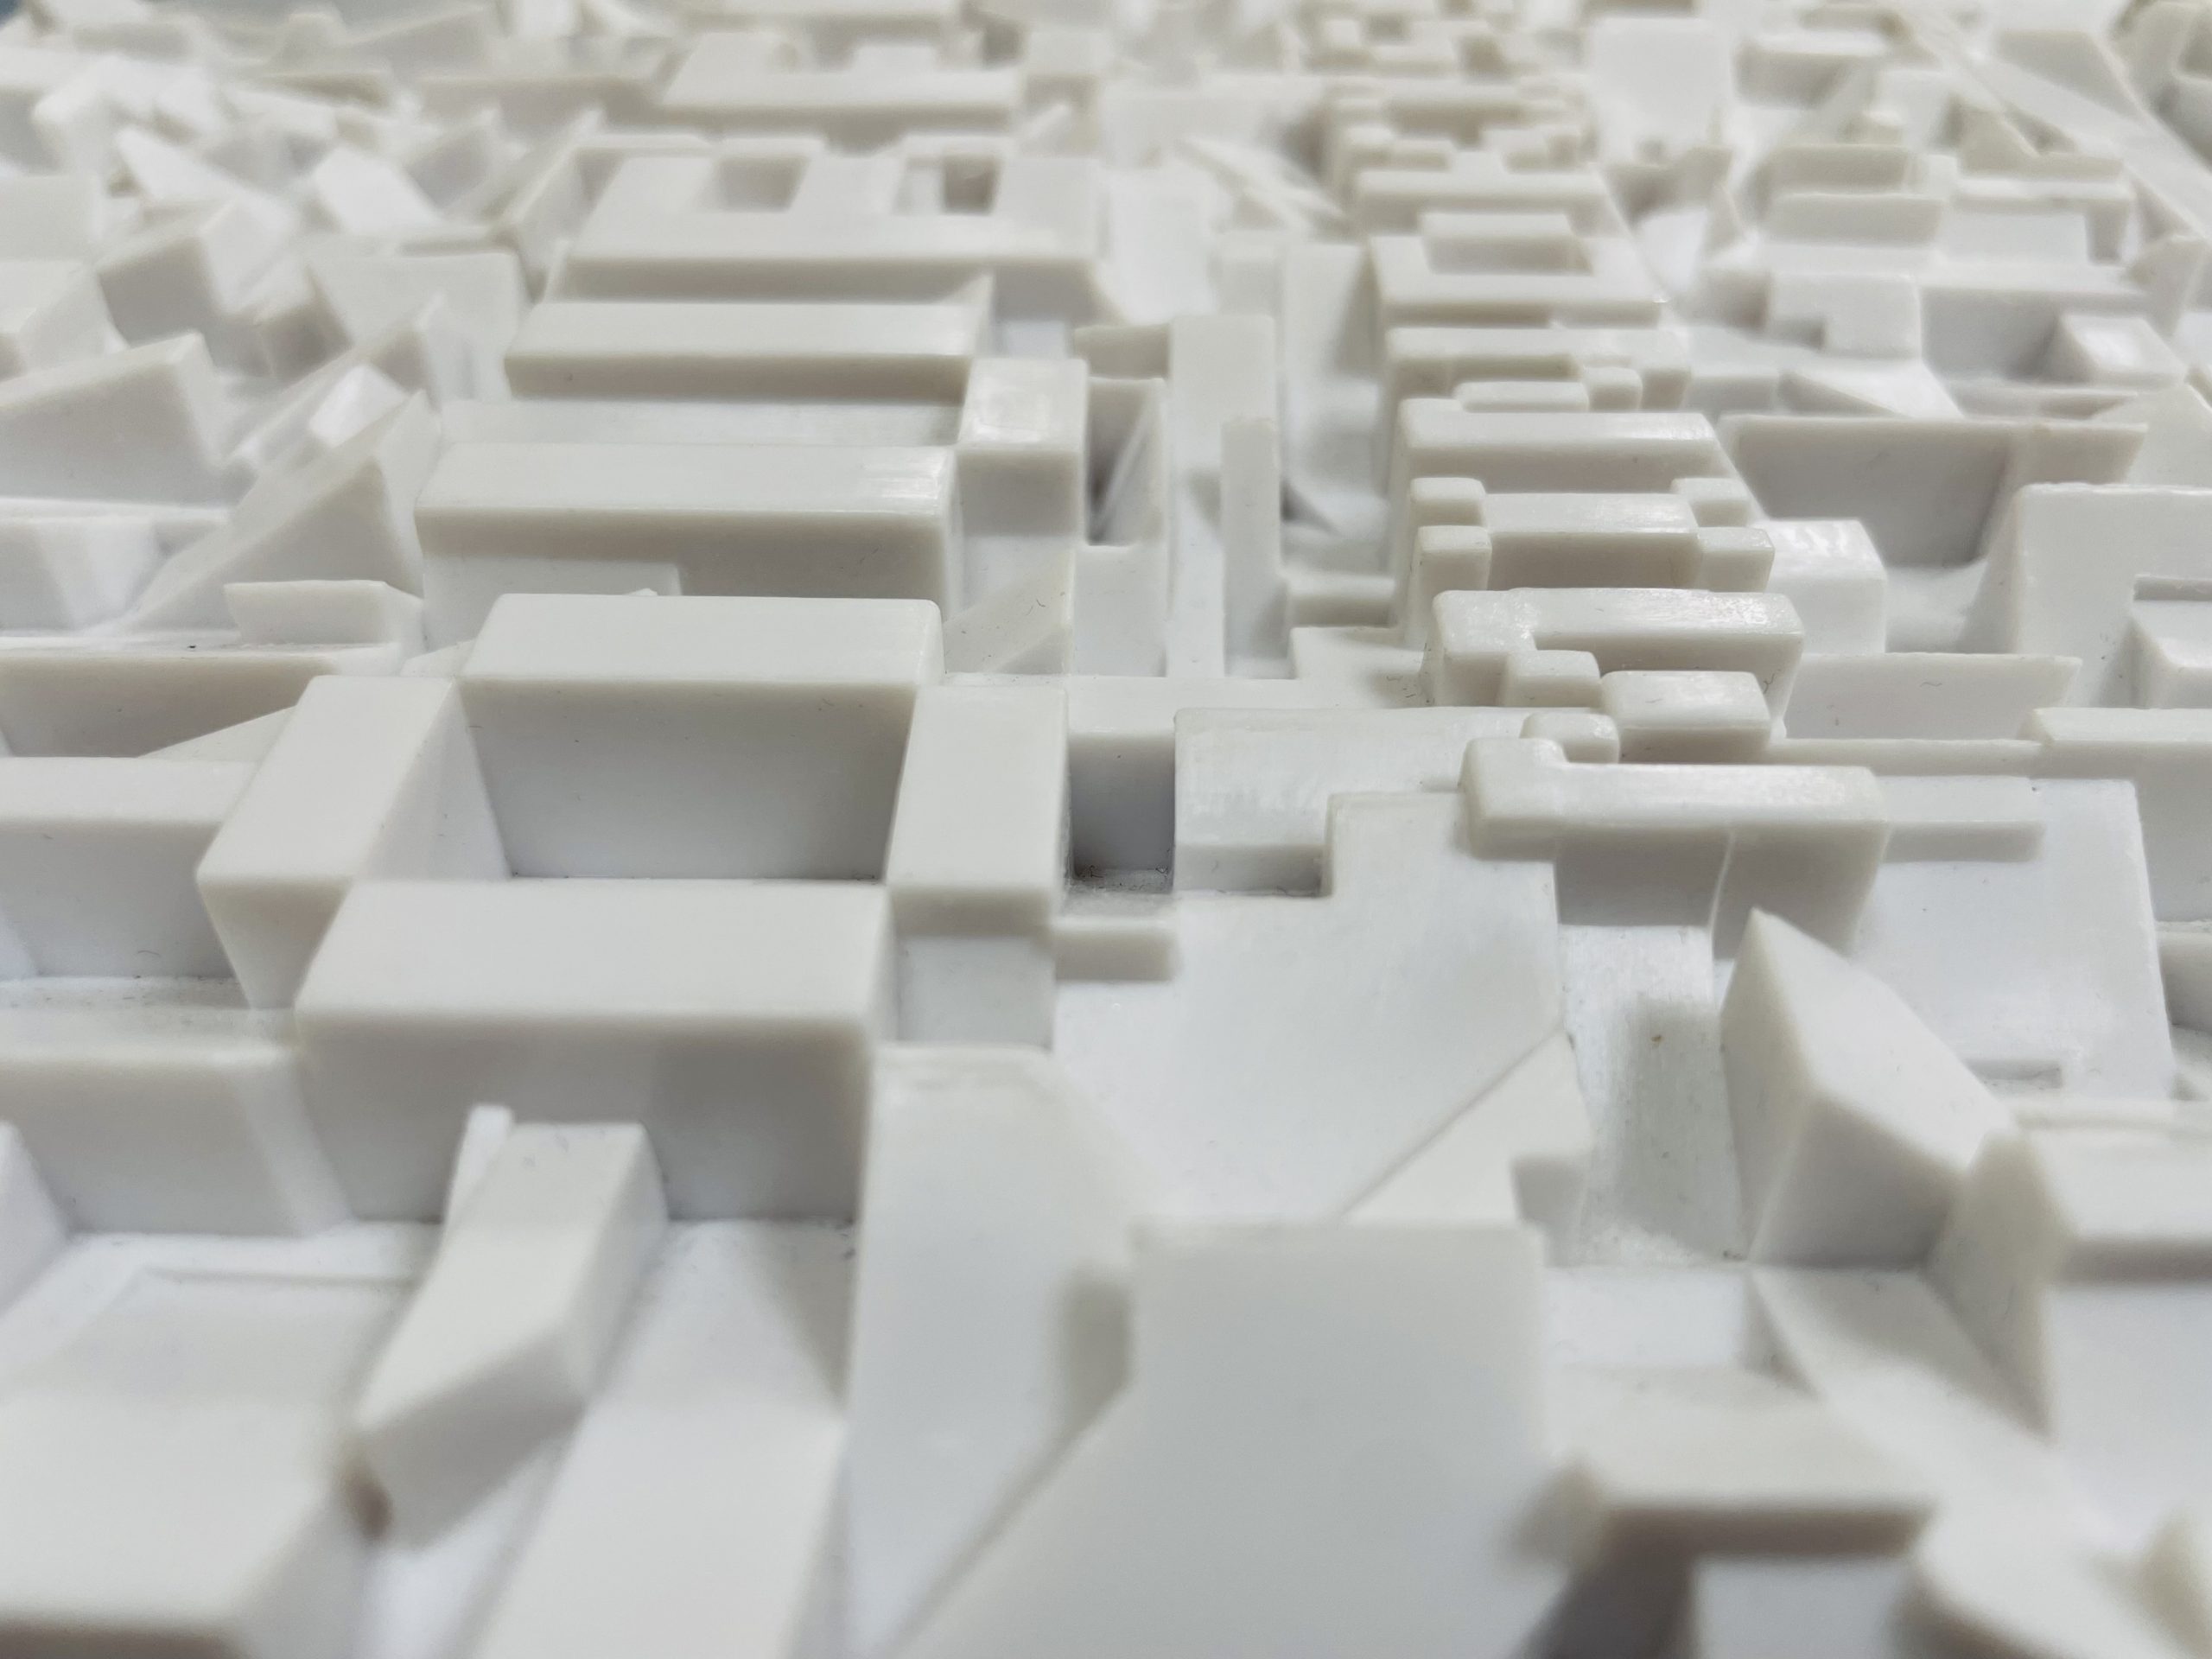
For one, the sculptural top of the slipcase consists of shapes and edges that are noticeably sharp. Pair that with the hard plastic material it’s made of, and you have an item that is bound to do some damage.

I am mostly referring to the damage the slipcase would do to any object placed beside it, but honestly this slipcase could probably hurt your hands as well if not handled carefully.

One of many pointy bits

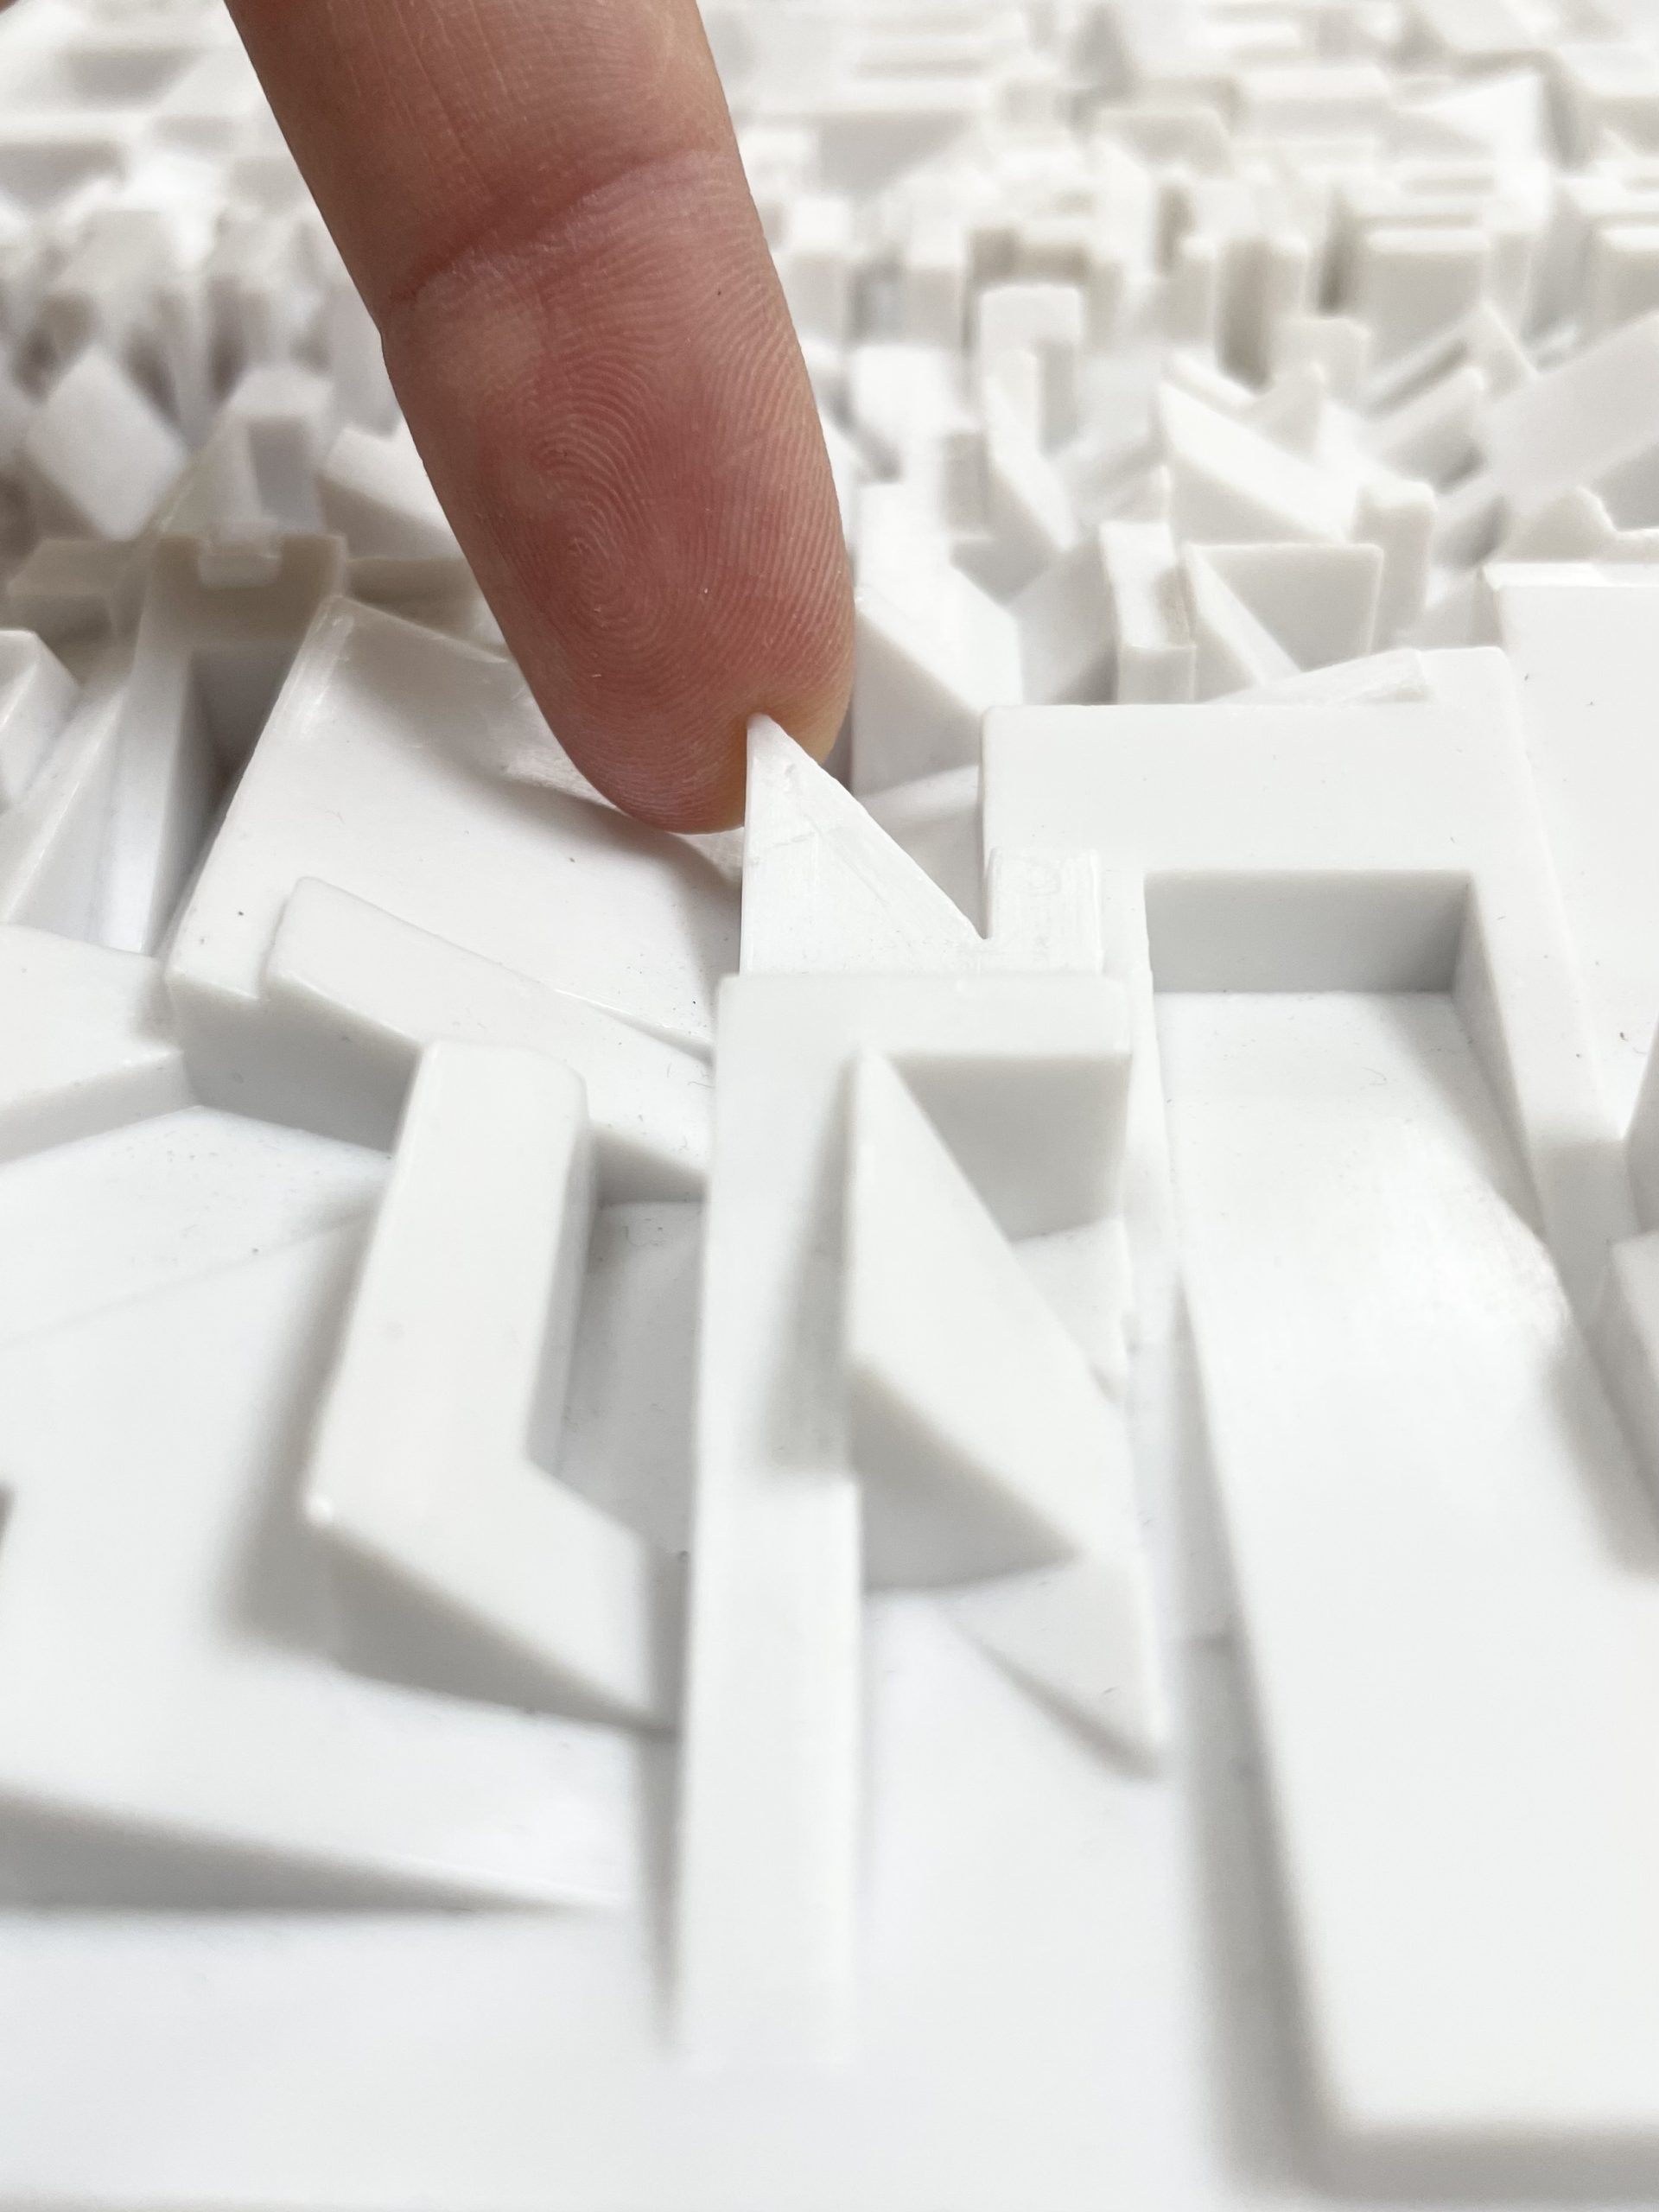
If this item were to sit as is on a shelf next to other items as normal, there is no way the stiff plastic edges wouldn’t eventually catch, snag, or tear the item beside it.


Another common problem with slipcases is how easily the books within them can fall out. These books are no exception due to the slippery, metallic material they are covered with. That combined with the equally slippery plastic case means the books have an especially high risk of sliding around.

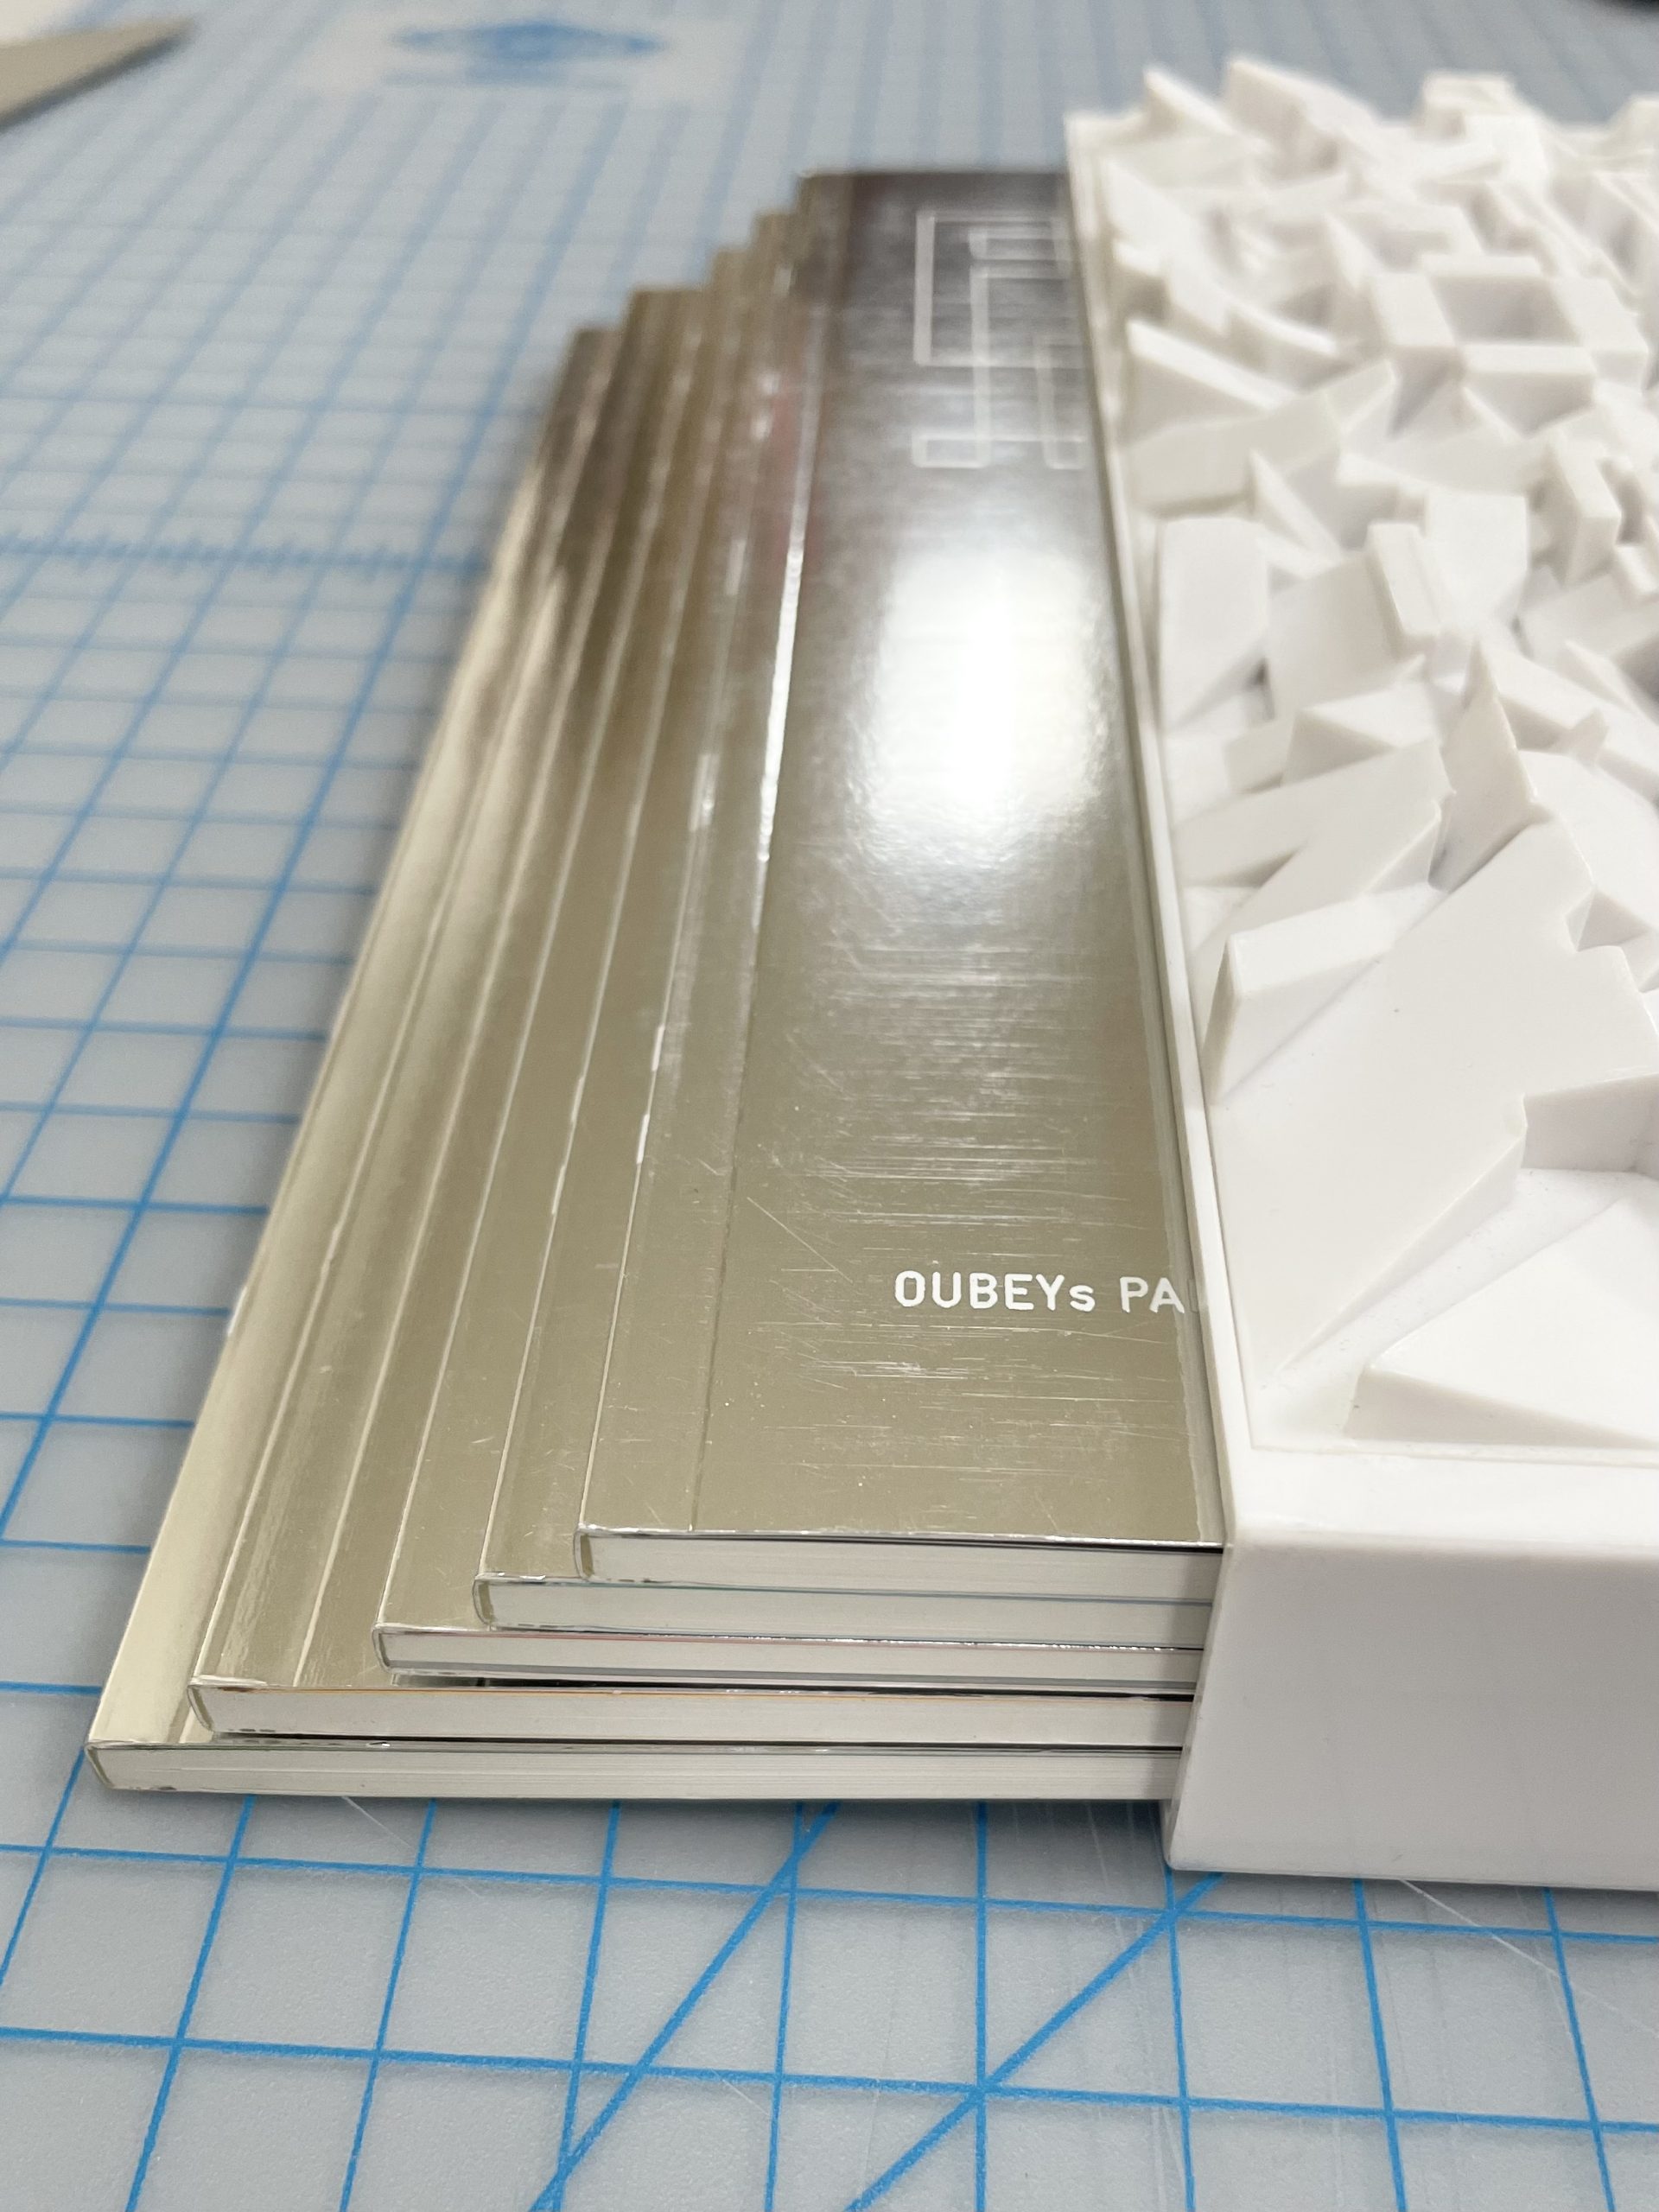
Additionally, the plastic of the slipcase might be doing damage to the books inside of it over time. Although the books are still reflective and metallic (I provided proof in the following photo), if you look at the covers more closely you can see many horizontal scratch marks across the surface of each cover.

Still a decent mirror

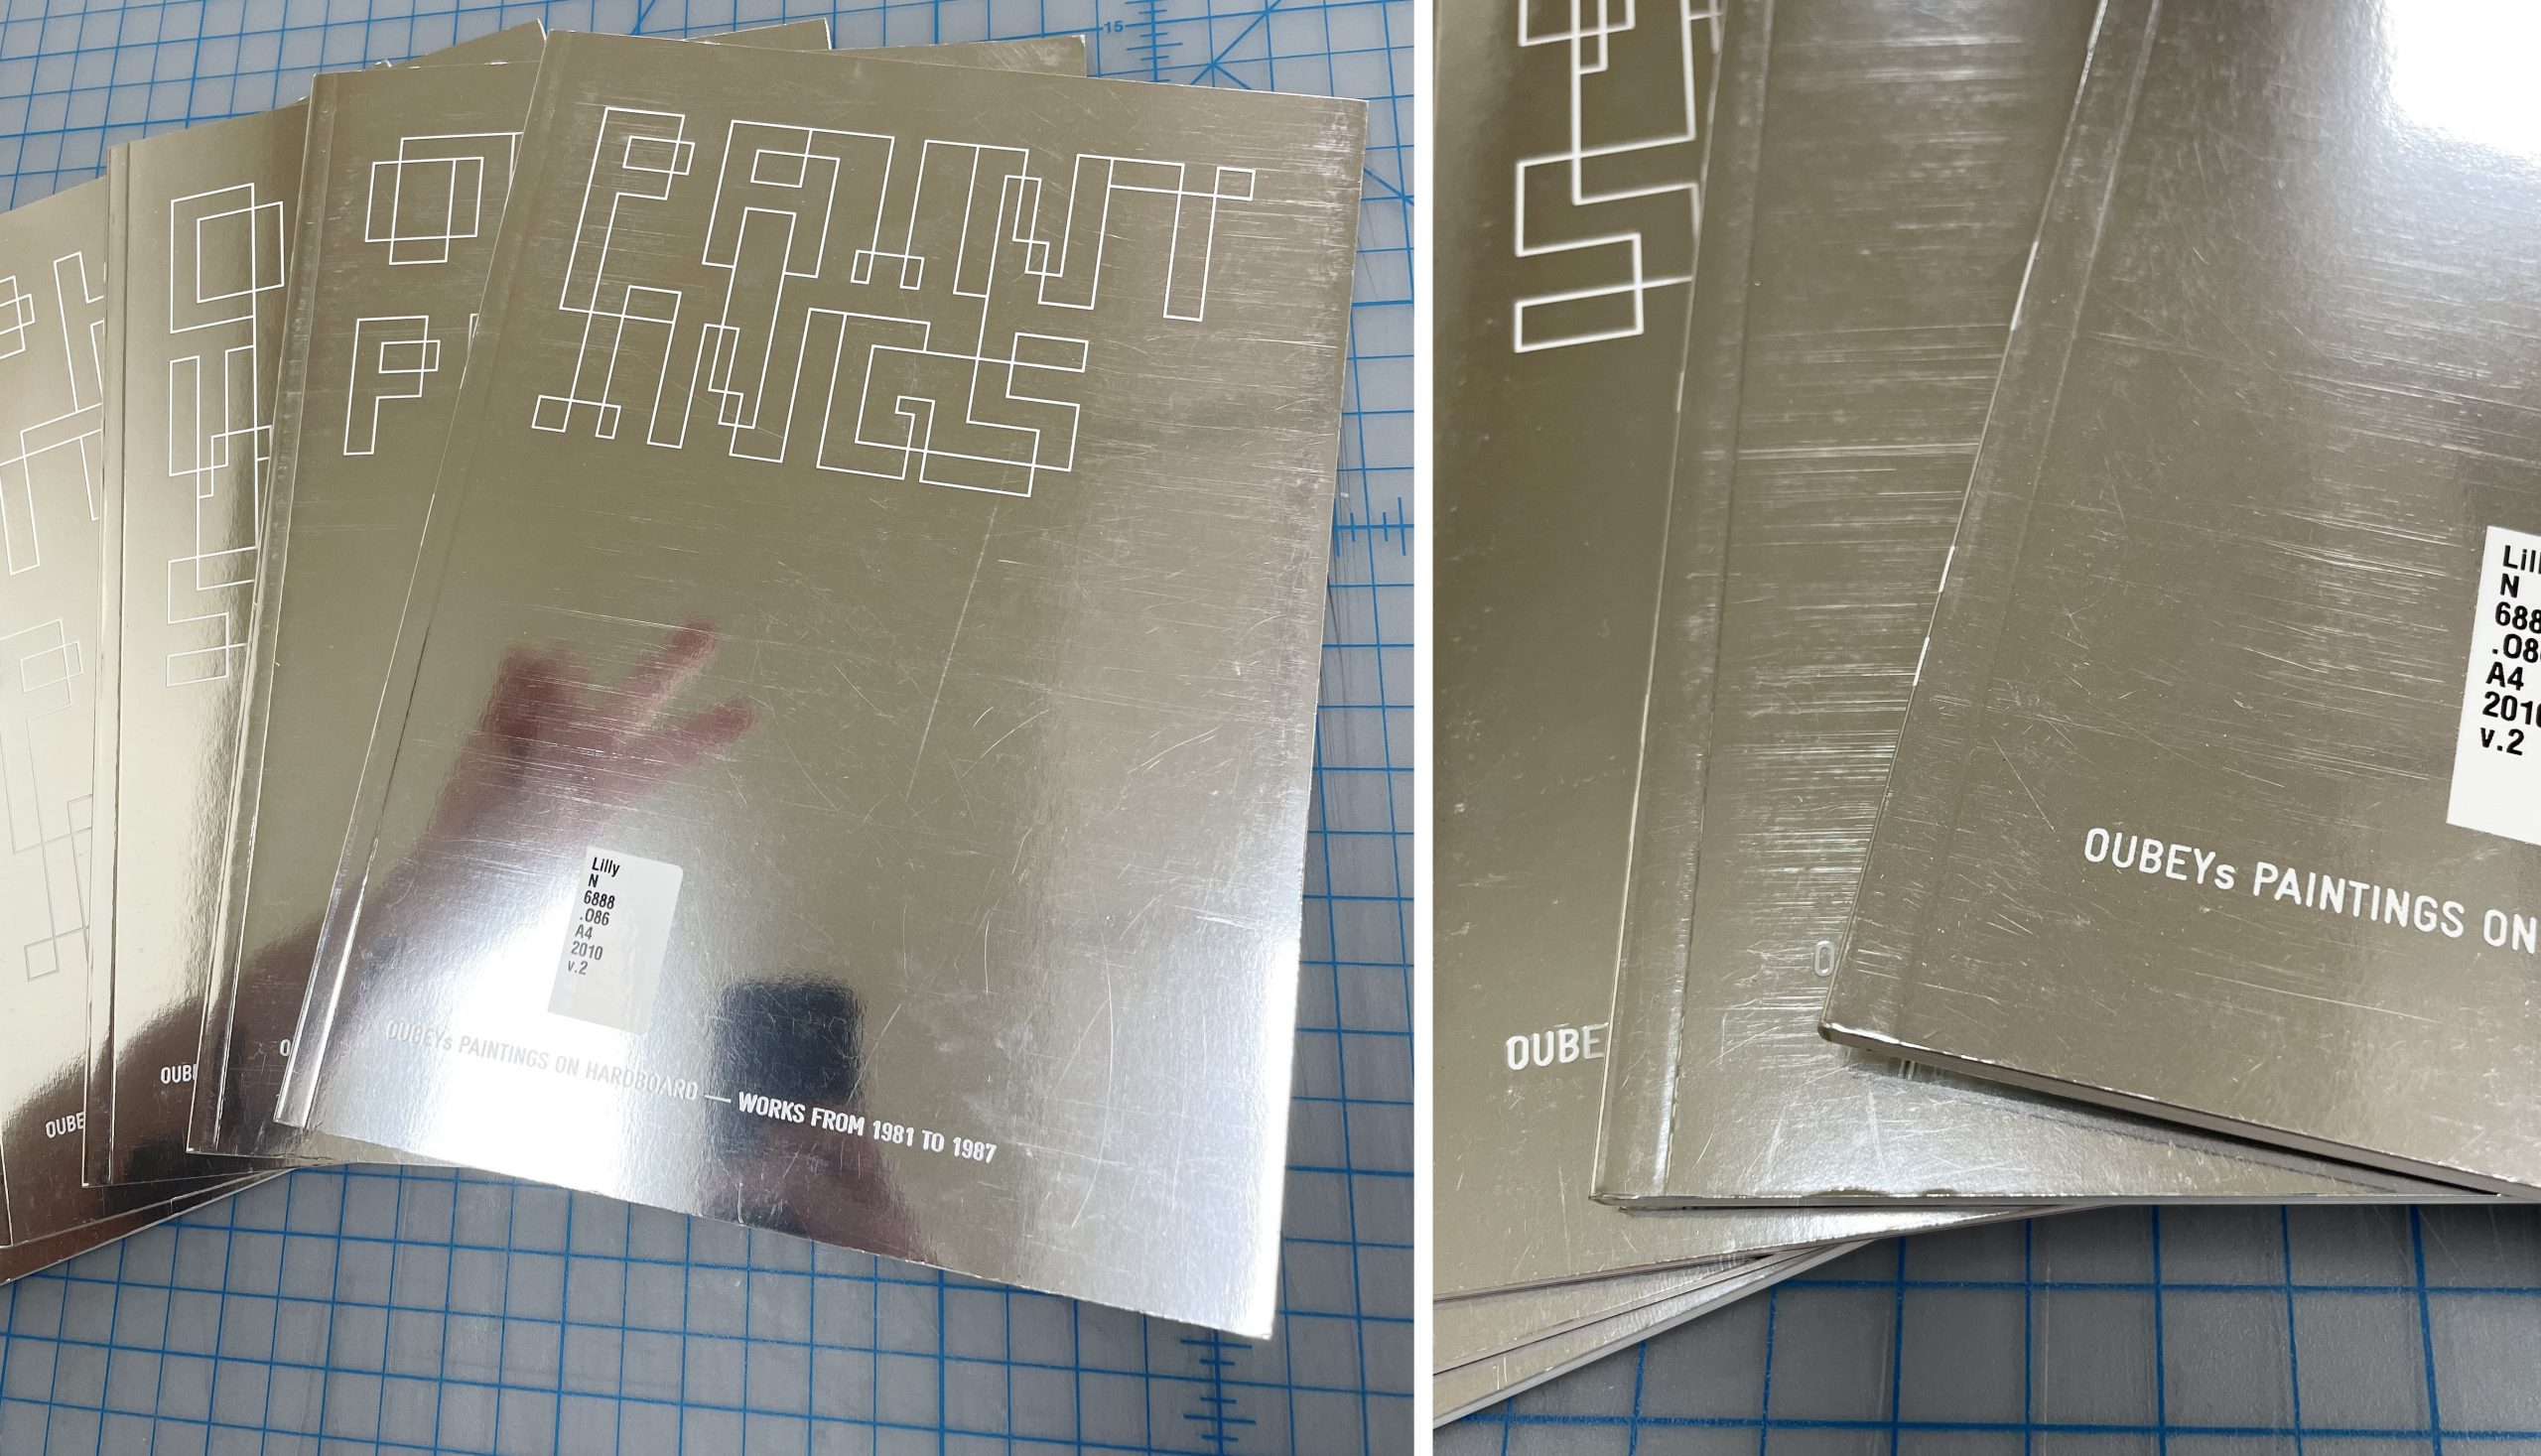
This observation is more of an assumption than a proven fact, but my guess is that these scratch marks are the result of the repetitive in and out motion of the books when they are removed or inserted in to the slipcase. The books fit rather snugly into the case, so they could be rubbing up against the inside whenever they move.

So, what can a conservation specialist do?

The Conclusion

Unfortunately, I can’t fix the issue regarding the covers of the books. Even if I knew how of a way treat metallic coatings (which I certainly don’t), something would still have to be done about the material of the slipcase rubbing up against the covers in the first place. An extreme solution would be to refrain from taking the books out of the slipcase at all, but then future readers would lose access to a significant portion of the information this item has to offer.

On a more positive note, something can be done about the nature of the slipcase. Luckily that solution is simple. We just make a box for it.

Does it feel a bit like hiding away a piece of art? Sure. However, as a library, one of our priorities is maintaining our collections while providing access to them. Making a box will protect our collections while also insuring that “Oubey: Mindkiss” is safer to handle for future patrons. And that’s a win for everyone.

Hot Property

By Rachel Penniman, Conservation Specialist

Back in early 2020 Henry gave a little peek into a project I was working on. When four architectural drawings of the Benjamin N. Duke House on 5th Avenue in New York City were acquired by the Rubenstein Library they were removed from their frames in order to incorporate them into the Semans family papers. After the drawings were removed from their frames the staff in the Rubenstein Library Technical Services department found they had been mounted directly onto a non-archival foam-core backing. The drawings were sent to Conservation to see if we could remove the poor quality board.

Drawing mounted to foam core before treatment.


These drawings were created by a reproduction process called aniline printing which was used in the late 1800’s to the early 1900’s and is identifiable by the distinctive green background color and blueish-black lines. These prints are not on paper but on drafting cloth; a cotton or linen fiber fabric that is heavily starched and rolled to give a smooth surface. Aniline prints fade quickly with exposure to light and are sensitive to heat, humidity, alkalinity, and a number of solvents including alcohols. The starches and additives in the drafting cloth can also be very sensitive to heat and water, and the acidic process of aniline printing degrades the cloth over time making it fragile. So my toolbox of conservator tricks to remove the backings was really limited: no heat, no humidification, and few safe solvents.

I could tell there was another layer between the foam core board and the architectural drawing but it was hard to tell what was going on back there. The backing board was attached with long 2” wide strips of a very sticky, waxy adhesive. I managed to separate the board by hand, lifting it away with a thin spatula and discovered something I have never seen before.

Back of drawing after foam core removed and contact paper revealed.

The entire back of every drawing was covered with big sheets of cream colored, self-adhesive plastic like you might use to line your kitchen shelves. It’s commonly called contact paper, though there’s nothing paper about it. The plastic used in these products is usually polyvinyl chloride which degrades very quickly and destructively over time so it needed to be removed before it caused further damaged to the drawings. Although the adhesive on this product is weak in order to allow you to lift and reposition it during installation on a kitchen cabinet, the drafting cloth was too fragile in many places to just peel it away. I needed to find a way to more gently remove the contact paper but my options were limited. After a lot of solvent testing and experimentation I found that timed application of a small vapor chamber of solvent would soften the adhesive on the contact paper enough to gently lift it away without leaving an adhesive residue behind and without damaging the print or the drafting cloth.

Contact paper being removed with solvent chambers in a fume hood with a pile of removed contact paper on the right.

Working slowly across each drawing I softened the contact paper backing and gently peeled it away to reveal lots of self-adhesive tape had also been applied directly to the back of the drawing. This object was like an onion: full of layers! Some of the tape came off along with the contact paper but the rest I removed with a small spatula and a crepe eraser. I then repaired the tears with a very thin, green toned archival paper. Whoever put the tape down was heavy handed and I often found there were no tears or damage beneath the tape at all.

Many pieces of tape revealed below the contact paper during treatment.


The same area with all the contact paper and tape removed and new archival mending in place.

This treatment was a good example of how sometimes less is more. Whoever applied hundreds of inches of tape, layers of contact paper, and huge areas of sticky adhesive to attach foam core backing board surely thought they were helping to protect a valued item. Instead they created a mess that took weeks to undo.


Diagram of the many layers in cross section.


Front of drawing after treatment completed.


Back of drawing after treatment completed.

The best part about removing all of those layers was revealing a manufacturer’s mark printed in pale purple ink on the back that reads:

Copied by
Peerless Blue Print Company
122 East 14th
New York
Phone 168-18th

This mark helps us to date when and where these drawings were created and would have been lost if all those layers weren’t removed.

Manufacturer’s mark previously covered by all the layers.

The property shown in these historic architectural drawings has recently been restored and is now on the market. The 8 bedroom, 10 bathroom, 20,000 square foot home which is directly across the street from the Metropolitan Museum of Art can be yours for just $80 million. Hopefully it’s not also held together with tape and contact paper.

https://www.zillow.com/homedetails/1009-5th-Ave-New-York-NY-10028/143156846_zpid/


Handsome Residences of Durham

by Rachel Penniman

We recently got this 1881 map of Durham in the lab and spent time comparing old streets and buildings to what’s currently on those locations.

We were especially interested in the large plot of land on Dillard Street owned by Julian Carr. The map shows many little winding paths on the property.

We wondered if it was a park or a cemetery, but no, it was just a huge personal estate. We found some great information on the Open Durham website including pictures of the beautiful original homes built on that site.

https://www.opendurham.org/buildings/waverly-honor

Waverly Manor (Courtesy Durham County Library, via Open Durham)

The original large homes are long gone, replaced by a number of commercial buildings in the 1920s, then a surface parking lot in 2008, and now a large hole in the ground.

A mixed-use development is currently planned for the block. Likely not as handsome as some of the previous structures, but at least a residence once again.

Hogarth Gets a Spa Day

For the last few months, I have been working on cleaning and stabilizing a very large (25″ x 19″) and fascinating book.

This binding contains a collection of  83 engravings, in various sizes, by William Hogarth (1697 – 1764). This item was formerly owned by Frank Baker (1910-1999), a faculty member at Duke. Hogarth was an English artist known best for his satirical works depicting morality and  social criticism. These works were first executed as paintings and then sold as engravings by subscription. The prints are remarkable and capture so many small details of English life in the 18th century. Interestingly, Hogarth’s work was so widely pirated that he fought to obtain copyright protection and the Copyright Act passed by Parliament in 1735 is known as the Hogarth Act.

In order to make these prints available to patrons, the book needed quite a bit of cleaning and mending. Several of the pages at the front and back were detached.

Before and after surface cleaning

The paper was so covered in surface grime that your fingers would become black from just turning pages, so I spent several weeks just surface cleaning everything. The resulting change was pretty dramatic.

With the tears along the edges mended, and the loose sheets reattached, this items is a little less daunting and safer to handle.

Many of the prints are large enough that they are simply sewn into the binding, but the smaller prints are mounted at the corners to larger sheets. Some of the smaller prints had become detached. Only a few of the prints in the volume have hand-applied color like plate 5 from ‘A Rake’s Progress‘ (above).

Loose prints were reattached with wheat starch paste.

During my initial review, I thought that the first  of four plates in the Election series was torn along the top (or gutter of the binding).

Upon closer inspection though, I discovered that the Election plate was whole – this torn stub was from something else.

Dr. Baker’s typewritten inventory doesn’t list another print in this location and the numbers penciled on each page aren’t interrupted, so it seems like this one has been missing for quite a while. Looking at the details of exposed wooden rafters that are depicted, this fragment could be from one of Hogarth’s more famous works, “Strolling Actresses Dressing in a Barn”.

It is hard to know for sure, but we will be noting the fragment’s location in the catalog record.

Apart from mending and reattaching the prints themselves, I also spent some time flattening the original interleaving. The binder had included sheets of thin, laid paper by affixing them to the verso of each leaf using dots of red wax. The interleaving had become very badly creased, torn, and in some cases was missing entirely.

During treatment, I flattened and repaired the interleaving as much as possible. New loose interleaving sheets were  added for the openings where original interleaving was missing or had major losses.

The top engraving above, titled “Tailpiece, or The Bathos”, is Hogarth’s last engraving, published just eight months before his death. It depicts the figure of Time exhaling his last breath among ruins. In the advertisements for this print that ran in the St James’s Chronicle for April 14, 1764, Hogarth wrote that it should “serve as a Tail-Piece to all the Author’s Engraved Works, when bound up together”.

The previous owner who had these prints collected and bound honored Hogarth’s wishes.

More Big Boxes

We have been on a Big Book Box roll lately. Last week you read about a boxing project for two large “boxed withs” (is that a real term in library land?). This week we bring you another multi-piece set that posed some challenges. “Whatever You Say, Say Nothing,” by Gilles Peress, consists of three books, two boxes, and a canvas bag. You can read more about this project and watch an interview with the author at Steidl Books.

Three books, two boxes, and a canvas bag on a table.
Prepare for boxing!

Artist books are often a challenge for shelving in library stacks. Rarely are they shelf-ready due to their materials or construction. How do you shelve a bag full of books? Do you separate the pieces for easier shelving and retrieval? Or box them all together to keep the items together? Did we mention this weighs a total of 27.5 pounds?

Time to box the boxes and bags.

We decided to take the boxes out of the canvas bag, and box all the parts in one enclosure that will include a label warning of the weight of the object. This makes it easier to shelve, and easy to put back together in its original form when it is used or exhibited.

All together now…

Now we need to find a bigger bin to send this over to Lilly Library. If your library has this title, let us know how it went to the shelf. We would be really interested in hearing about it.


A Tiny Press Calls for a Tiny Book

Over the past year, I’ve been working on an exhibit revolving around the work I do in Conservation Services and the Collection Services Division as a whole. As luck would have it, Beth has this wonderful miniature book press that fit perfectly into the display case I was in charge of designing.

But what is a book press without a book to press? With that in mind, I took this opportunity to make my first miniature book.

First, I made a tiny book block.

I left the paper longer than it needed to be so that I could weigh the pages down while I sewed it all together. Once that was done, I decided it would be nice to try and round the spine. This proved to be a bit difficult with the normal tools we use for rounding.

I felt I was more likely to just crush the entire spine with the hammer than actually round it. A Teflon folder made for a safer option for this tiny spine.

Next, I needed to trim the book block to a more appropriate size. I started to cut it with just a scalpel and a ruler, but as you can see that wasn’t really going well or looking particularly nice.

I decided instead to try to trim the book in a more traditional method. This meant placing the book block into a press and using a sharp, flat blade to cut across the pages evenly.

This was much more successful and I ended up with a nice and neat book block.

After that, I covered the spine with a Japanese tissue for strength. Then I added a textile spine lining as well as a paper lining for additional support.

Now I could make the covers, which ended up being the easiest part of this whole process.

The hardest part came next, which was casing the book block into the covers. Because the book is so tiny, it was difficult to make sure the book didn’t move out of place as I glued up the paper that would connect the book block to the covers.

I eventually managed to figure it out and put the book in a press to dry flat.

I have to say it looks a bit silly in the full-sized press.

But once it was dry, the book was done!

It certainly fits in much better with a press its own size.

You can check out this tiny press with its tiny book, along with the rest of the great displays my colleagues put together, in the exhibit The Library Uncovered: Behind the Scenes with Collection Services that is currently open to the public in the Jerry and Bruce Chappell Family Gallery in Perkins.

Hidden Print Waste

A lot of different materials go into producing a book’s binding and for centuries bookbinders have used pieces of broken or discarded books to produce new ones. We often find scraps of manuscript or print, on either paper or parchment, used as spine linings, as endsheets, or even as full covers for bindings (see images from the collections of Princeton or Library of Congress here). We often describe this practice as waste (manuscript waste, printer’s waste, binding waste, etc.). Some important texts have only survived because they were reused in this way.

While some examples of binding waste (like covers or endleaves) are immediately obvious, others are only revealed by damage. This early 18th century printed book came in for rehousing recently and shows some of the fascinating things that can be hidden beneath the surface.

In areas where leather corners have come off or the sprinkled brown paper sides have lifted you can see some text peaking through. The book itself is printed in Latin, but the waste used in the binding is in German. This edition was printed in Munich, so it makes sense that a contemporary binding would also include waste in German.

In addition to the mechanical damage to the paper covering material along the board corners and edges, there is also some insect damage along the faces of both boards.

The insects have eaten away at the first several layers of binding material, revealing many layers of print – sometimes in different orientations. It seems our print waste was not just used as a board lining, but the boards themselves are composed of many layers of print laminated together.

I am usually not excited to encounter an insect-damaged book, but in this case the bugs have created a rather beautiful object – almost like a typographic topographical map – and have revealed useful information about its production.

The Week in Conservation: We’ve Been Busy!

It’s been a busy week this week in the Underground. We hosted a tour for the Class of 1990, who had their 20th Reunion a bit late due to the pandemic.

Tour group listens to department head
Our first in-person tour of the new academic year.

We have a tremendous amount of mold recovery work in the lab at the moment. We have been drying and vacuuming materials pretty much non-stop for several weeks. There is no light at the end of the tunnel yet, but every page gets us closer.

vacuuming mold spores from paper
Vacuuming mold is both satisfying and disappointing. It’s like the Schrödinger’s Cat of treatments.

We had an all-hands-on-deck repair day for the circulating collections backlog. With no summer students this year, we had a lot of materials waiting for their 15 minutes of fame aka Quick Repair. We got through 107 items in half a day.

book truck with finished repairs
Quick repairs are very satisfying and great for the stats.

Speaking of backlogs…Technical Services has been working through a lot of musical scores lately and they have backed up a bit in the lab. This workflow is next on our list of “get it done” projects.

Book truck with music scores ready for binding.
Can scores have existential crises?

Preparations for the Lilly Library renovation started back in 2019 and really hasn’t stopped. We are getting close to finishing a huge project to provide enclosures for items going to the Library Service Center for the duration of the renovation project. Tyvek envelopes are a quick and economical enclosure for brittle and fragile materials that we can’t treat before going off site.

book truck with enveloped collection material
So. Many. Envelopes.

Our student assistant is back, and plowing through work. Look at all the brittle pamphlets she has put into binders this week. We love seeing work pile up on the QC shelf.

A shelf of finished pamphlets await quality control
We love seeing the QC shelf pile up with work.

And of course, at the time of writing this post, we are experiencing the remnants of Hurricane Ian. We spent Thursday afternoon putting out absorbent pads around our known leaks, and making sure everyone knew the disaster team’s contact information.

Map of Hurricane Ian
Hurricane Ian’s impact. Image Raleigh News & Observer

For organizations looking for recovery help, here are some resources:

We are thinking of all our colleagues in Florida whose institutions took a direct hit, as well as everyone who has experienced the ravages of this storm.

Invasion of the Binding Snatchers

When this copy of Memoirs of the life of the Reverend George Whitefield (1798) came into the lab the other day, we knew pretty quickly that something was off.

The label on the spine looked like it was sitting inside a little window of leather, and not even very well lined up. Looking closer, you could also see some stitching running vertically along the center of the spine.

We often see examples of home-made repairs for bindings, but I had never seen one like this before. It appears that someone has just swapped bindings from another book!

I’m guessing that the original boards had come off of the book and, rather than having it rebacked, a previous owner had just located a similarly sized-volume as a donor. On the interior of the boards, you can see evidence of cord from the previous board attachment. After removing the binding from it’s original textblock, a little window was cut in one of the spine panels to allow the correct titling to mostly show through, and then the new textblock was glued (and sewn) in at the spine. It’s a pretty clever solution, but it must have been difficult to find a donor binding of similar enough size to work. I always enjoy finding evidence of historical repairs and seeing the creative approaches that people have taken to keep their books in usable condition.

Edit: Today I learned that there is a term that could be applied to this item: remboîtage.  It is interesting to compare the definitions from Etherington & Roberts and Ligatus (derived from Carter’s ABC for Book Collectors). Most folks would not think of this as an example of a recase, because that term implies putting the textblock back into it’s own binding. Carter’s definition of remboîtage goes to great lengths to describe it as putting a textblock in a more elegant, more desirable, or superior binding. This rather crudely executed swap may be a bit of a stretch for Carter, but one could argue that a functioning binding is more desirable than a broken one.