Category Archives: Digitization Expertise

Digitization Details: Before We Push the “Scan” Button

The Digital Production Center at the Perkins Library has a clearly stated mission to “create digital captures of unique, valuable, or compelling primary resources for the purpose of preservation, access, and publication.”  Our mission statement goes on to say, “Our operating principle is to achieve consistent results of a measurable quality. We plan and perform our work in a structured and scalable way, so that our results are predictable and repeatable, and our digital collections are uniform.”

That’s a mouthful!

TV0198

What it means is the images have to be consistent not only from image to image within a collection but also from collection to collection over time.  And if that isn’t complex enough this has to be done using many different capture devices.  Each capture device has its own characteristics, which record and reproduce color in different ways.

How do we produce consistent images?

There are many variables to consider when solving the puzzle of “consistent results of a measurable quality.”  First, we start with the viewing environment, then move to monitor calibration and profiling, and end with capture device profiling.  All of these variables play a part in producing consistent results.

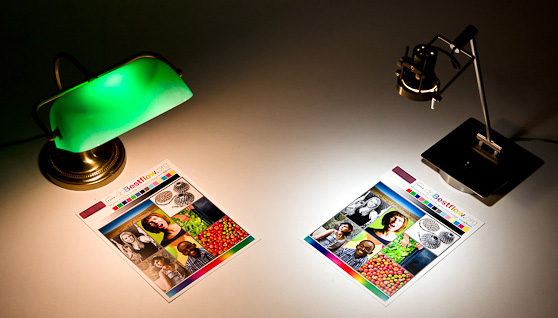
Full spectrum lighting is used in the Digital Production Center to create a neutral environment for viewing the original material.  Lighting that is not full spectrum often has a blue, magenta, green or yellow color shift, which we often don’t notice because our eyes are able to adjust effortlessly.  In the image below you can see the difference between tungsten lighting and neutral lighting.

Tungsten light (left) Neutral light (right)

Our walls are also painted 18 percent gray, which is neutral, so that no color is reflected from the walls onto the image while comparing it to the digital image.

Now that we have a neutral viewing environment, the next variable to consider is the computer monitors used to view our digitized images.  We use a spectrophotometer (straight out of the Jetsons, right?) made by xrite to measure the color accuracy, luminance and contrast of the monitor.  This hardware/software combination uses the spectrophotometer as it’s attached to the computer screen to read the brightness (luminance), contrast, white point and gamma of your monitor and makes adjustments for optimal viewing.  This is called monitor calibration.  The software then displays a series of color patches with known RGB values which the spectrophotometer measures and records the difference.  The result is an icc display profile.  This profile is saved to your operating system and is used to translate colors from what your monitor natively produces to a more accurate color representation.

Now our environment is neutral and our monitor is calibrated and profiled.  The next step in the process is to profile your capture device, whether it is a high-end digital scan back like the Phase One or BetterLight or an overhead scanner like a Zeutschel. From Epson flatbed scanners to Nikon slide scanners, all of these devices can be calibrated in the same way.  With all of the auto settings on your scanner turned off, a color target is digitized on the device you wish to calibrate.  The swatches on the color target are known values similar to the series of color patches used for profiling the monitor.  The digitized target is fed to the profiling software.  Each patch is measured and compared against its known value.  The differences are recorded and the result is an icc device profile.

Now that we have a neutral viewing environment for viewing the original material, our eyes don’t need to compensate for any color shift from the overhead lights or reflection from the walls.  Our monitors are calibrated/profiled so that the digitized images display correctly and our devices are profiled so they are able to produce consistent images regardless of what brand or type of capture device we use.

Gretag Macbeth color checker

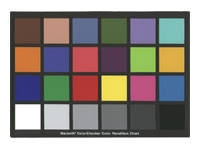
During our daily workflow we a Gretag Macbeth color checker to measure the output of the capture devices every day before we begin digitizing material to verify that the device is still working properly.

All of this work is done before we push the “scan” button to ensure that our results are predictable and repeatable, measurable and scalable.  Amen.

Can You (Virtually) Dig It?

A group from Duke Libraries recently visited Dr. Maurizio Forte’s Digital Archaeology Initiative (a.k.a. “Dig@Lab”) to learn more about digital imaging of three-dimensional objects and to explore opportunities for collaboration between the lab and the library.

2014-04-29 15.37.39
These glasses and stylus allow you to disassemble the layers of a virtual site and rearrange and resize each part.

Dr. Forte (a Professor of Classical Studies, Art, and Visual Studies) and his colleagues were kind enough to demonstrate how they are using 3D imaging technology to “dig for information” in simulated archaeological sites and objects.  Their lab is a fascinating blend of cutting-edge software and display interfaces, such as the Unity 3D software being used in the photo above, and consumer video gaming equipment (recognize that joystick?).

Zeke tries not to laugh as Noah dons the virtual reality goggles.

Using the goggles and joystick above, we took turns exploring the streets and buildings of the ancient city of Regium Lepedi in Northern Italy.  The experience was extremely immersive and somewhat disorienting, from getting lost in narrow alleys to climbing winding staircases for an overhead view of the entire landscape.  The feeling of vertigo from the roof was visceral.  None of us took the challenge to jump off of the roof, which apparently you can do (and which is also very scary according to the lab researchers).  After taking the goggles off, I felt a heaviness and solidity return to my body as I readjusted to the “real world” around me, similar to the sensation of gravity after stepping off a trampoline.

Alex--can you hear me?
Alex–can you hear me?

The Libraries and Digital Projects team look forward to working more with Dr. Forte and bringing 3D imaging into our digital collections.

More information about the lab’s work can be found at:

http://sites.duke.edu/digatlab/


Mike views a mathematically modeled 3D rendering of a tile mosaic.

(Photos by Molly Bragg and Beth Doyle)

Digitization Details: Bringing Duke Living History Into Your Future

Recently, I digitized 123 videotapes from the Duke University Living History Program. Beginning in the early 1970’s, Duke University faculty members conducted interviews with prominent world leaders, politicians and activists. The first interviews were videotaped in Perkins Library at a time when video was groundbreaking technology, almost a decade before consumer-grade VCRs starting showing up in people’s living rooms. Some of the interviews begin with a visionary introduction by Jay Rutherfurd, who championed the program:

“At the W. R. Perkins library, in Duke University, we now commit this exciting experiment in electronic journalism into your future. May it illuminate well, educate wisely, and relate meaningfully, for future generations.”

Clearly, the “future” that Mr. Rutherfurd envisioned has arrived. Thanks to modern technology, we can now create digital surrogates of these videotaped interviews for long-term preservation and access. The subjects featured in this collection span a variety of generations, nationalities, occupations and political leanings. Interviewees include Les Aspin, Ellsworth Bunker, Dr. Samuel DuBois Cook, Joseph Banks Rhine, Jesse Jackson, Robert McNamara, Dean Rusk, King Mihai of Romania, Terry Sanford, Judy Woodruff, Angier Biddle Duke and many more. The collection also includes videotapes of speeches given on the Duke campus by Ronald Reagan, Abbie Hoffman, Bob Dole, Julian Bond and Elie Wiesel.

residue
Residue wiped off the head of a U-matic playback deck, the result of sticky-shed syndrome.

Many of the interviews were recorded on 3/4″ videotape, also called “U-matic.” Invented by Sony in 1969, the U-matic format was the first videotape to be housed inside a plastic cassette for portability, and would soon replace film as the primary television news-gathering format. Unfortunately, most U-matic tapes have not aged well. After decades in storage, many of the videotapes in our collection now have sticky-shed syndrome, a condition in which the oxide that holds the visual content is literally flaking off the polyester tape base, and is gummy in texture. When a videotape has sticky-shed, not only will it not play correctly, the residue can also clog up the tape heads in the U-matic playback deck, then transfer the contaminant to other tapes played afterwards in the same deck. A U-matic videotape player in good working order is now an obsolete collector’s item, and our tapes are fragile, so we came up with a solution: throw those tapes in the oven!

oven2
After baking, the cookies (I mean U-matic videotapes) are ready for digitization!

At first that may sound reckless, but baking audio and videotapes at relatively low temperatures for an extended period of time is a well-tested method for minimizing the effects of sticky-shed syndrome. The Digital Production Center recently acquired a scientific oven, and after initial testing, we baked each Duke Living History U-matic videotape at 52 celsius (125 fahrenheit) for about 10 hours. Baking the videotapes temporarily removed the moisture that had accumulated in the binder, and made them playable for digitization. About 90% of our U-matic tapes played well after baking. Many of them were unplayable beforehand.

videoracks
The Digital Production Center’s video rack and routing system.

After giving the videotapes time to cool down, we digitize each tape, in real time, as an uncompressed  file (.mov) for long-term preservation. Afterwards, we make a smaller, compressed version (.mp4) of the same recording, which is our access copy. Our U-matic decks are housed in an efficiently-designed rack system, which also includes other obsolete videotape formats like VHS, Betacam and Hi8. Centralized audio and video routers allow us to quickly switch between formats while ensuring a clean, balanced and accurate conversion from analog to digital. Combining the art of analog tape baking with modern video digitization, the Digital Production Center is able to rescue the content from the videotapes, before the magnetic tape ages and degrades any further. While the U-matic tapes are nearing the end of their life-span, the digital surrogates will potentially last for centuries to come. We are able to benefit from Mr. Rutherfurd’s exciting experiment into our future, and carry it forward… into your future. May it illuminate well, educate wisely, and relate meaningfully, for future generations.


Post contributed by Alex Marsh


Digitization Details: Sidney D. Gamble’s Lantern Slides

I have worked in the Digital Production Center since March of 2005 and I’ve seen a lot of digital collections published in my time here.  I have seen so many images that sometimes it is difficult to say which collection is my favorite but the Sidney D. Gamble Photographs have always been near the top.

The Sidney D. Gamble Photographs are an amazing collection of black and white photographs of daily life in China taken between 1908 and 1932.  These documentary style images of urban and rural life, public events, architecture, religious statuary, and the countryside really resonate with me for their unopposed moment in time feel.  Recently the Digital Collections Implementation Team was tasked with digitizing a subset of lantern slides from this collection.  What is a lantern slide you might ask?

RL_10074_LS_0105_large
Herding Ducks

A lantern slide is a photographic transparency which is glass-mounted and often hand-colored for projection by a “magic lantern.”  The magic lantern was the earliest form of slide projector which, in its earliest incarnation, used candles to project painted slides onto a wall or cloth screen.   The projectionist was often hidden from the audience making it seem more magical.   By the time the 1840s rolled around photographic processes had been developed by William and Frederick Langenheim that enabled a glass plate negative to be printed onto another glass plate by a contact method creating a positive.  These positives were then painted in the same fashion that the earlier slides were painted (think Kodachrome).  The magic lantern predates the school slate and the chalkboard for use in a classroom.

After working with and enjoying the digitization of the nitrate negatives from the Sidney D. Gamble Photographs it has been icing on the cake to work with the lantern slides from the same collection so many years later.  While the original black and white images resonate with me the lantern slides have added a whole new dimension to the experience.  On one hand the black and white images lend a sense of history and times passed and on the other, the vivid colors of the lantern slides draw me into the scene as if it were the present.

RL_10074_LS_0297_large
Barbers on Bund

I am in awe of the amount of work and the variety of skill sets required to create a collection such as this.   Sidney D. Gamble, an amateur photographer, to trek across China over 4 trips spanning 24 years, photographing and processing nitrate negatives in the field without a traditional darkroom, all the while taking notes and labeling the negatives.  Then to come home and create the glass plate positives and hand color over 500 of them.  For being an “amateur photographer” Gamble’s images are striking.  The type of camera he used takes skill and knowledge to create a reasonably correct exposure.  Processing the film is technically challenging in a traditional darkroom and is made much more difficult in the field.  Taking enough notes while shooting, processing and traveling so they make sense as a collection is a feat in itself.  The transfer from negative film to positive glass plates on such a scale is a tedious and technical venture.  Then to hand paint all of the slides takes additional skill and tools.  All of this makes digitization of the material look like child’s play.

An inventory of the hand-colored slides was created before digitization began.  Any hand-colored slides with existing black and white negatives were identified so they can be displayed together online.  A color-balanced light box was used to illuminate the lantern slides and a Phase One P65 Reprographic camera was used in conjunction with a precision Kaiser copy stand to capture them.   All of the equipment used in the Digital Production Center is color-calibrated and profiled so consistent results can be achieved from capture to capture.  This removes the majority of the subjective decision making from the digitization process.  Sidney D. Gamble had many variables to contend with to produce the lantern slides much like the Digital Collections Implementation Team deals with many variables when publishing a digital collection.  From conservation of the physical material, digitization, metadata, interface design to the technology used to deliver the images online and the servers and network that connect everything to make it happen, there are plenty of variables.  They are just different variables.

Nowadays we photograph and share the minutia of our lives.  When Sidney Gamble took his photographs he had to be much more deliberate.   I appreciate his deliberateness as much as I appreciate all the people involved in publishing collections.  I look forward to publication of the Sidney D. Gamble lantern slides in the near future and hope you will enjoy this collection as much as I have over the years.

Post Contributed by Mike Adamo

Digitization Details: Re-Formatting Audio Cassettes

Cassette
A real live audio cassette!

The 310 oral histories that comprise the newly published additions to the Behind the Veil digital collection were originally recorded in the 1990’s to the now (nearly) obsolete compact cassette format—what were commonly called “tapes”.  The beauty of the compact cassette format was that it was small and portable (especially compared to the earlier reel-to-reel tape format), relatively durable due to its hard plastic outer shell, and most of all—could easily be recorded to at home by non-professional users.  This made it perfect for oral historians who needed to be able to record interviews in the field at low cost with minimal hassle.  

Unfortunately, the compact cassette format hasn’t aged particularly well.  Due to cheap materials, poor storage conditions, and normal mechanical wear and tear, many of these tapes are already borderline unplayable a short 40 years after their first introduction.  This introduces a number of challenges to our process of converting the audio information on the tapes into a digital file format that can easily be accessed online by patrons.  I won’t exhaustively detail our digitization process here, but only touch on a few issues and how we dealt with them.

Inspecting a tape
Our fearless audio digitization expert carefully inspects a tapes.

Physical degradation and damage to tapes: We visually inspected each tape prior to digitization.  Any that were visibly broken or had twisted or jammed tape were rehoused in new outer shells.  At least with this collection, rehousing allowed us to successfully play back all of the tapes.

Poor quality of original recordings: We also did a brief audio inspection of each tape before digitization.  This allowed us to identify issues with audio quality.  We found that the interviews were done in a wide variety of locations, often with background traffic, television, appliance and conversation noise bleeding into the recording.  There was no easy fix for this, as these issues are inherent in the recording.  Our solution was to provide the best possible playback on a high-quality cassette deck, a direct and balanced signal path, and high quality analog-to-digital conversion at the preservation standard of 24 bits, 96.1 kHz.  This ensured that the digital copy faithfully reproduced the audio material on the cassette, warts and all.

Other errors in original recordings: There were some issues in the original recordings that we opted to fix via digital editing or processing in our files for patron use (while retaining the unaltered preservation files).

  • In cases where there was a significant gap of silence in the middle of a tape, we edited out the silence for continuity’s sake.
  • In cases where there were loud and abrasive clicks, pops, or microphone noise at the beginning or end of a tape side, we edited out these noises.
  • Several tapes were apparently recorded at the wrong speed, resulting in a “chipmunk voice” effect.  I used a Speed/Pitch function in our audio capture software to electronically slow these files down so that they play back intelligibly and as intended.
deck
Audio digitization deck

Another challenge, common to all time-based analog media, is the cassette tape’s “real-time” nature.  Unlike a digital file that can be copied nearly instantaneously, a 90-minute cassette tape actually takes 90 minutes to make a digital copy.  Currently we run two cassette decks simultaneously, allowing us to double our throughput.

As you can see, audio cassette digitization is more than just a matter of pressing “play”!

–post written by Zeke Graves

Still want to learn more about the Behind the Veil collection of oral histories?  Check out coverage of the collection over at Rubenstein Library blog, The Devil’s Tale.