Tube Caps Part II: Adventures in Cutting!

By Rachel Penniman, Senior Conservation Technician

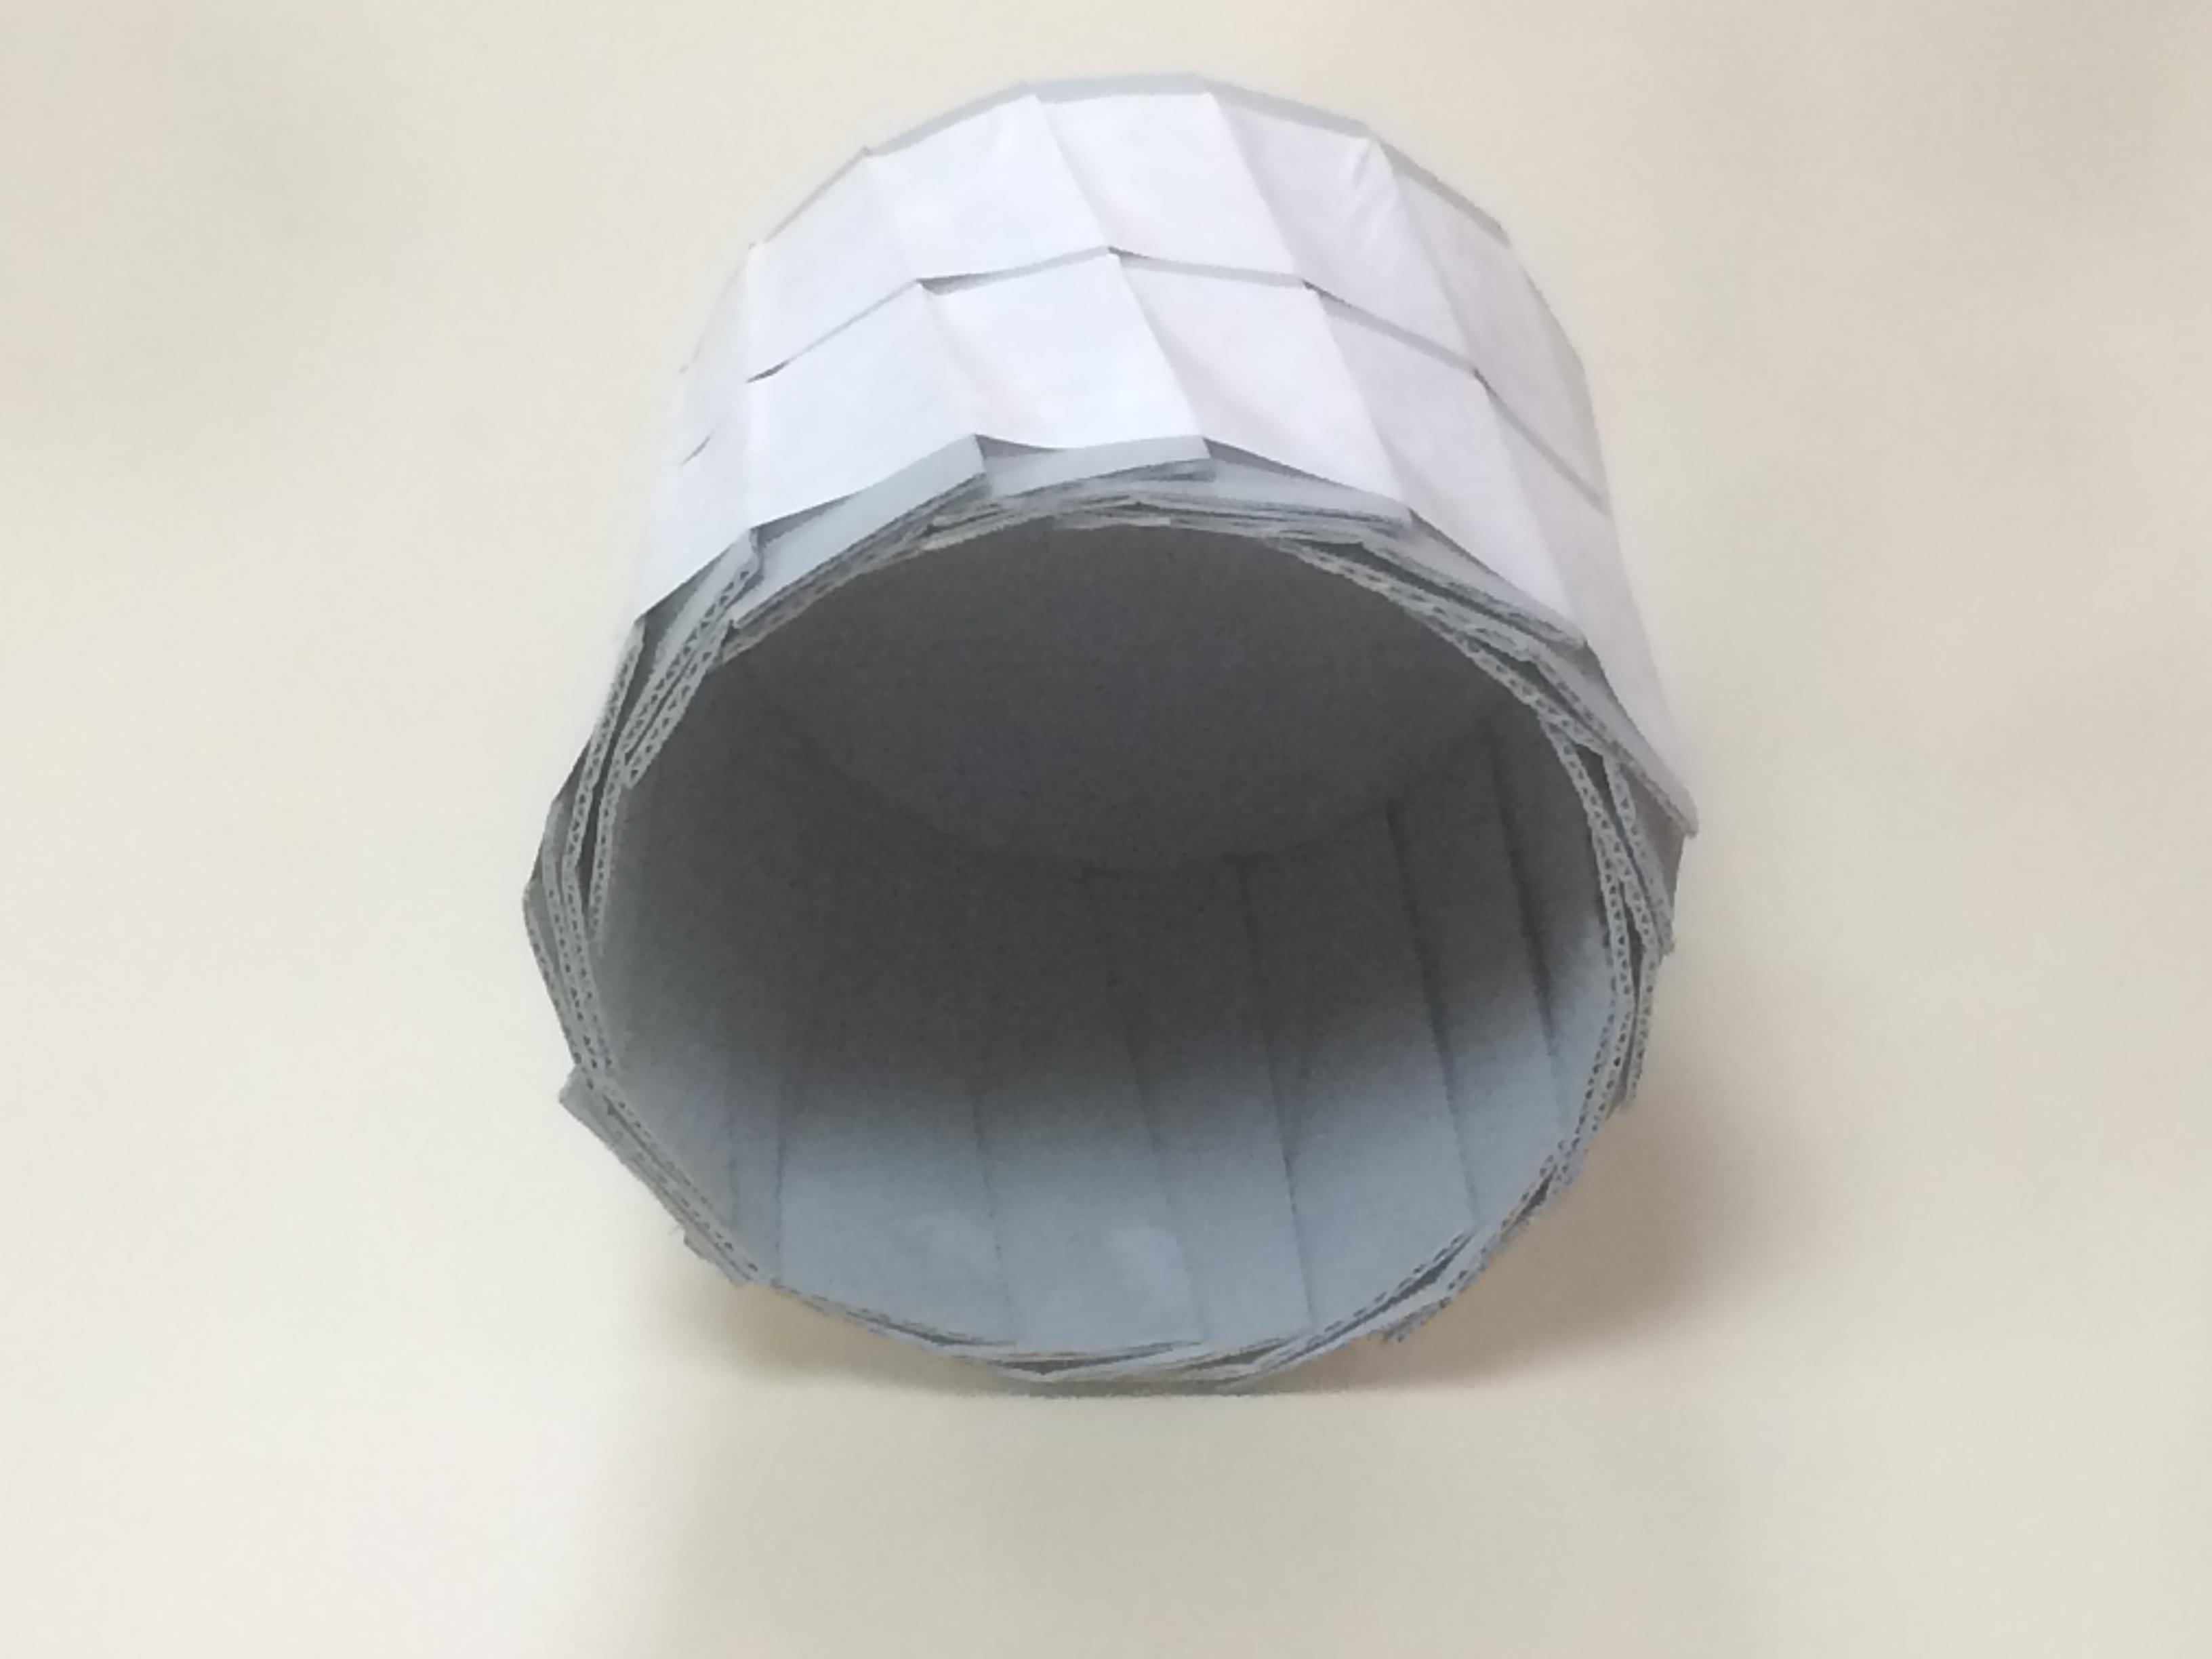
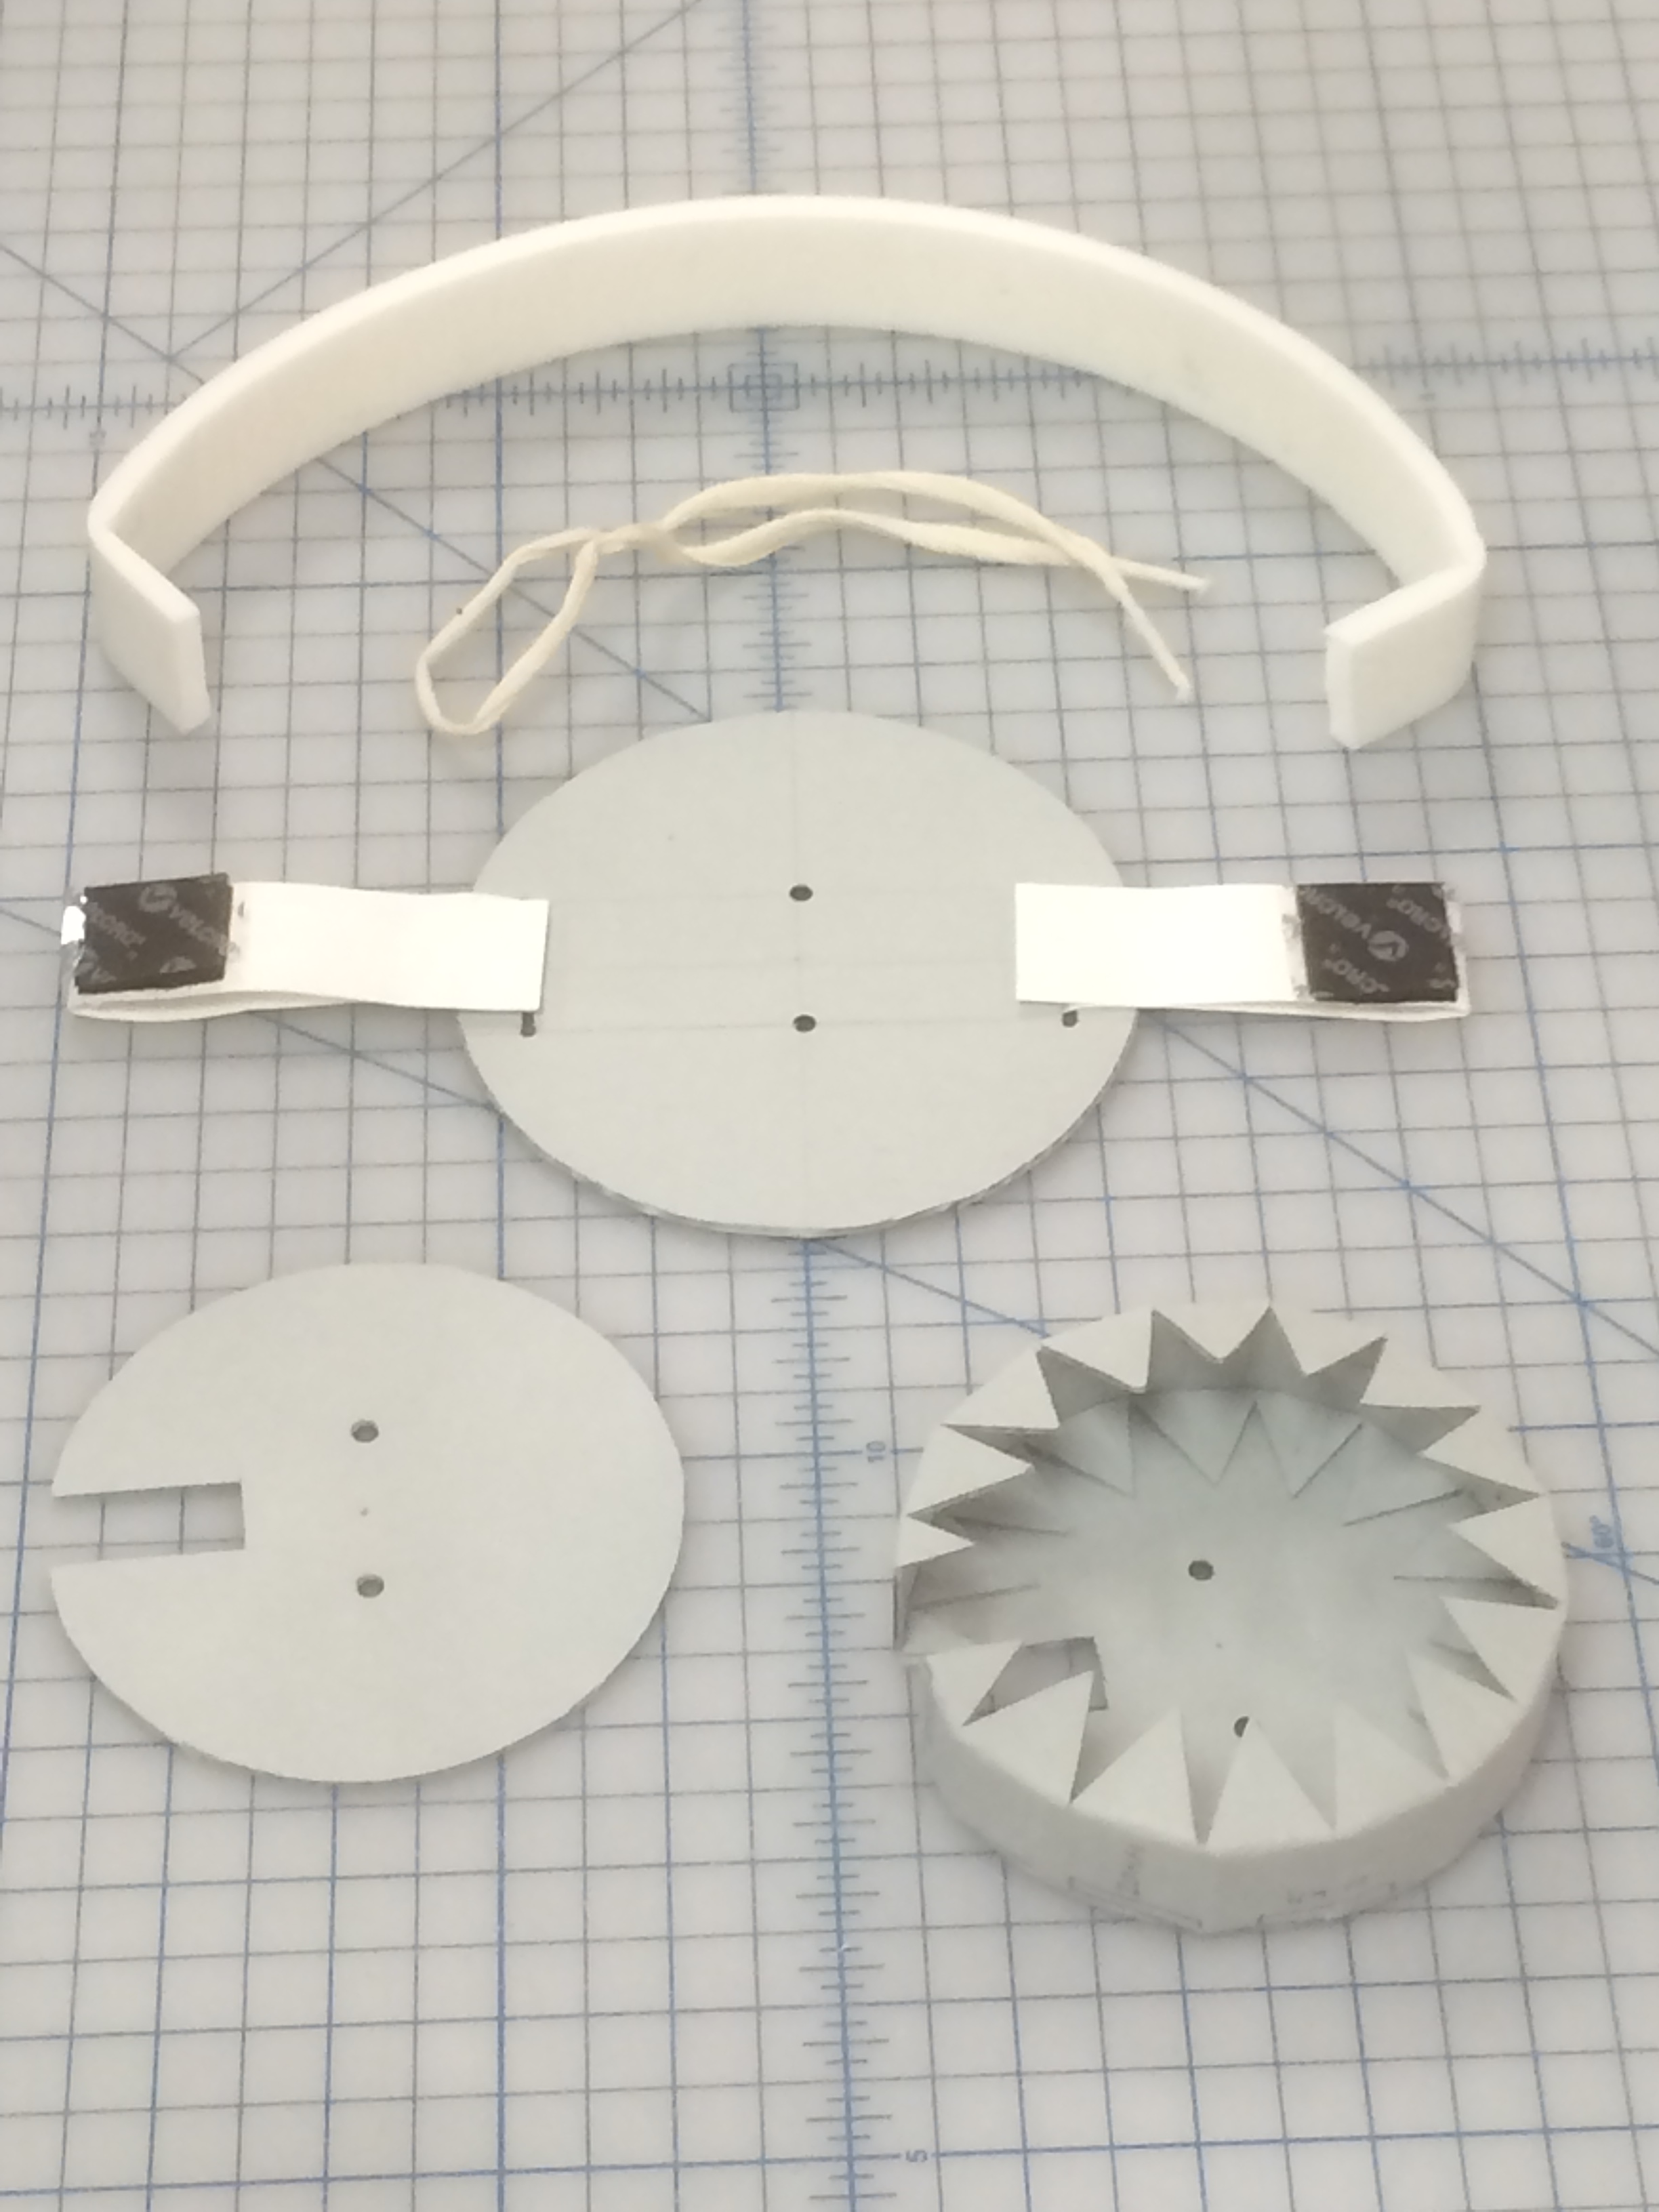
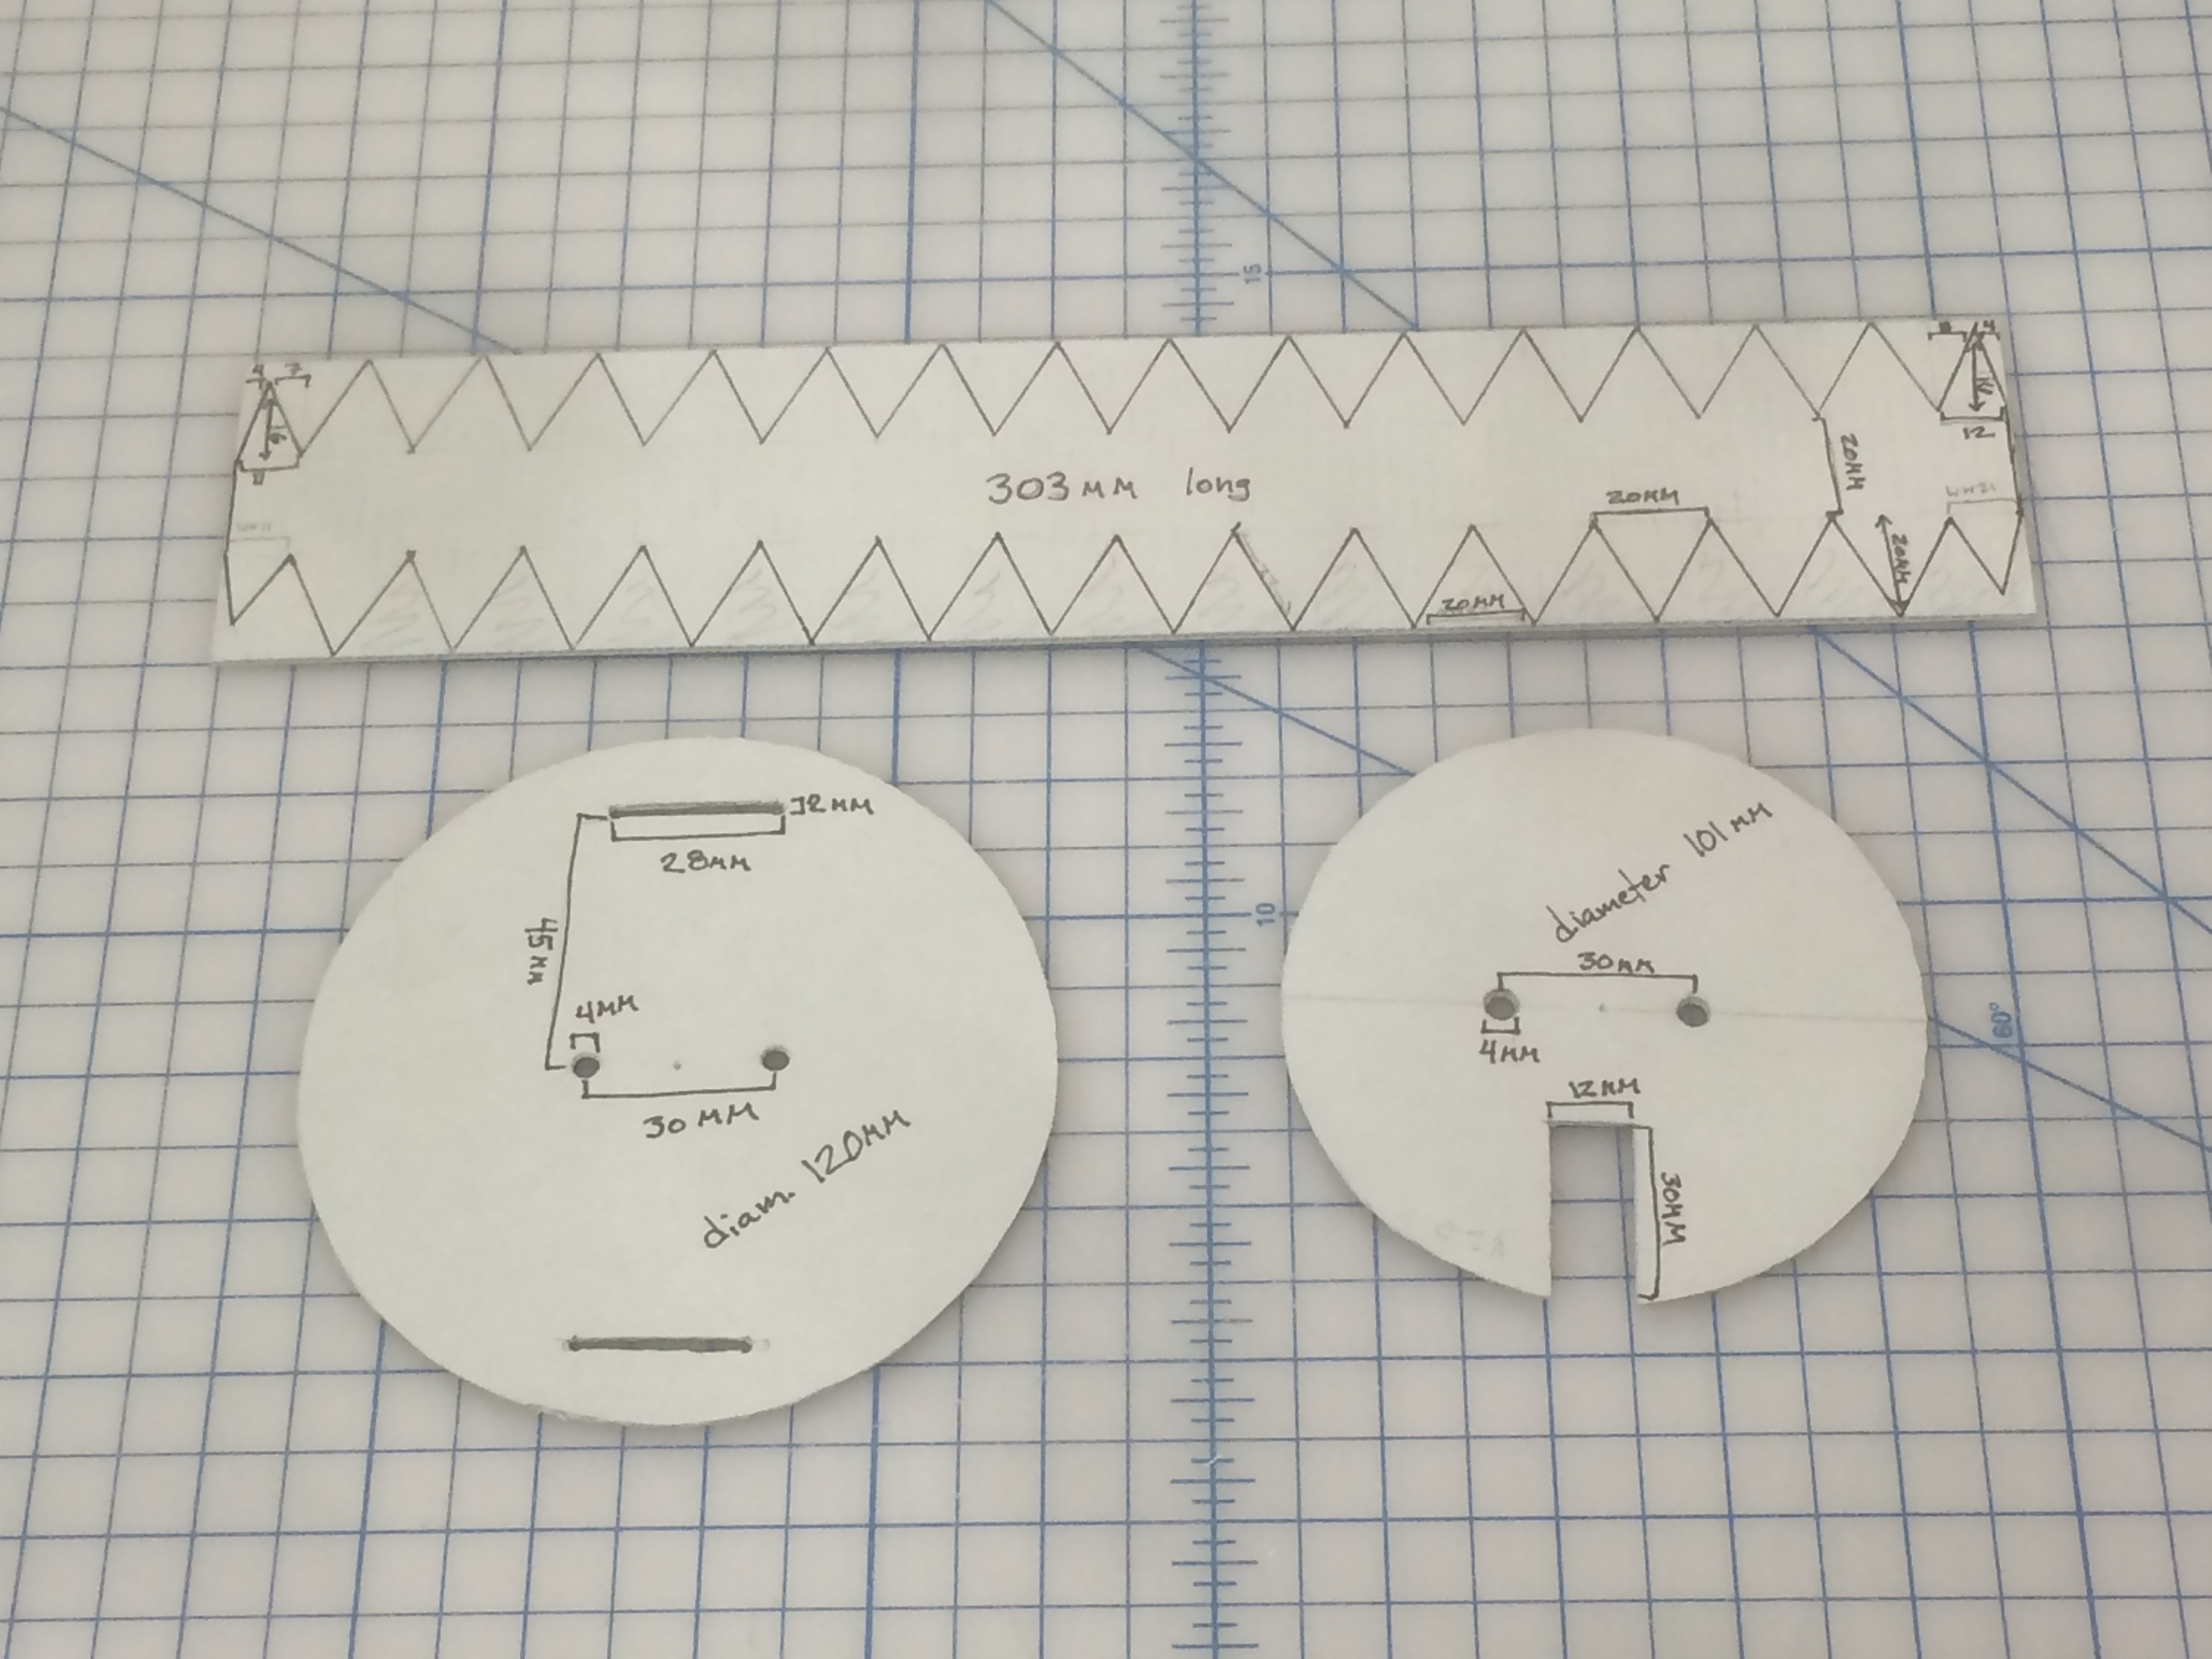
In my last blog post I showed the design process for creating caps for rolled storage tubes. After going through multiple versions of potential designs I had found a model that used a minimal amount of material and still created an effective cap. Unfortunately I had also discovered the woes of trying to cut perfect circles by hand.

1 Tube Cap v3 parts
Tube Cap Version 3.0 ready for assembly

Initially I looked into getting a circular mat cutter but even with that specialized tool, it still looked tricky to use and time consuming.

Fortunately I work with a group of creative individuals so while I was bemoaning the difficulty of cutting circles, Henry suggested I look into getting them laser or die cut. Huzzah! That reminded me of an article I’d read about a makerspace on campus called the Innovation Studio. Makerbots, Shopbots, and Printerbots, oh my! After communicating with Chip and Vinny, the nice folks who run the iStudio, they assured me their equipment that would have no problem cutting our corrugated board.

From the description on the iStudio webpage:

“The Epilog Zing is a desktop-style 30 watt CO2 laser cutter. It can operate in two different modes: raster and vector. Raster mode is for engraving into the surface of materials. You can take photographs/images/text/etc. and use the software to engrave into a variety of materials, including wood, some plastics, some metals, and acrylic. Vector mode is for cutting custom shapes through thin materials by using a slow moving, high powered laser.”

Lasers are exciting!

The iStudio is conveniently located just across the street from the library. So Tedd and I brought some templates of the parts I needed over to the iStudio and they helped us draft up a vector drawing to my exact specifications in Solidworks.

My carefully measured templates

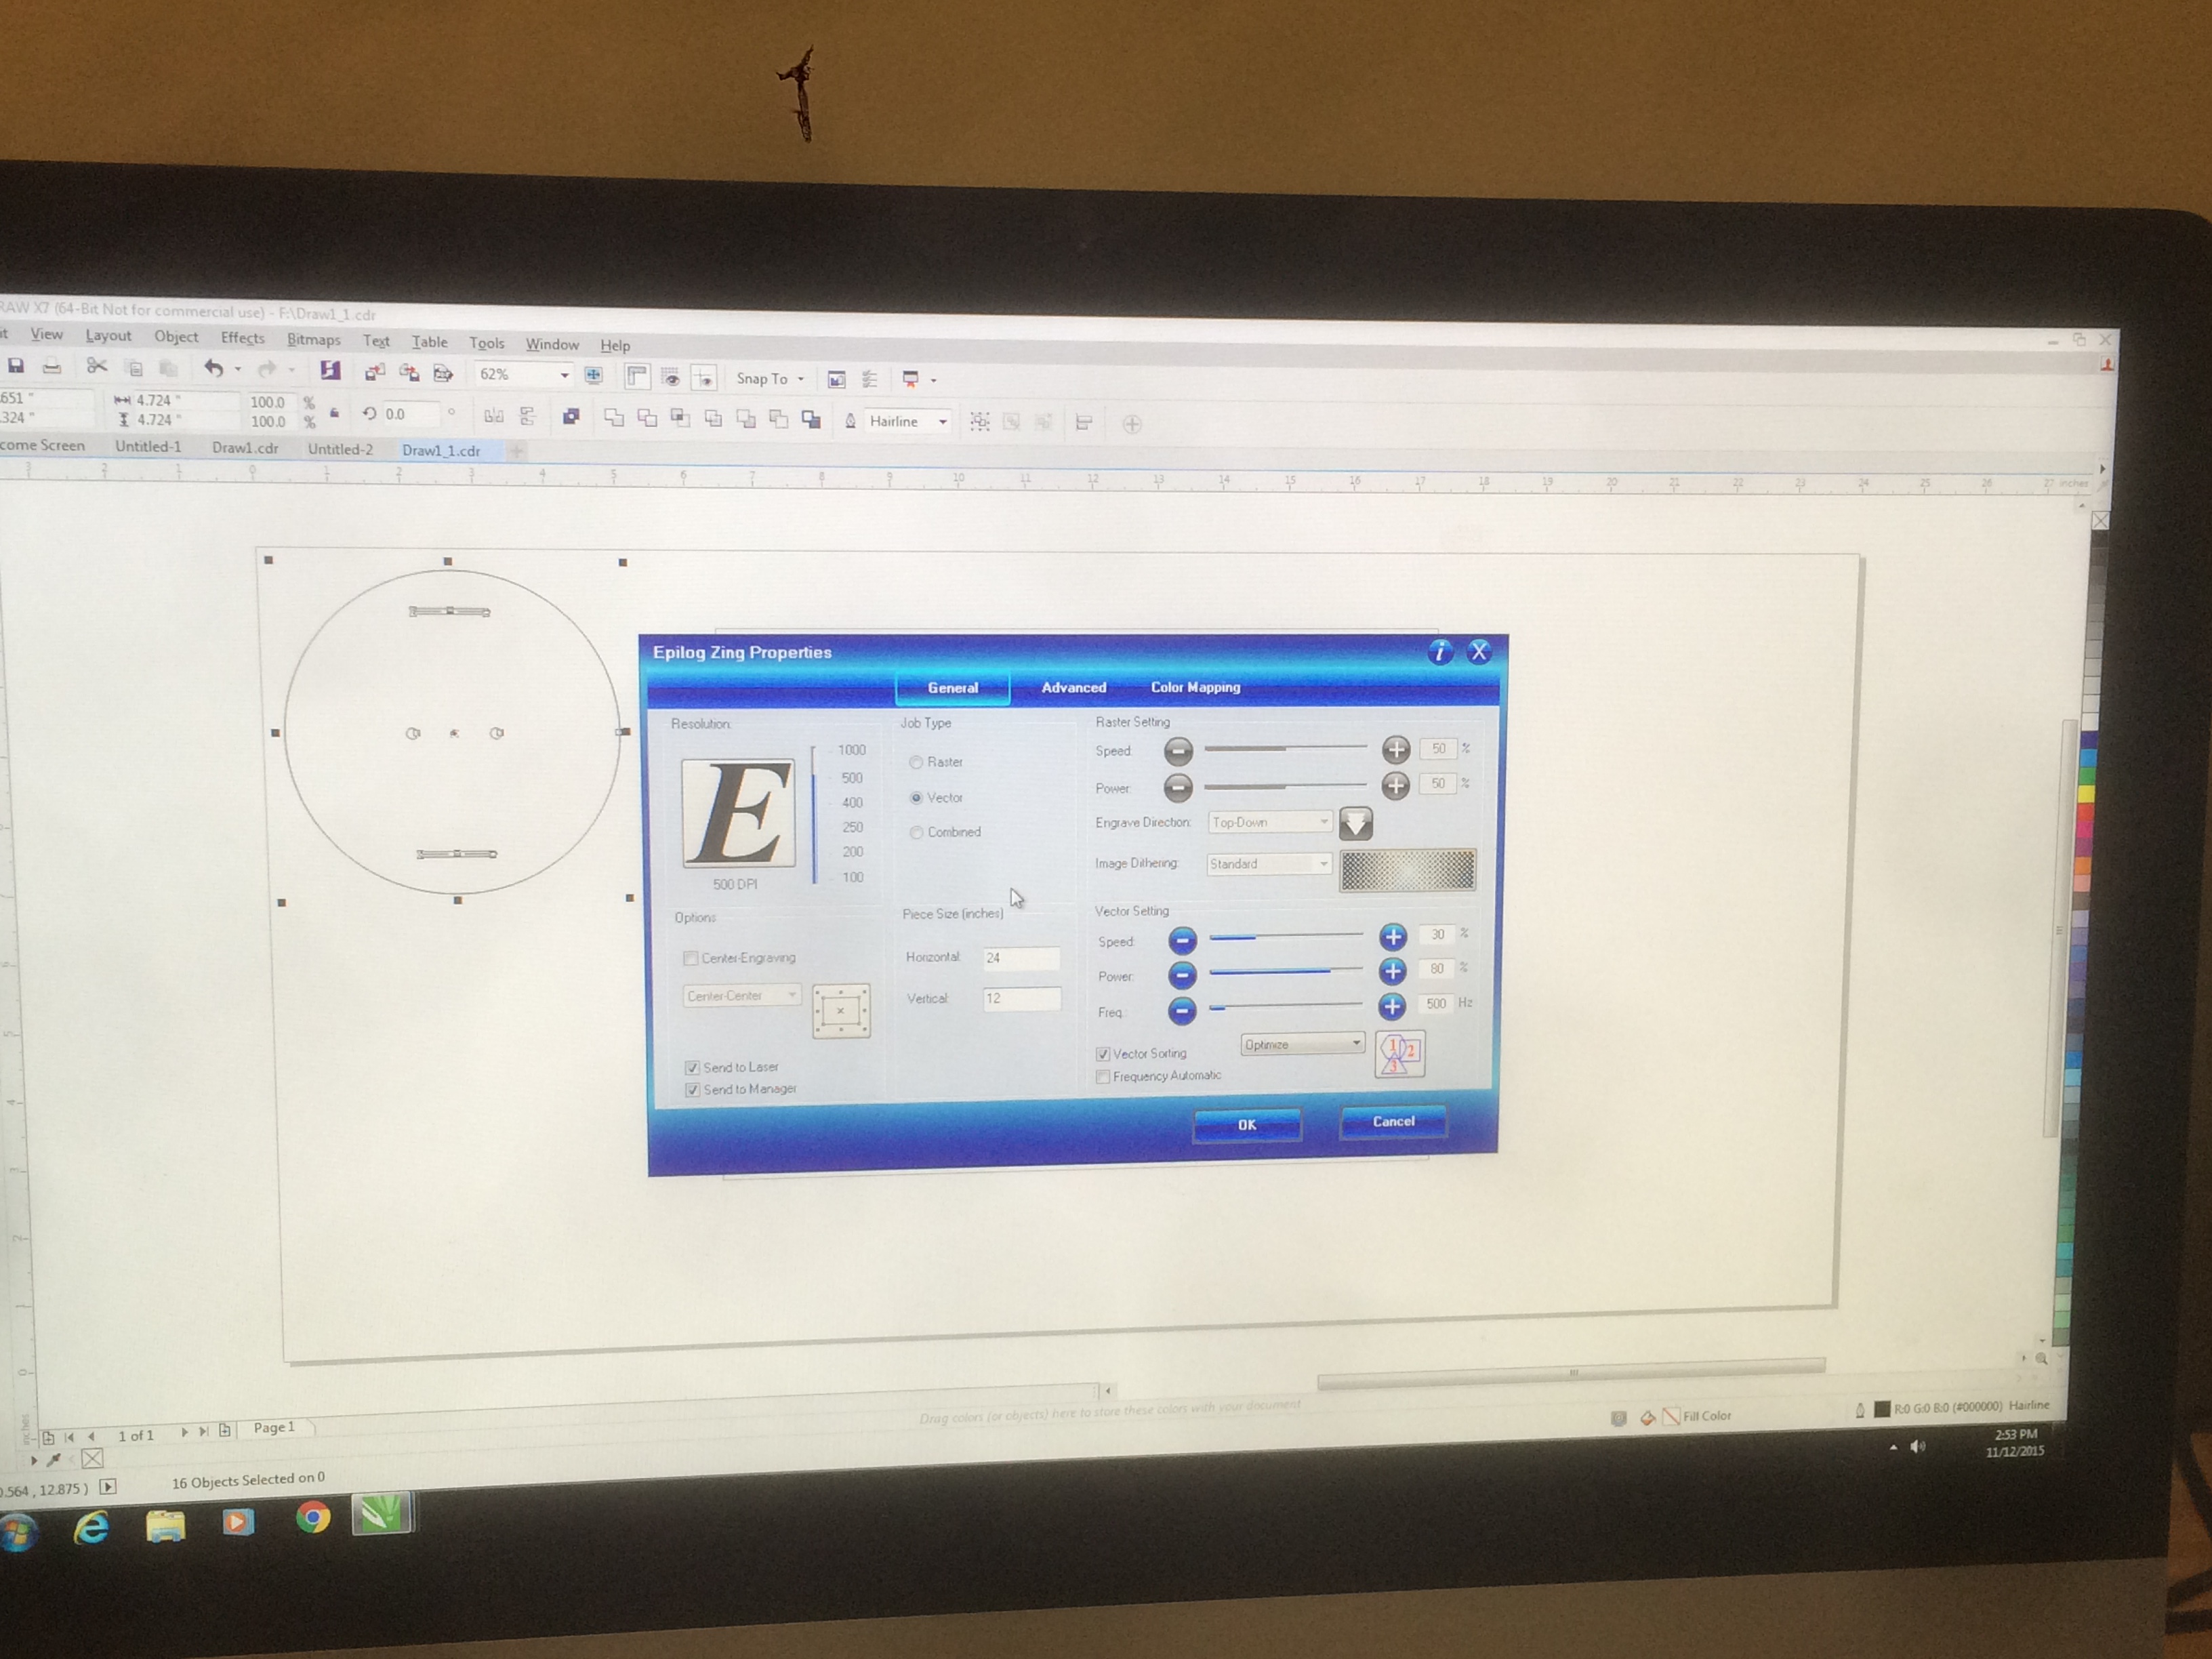
The vector drawings got inserted into a CorelDRAW page and then the file was sent as a print job to the Epilog Zing.

Vector drawing and print settings

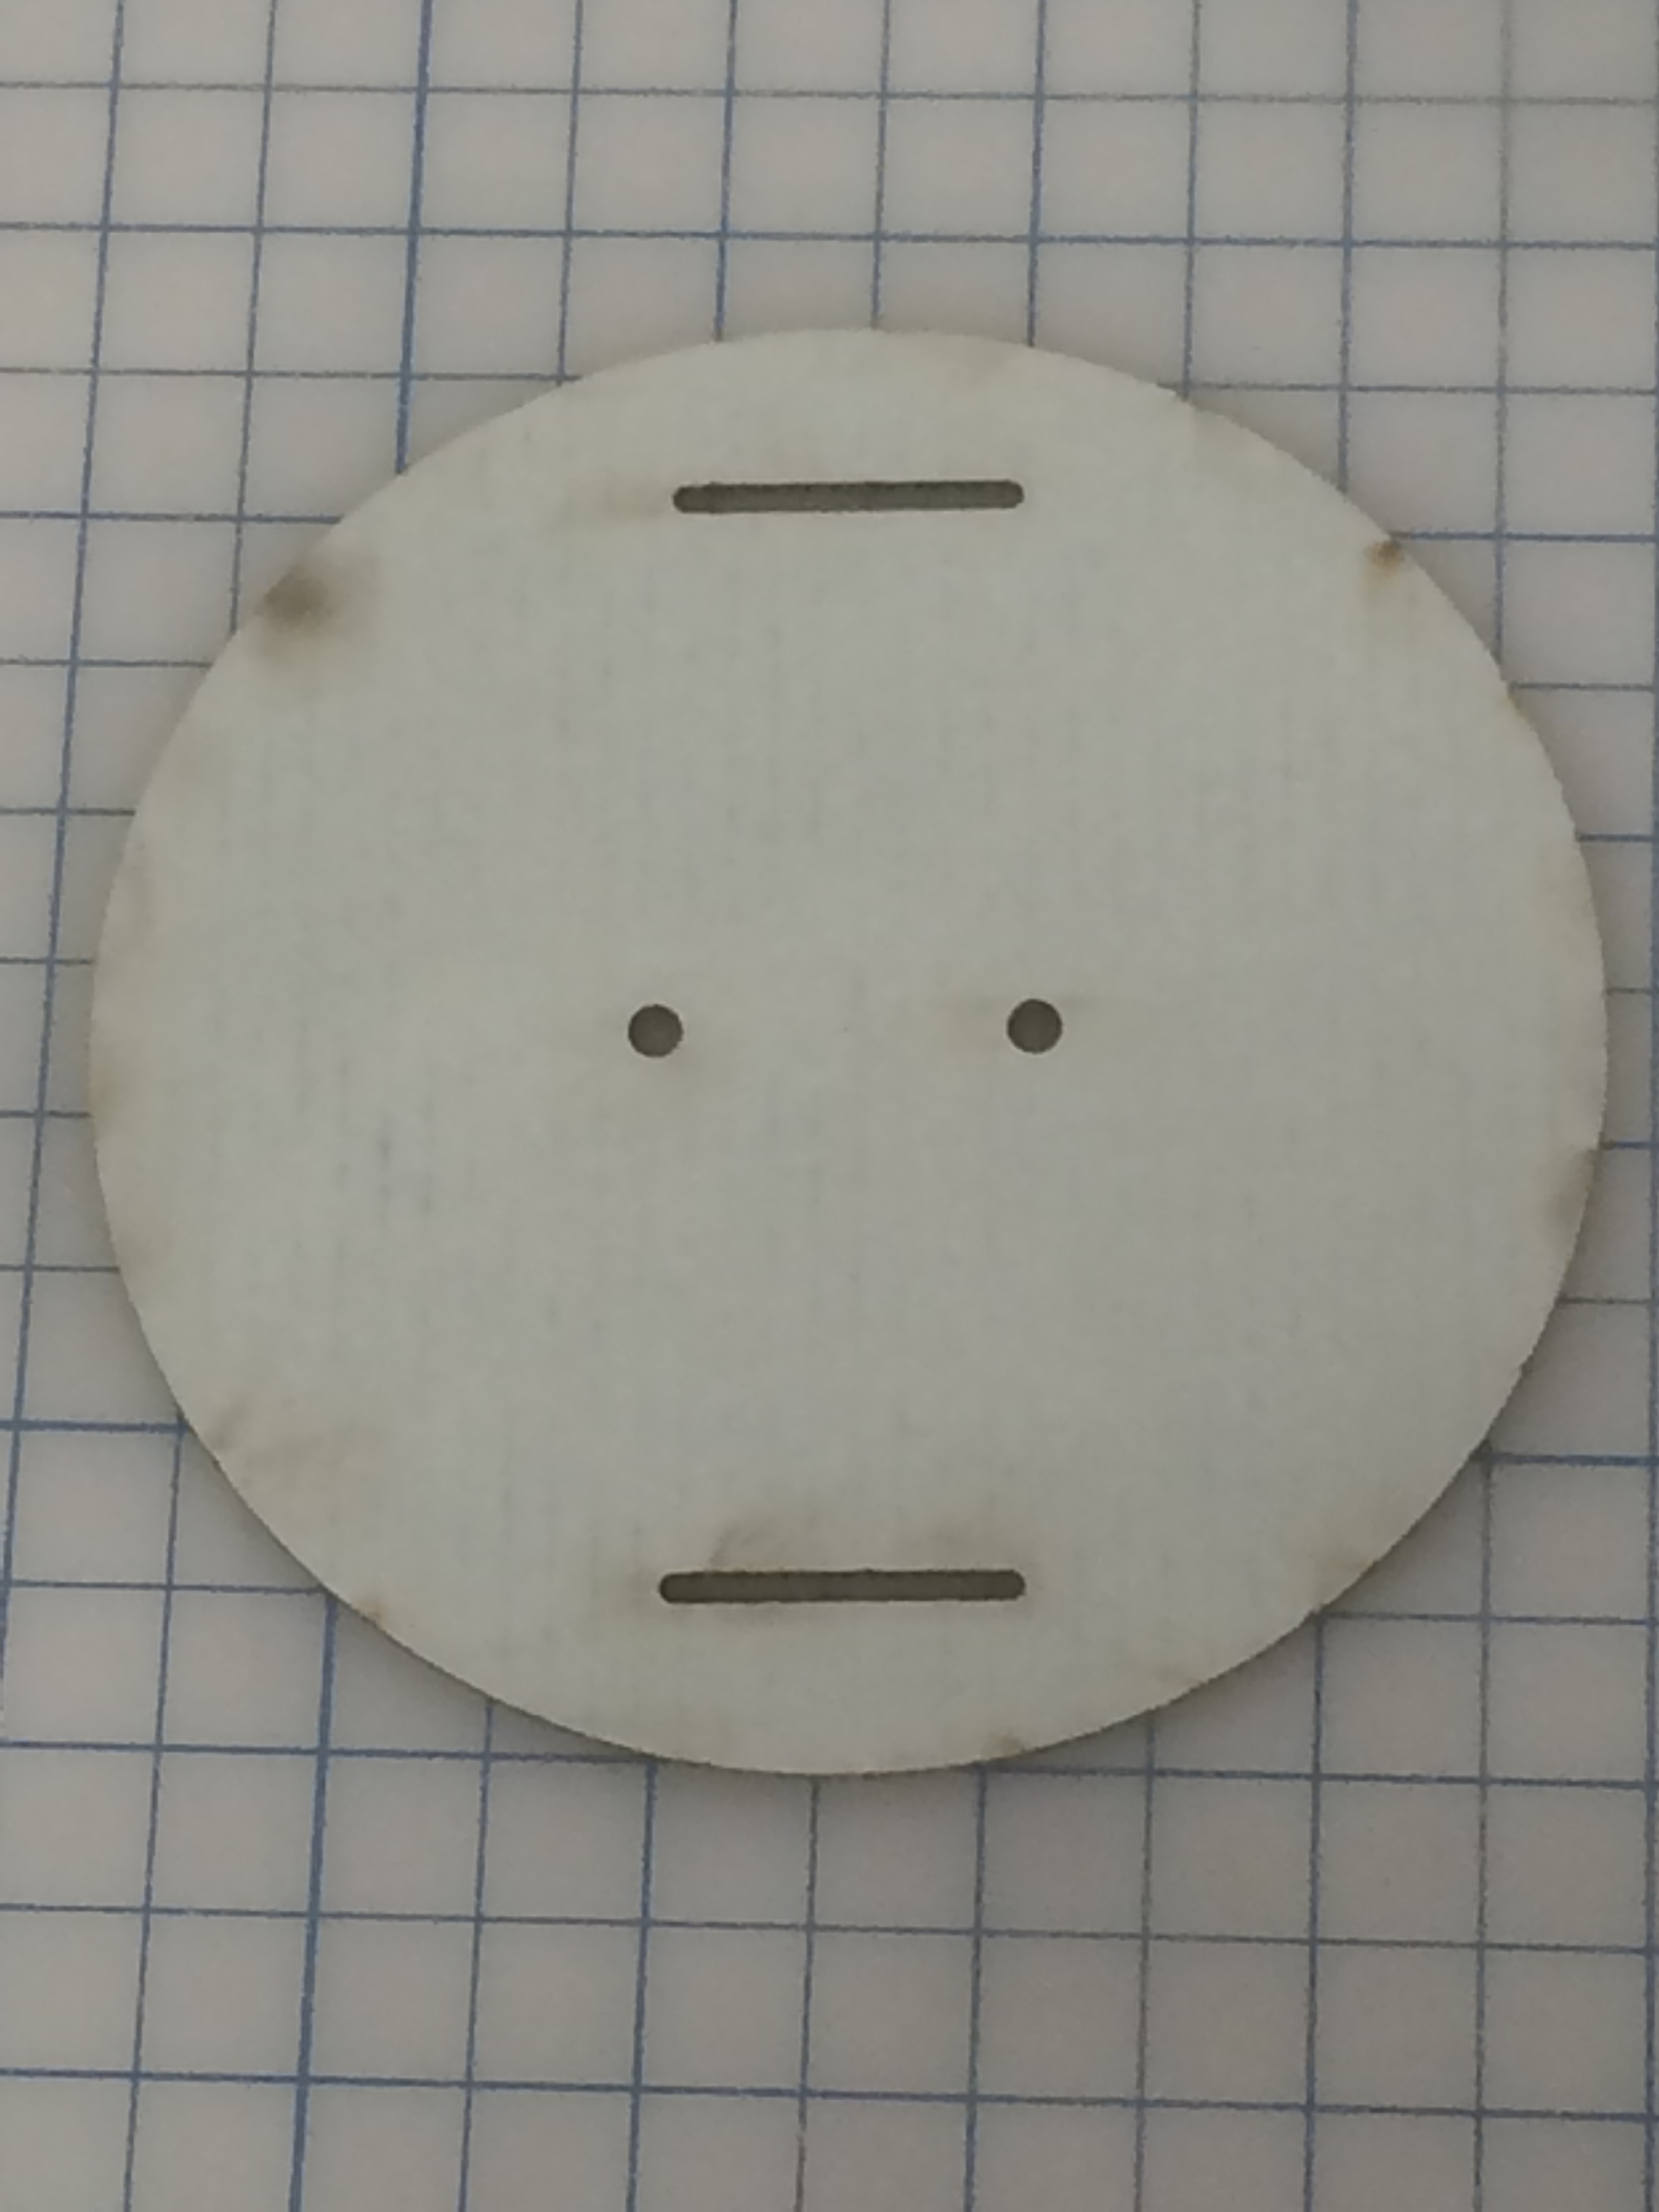
Our first attempt very quickly yielded an expertly cut circle but the laser caused scorch marks on the board.

Nicely cut but it smelled like a campfire and left ash on my fingers

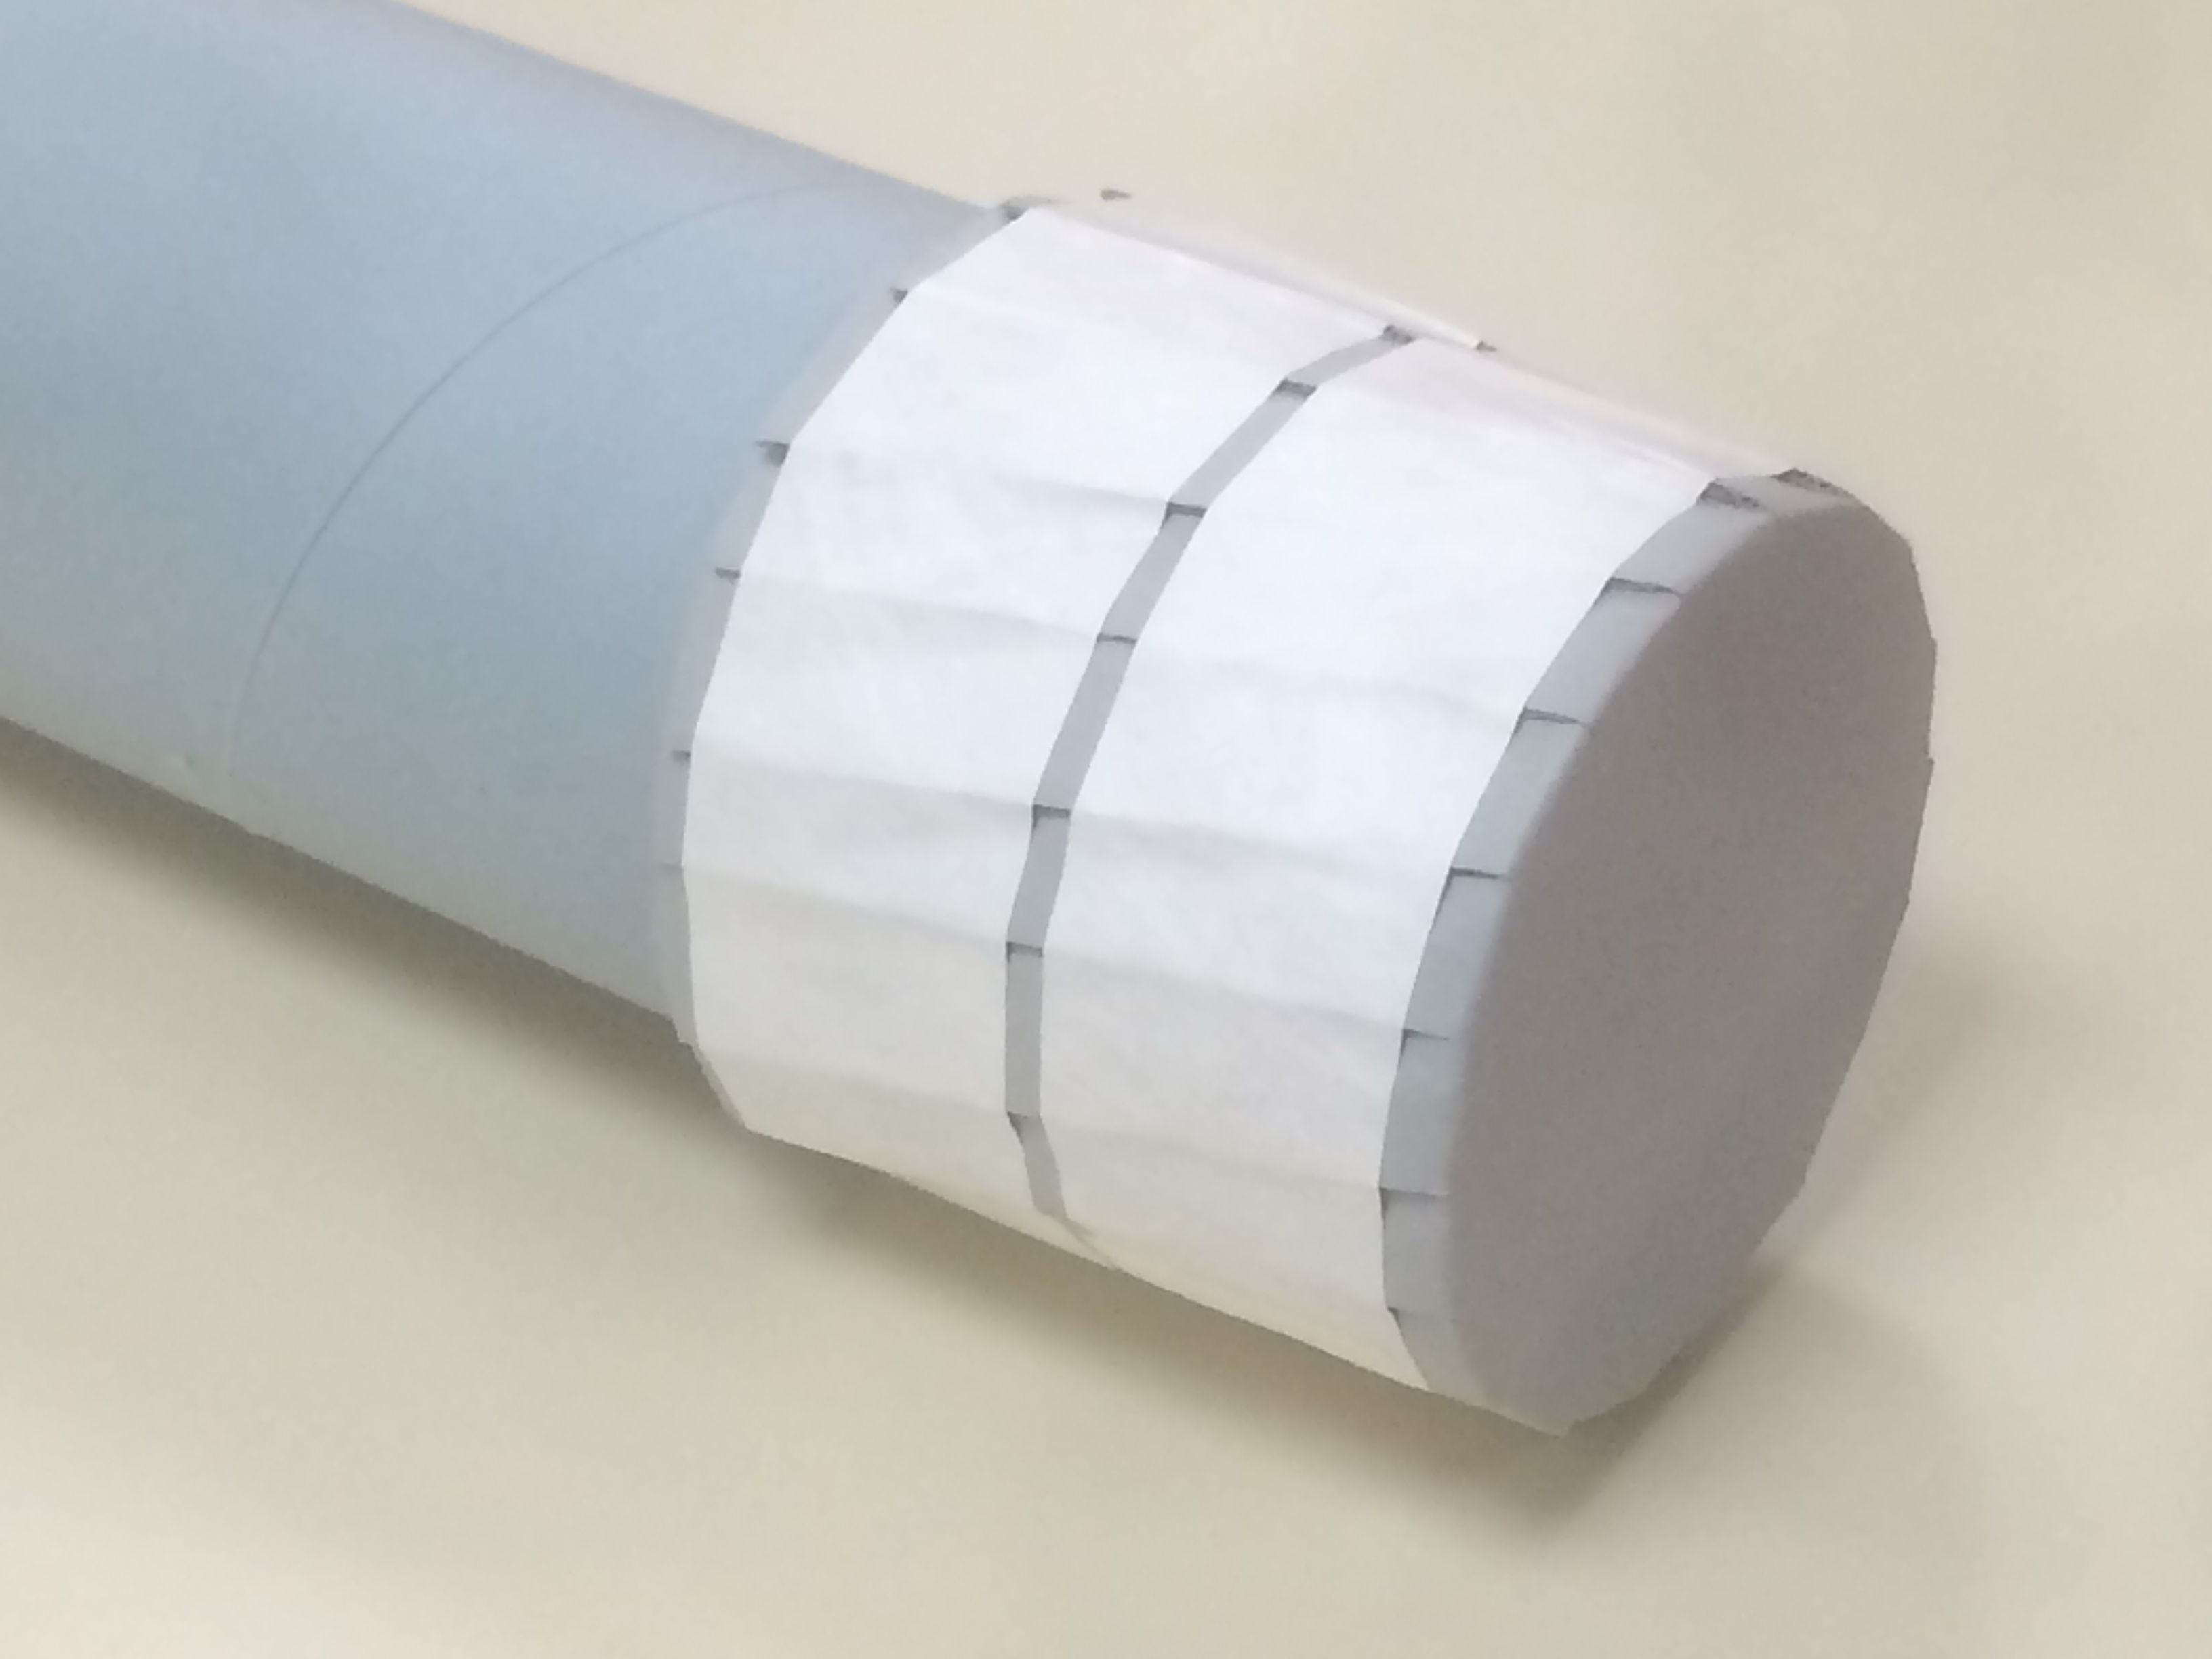
The cutting action of the laser can be altered by adjusting its speed and/or power so Tedd and I continued adjusting until we found a good setting that cleanly cut the board without being so overpowered to cause scorch marks.

Testing out the laser with different settings

In the end we found a setting of 50% speed and only 20% power made the perfect cut. The board still had a slightly burned scent to it even with the power so low, but leaving the parts in our fume hood overnight took care of that. Because the laser works by vaporizing the material, I’m not actually sure it’s possible to cut the board without having some smell.

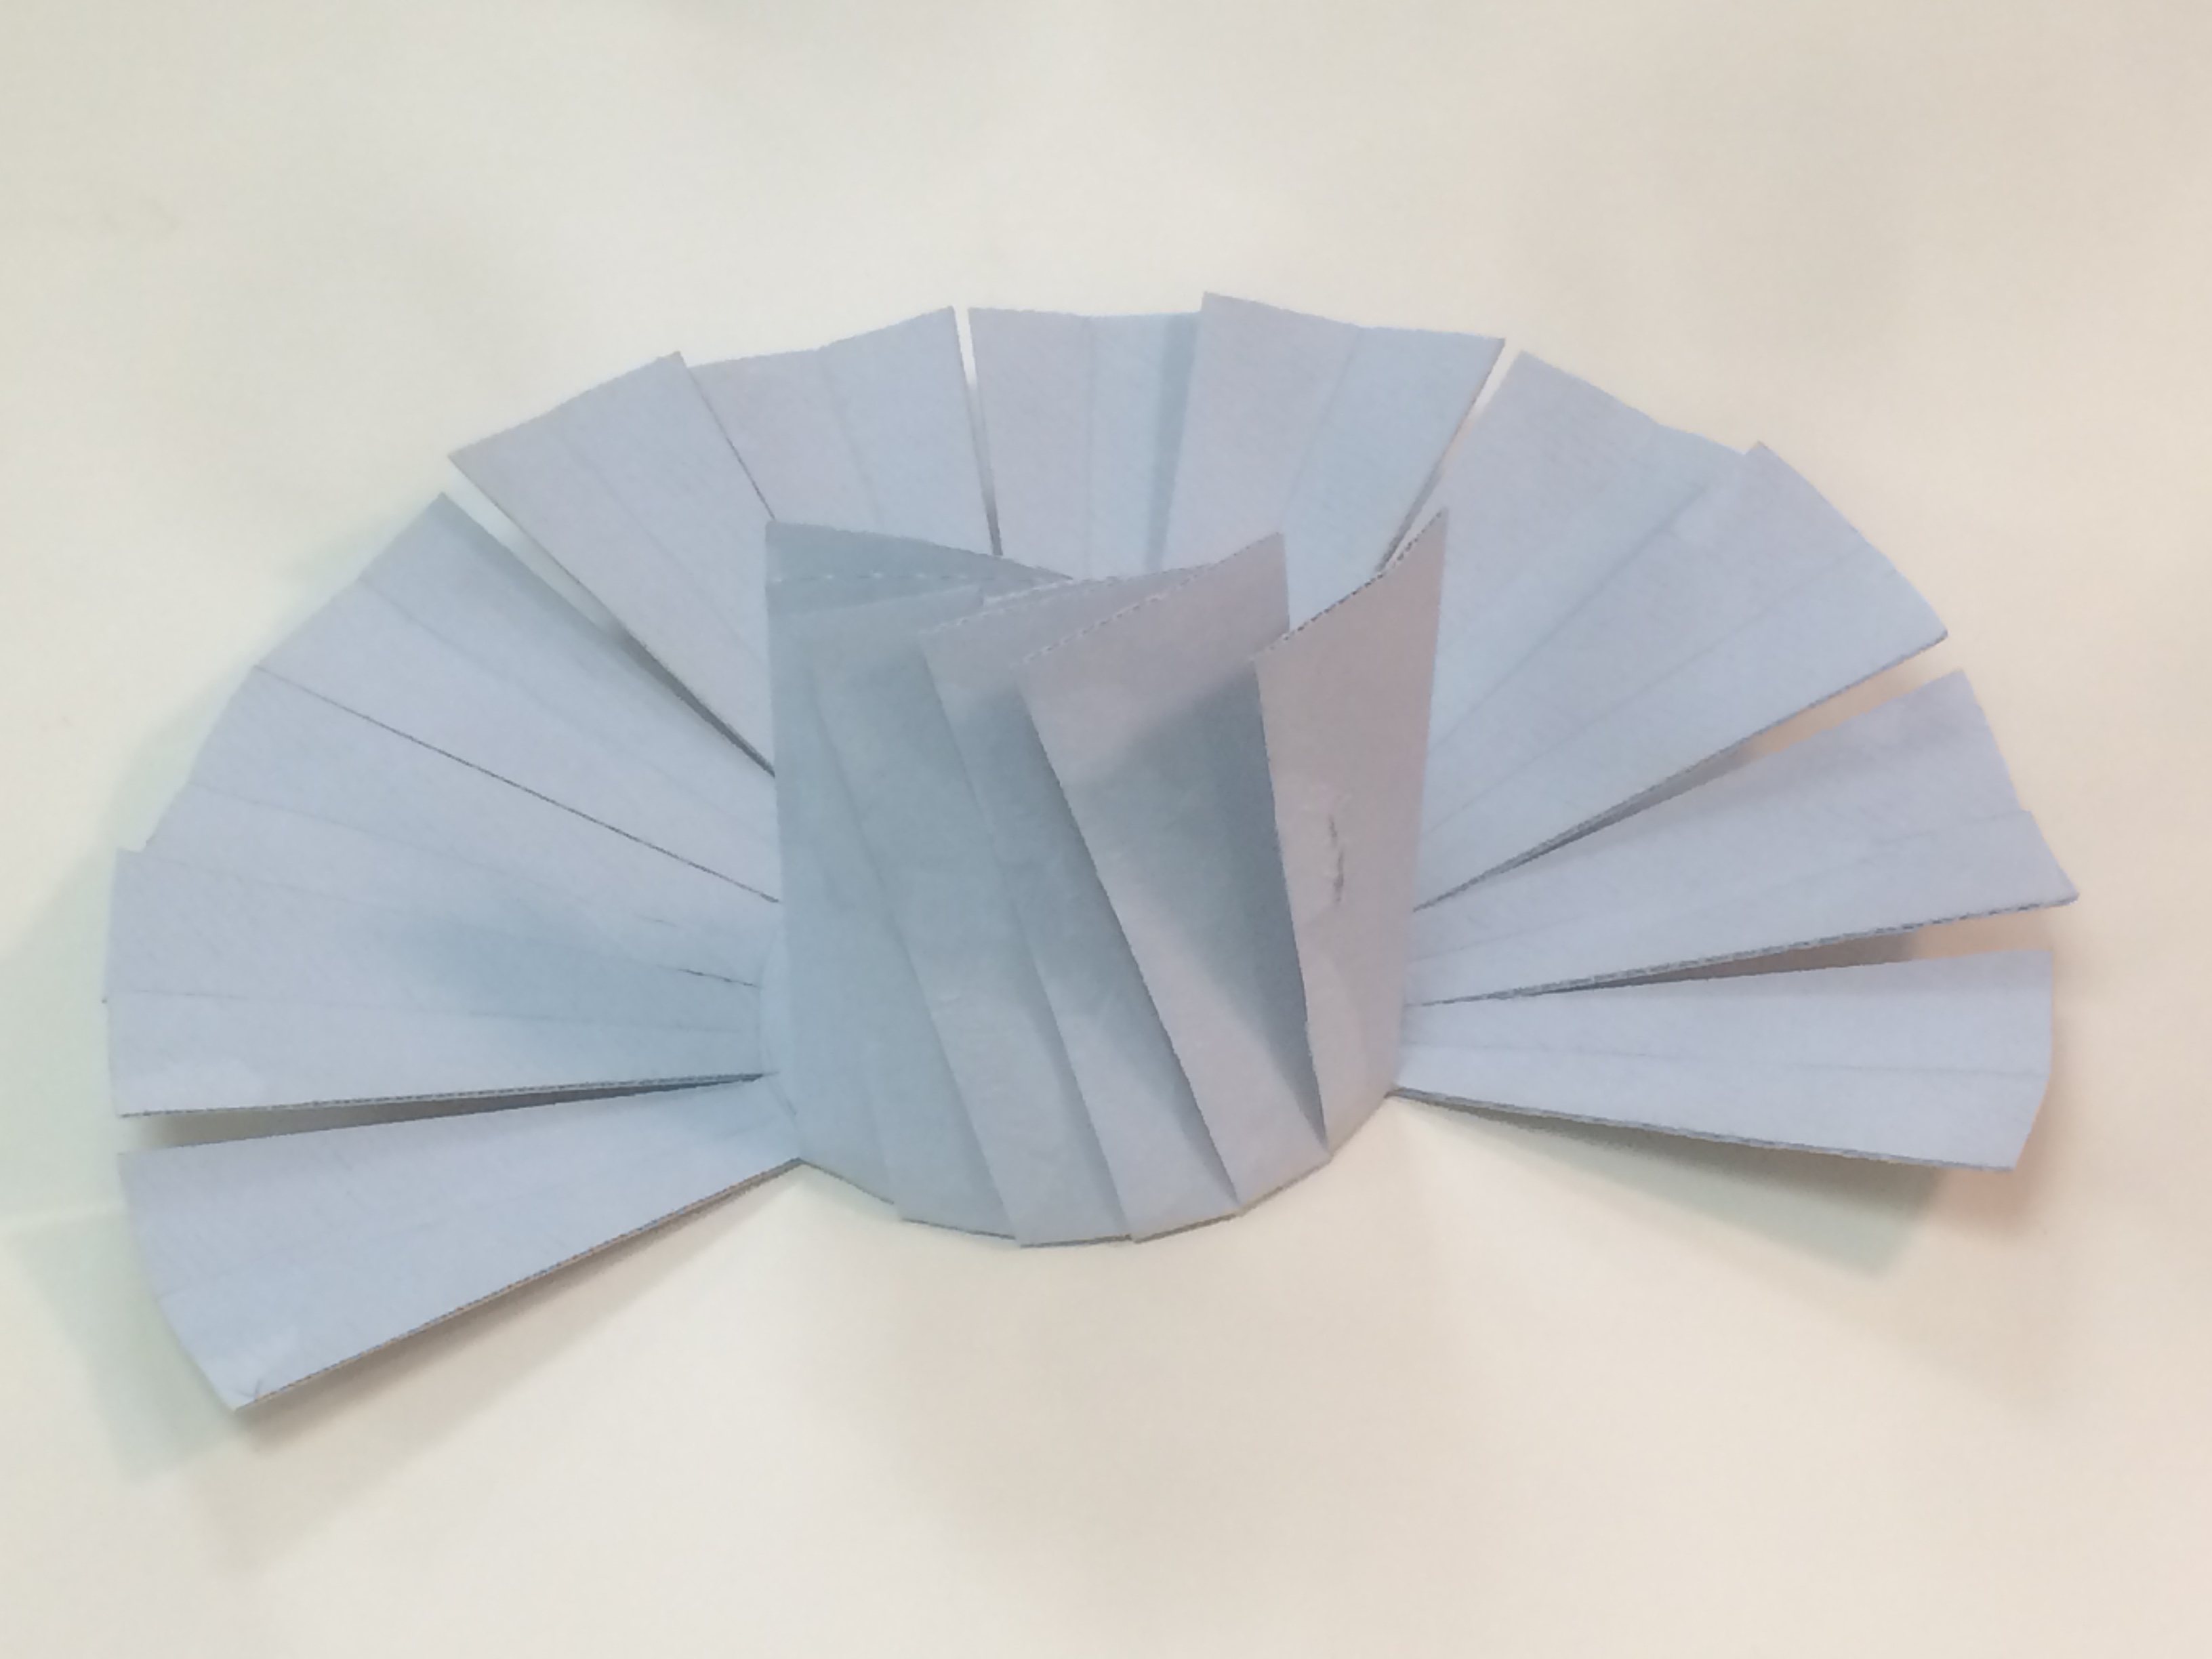
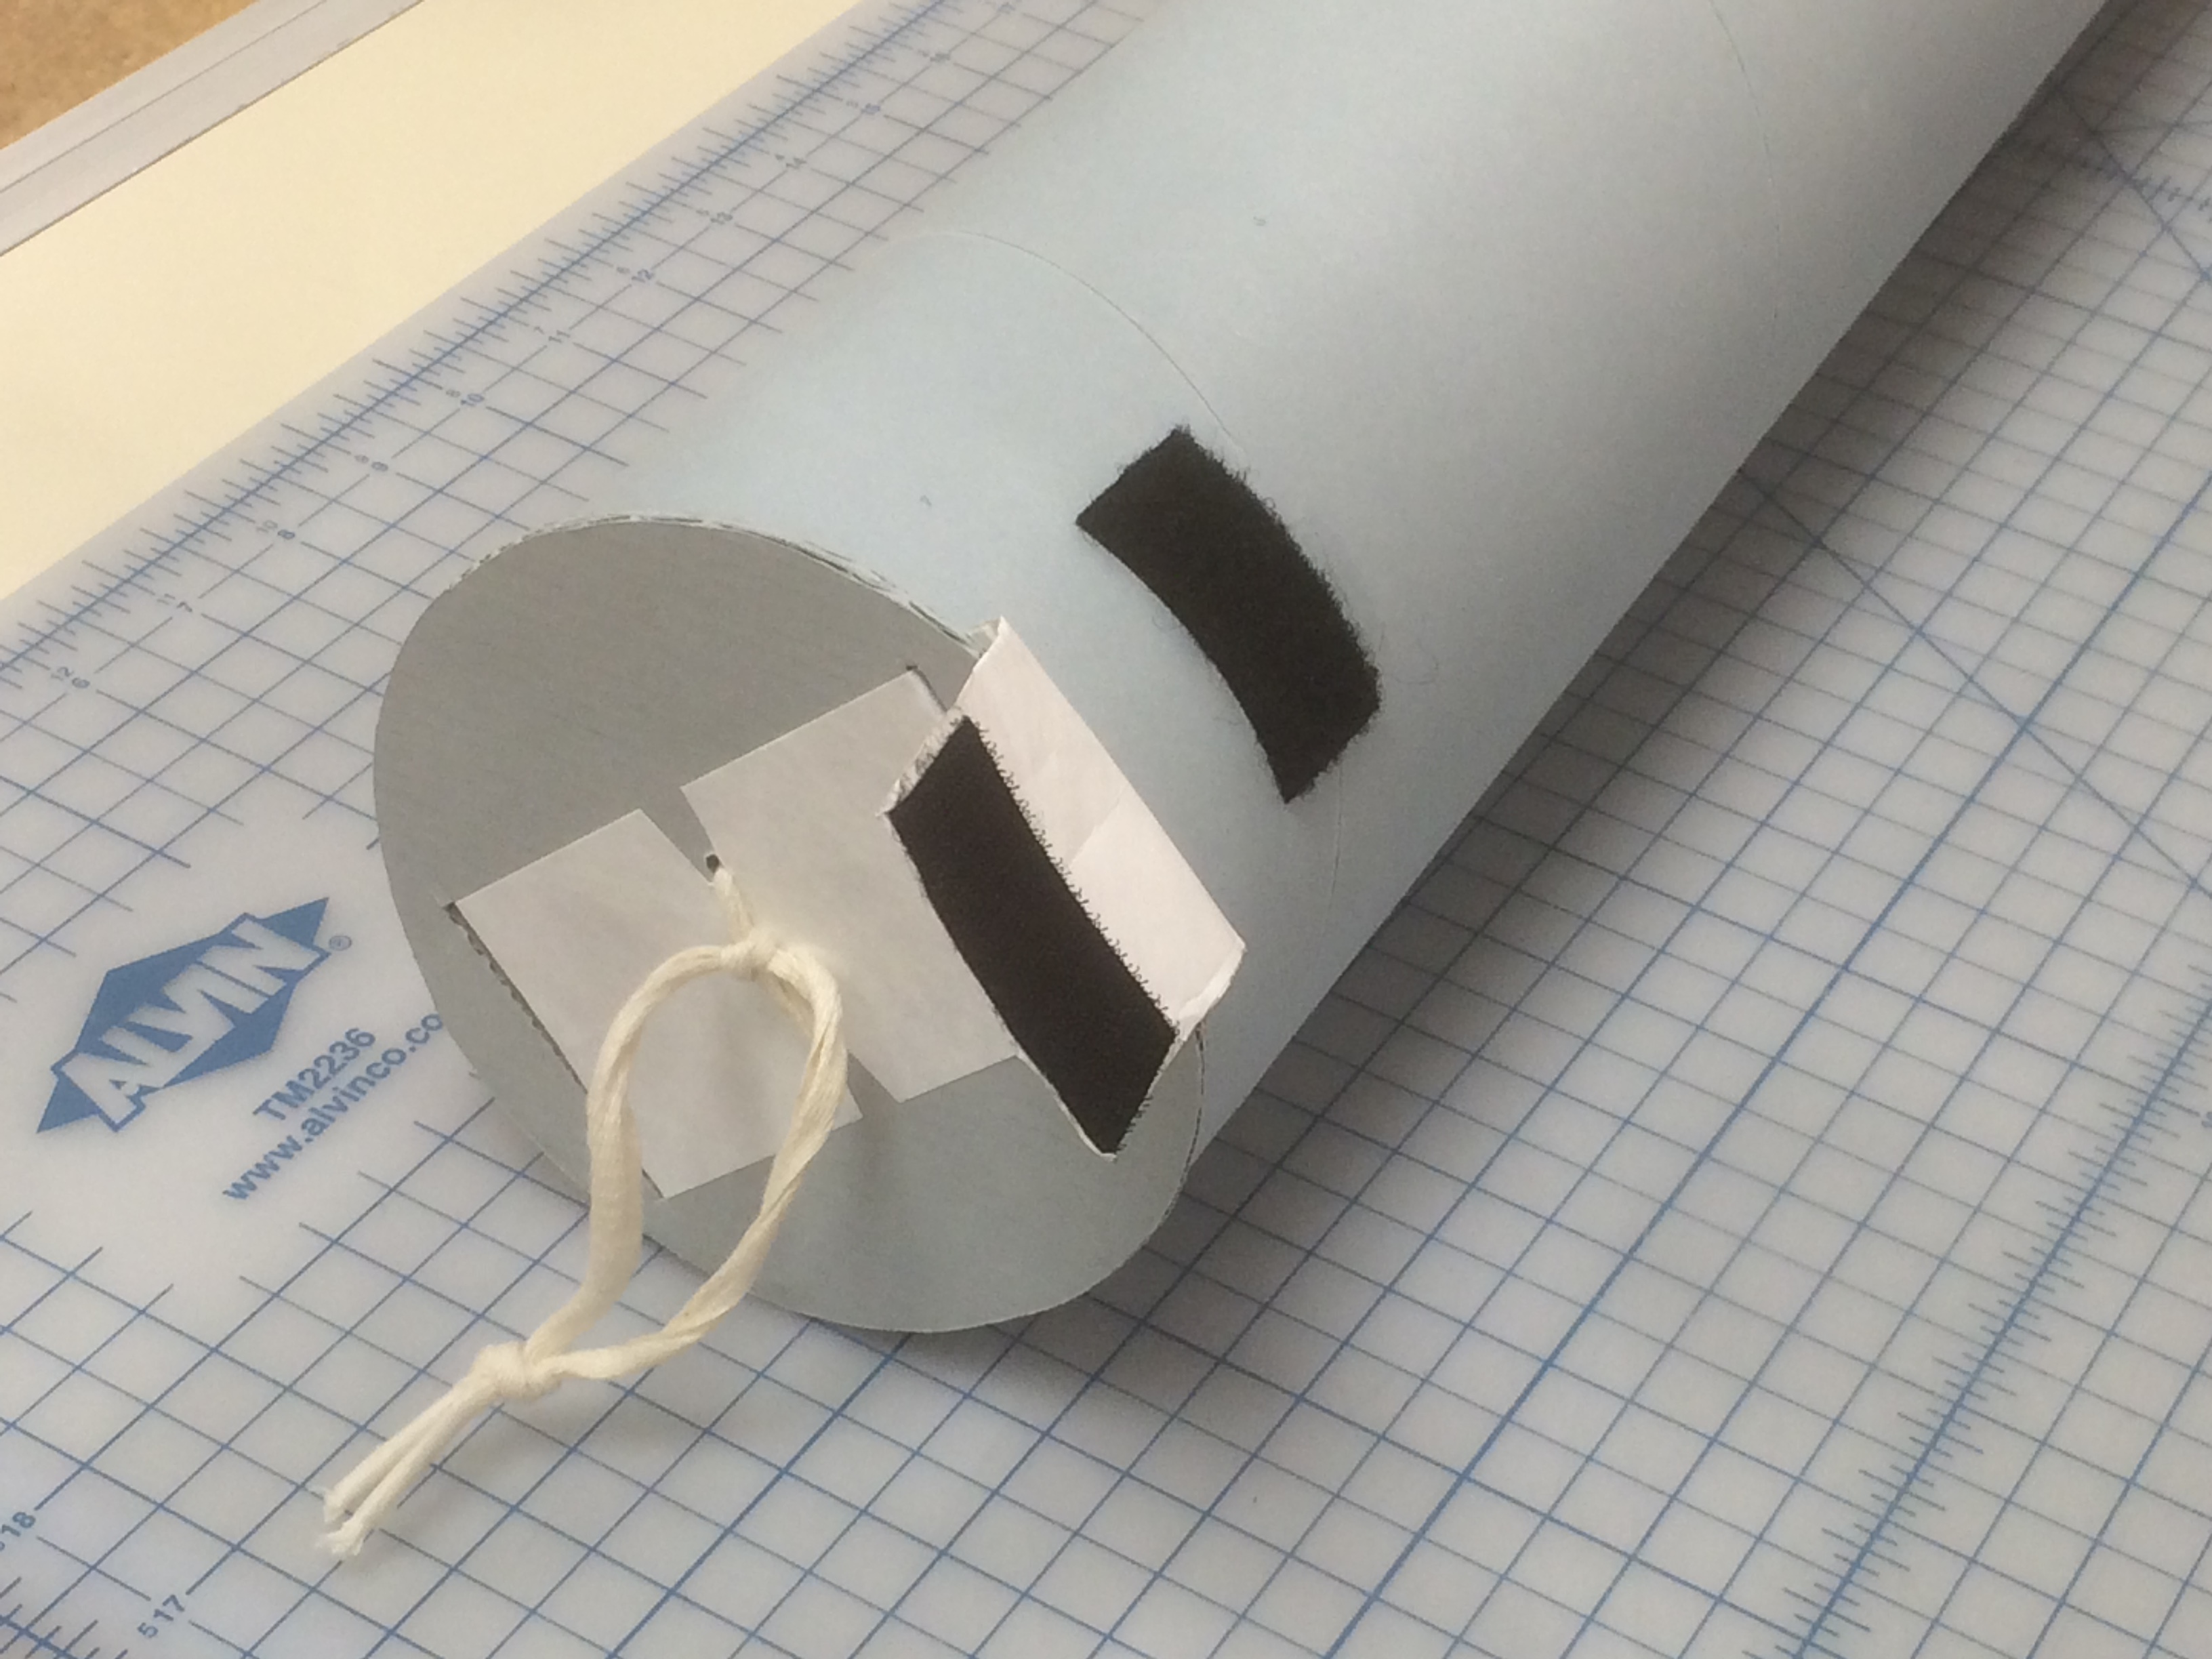
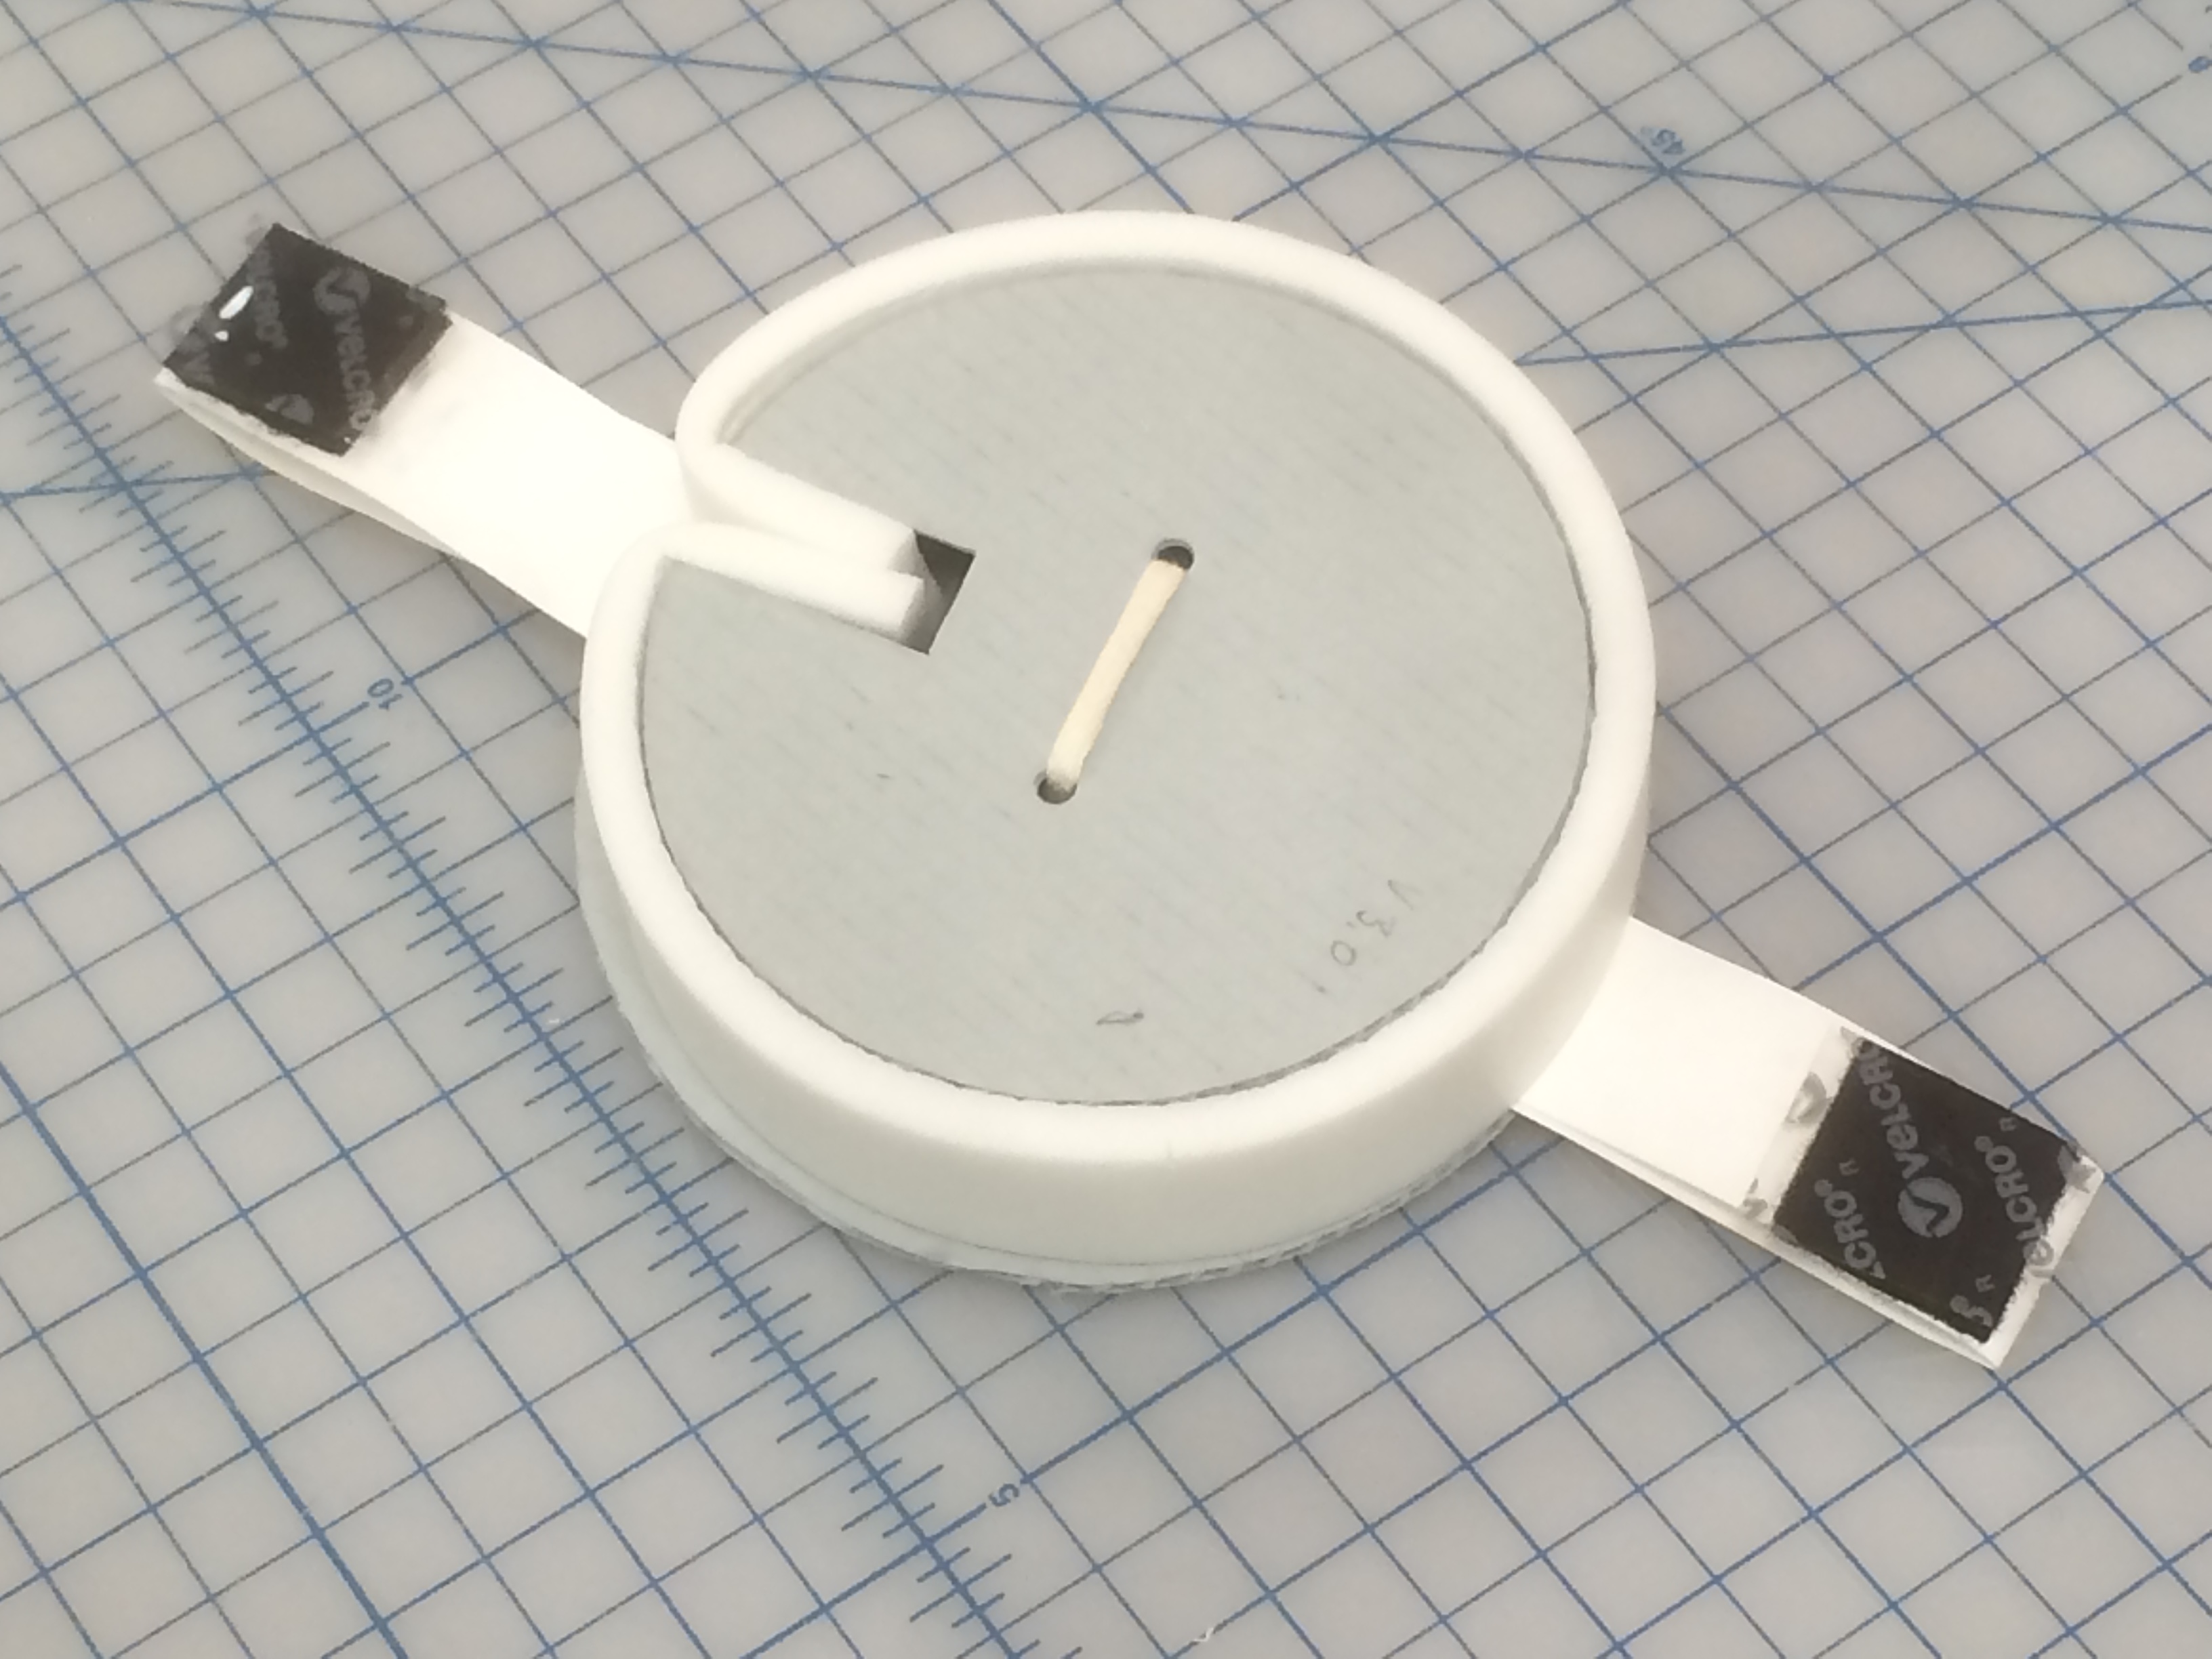
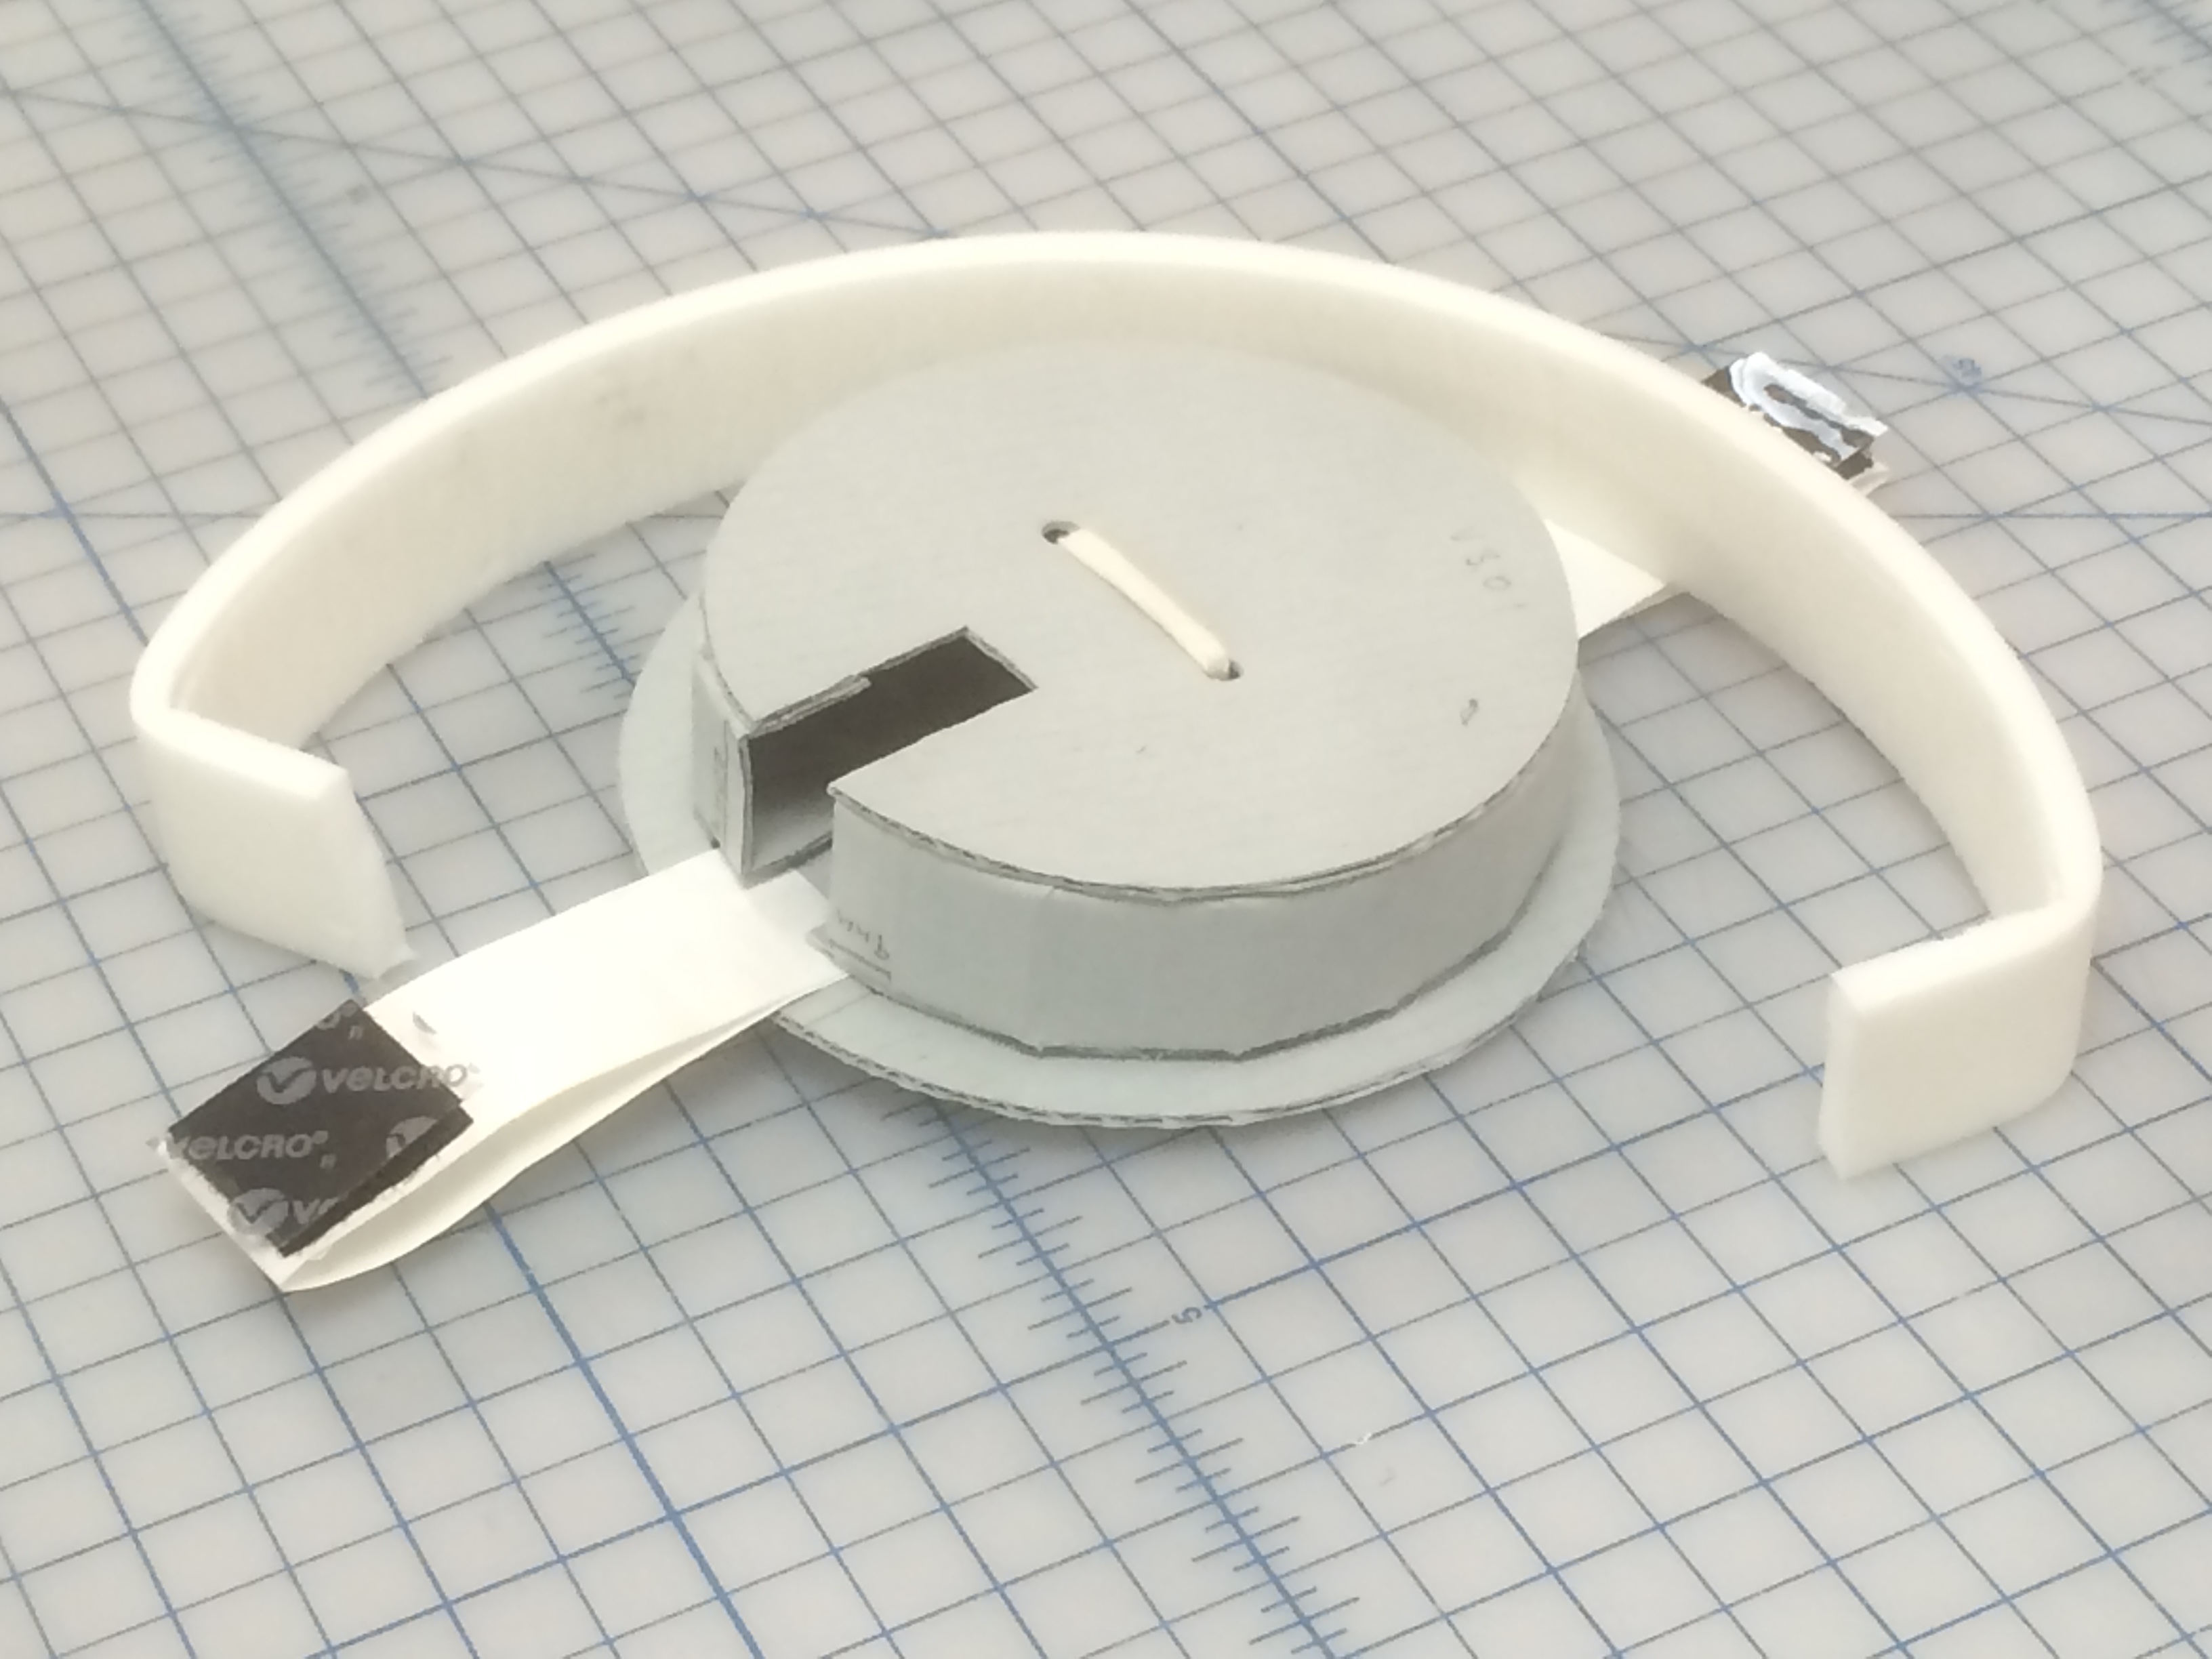
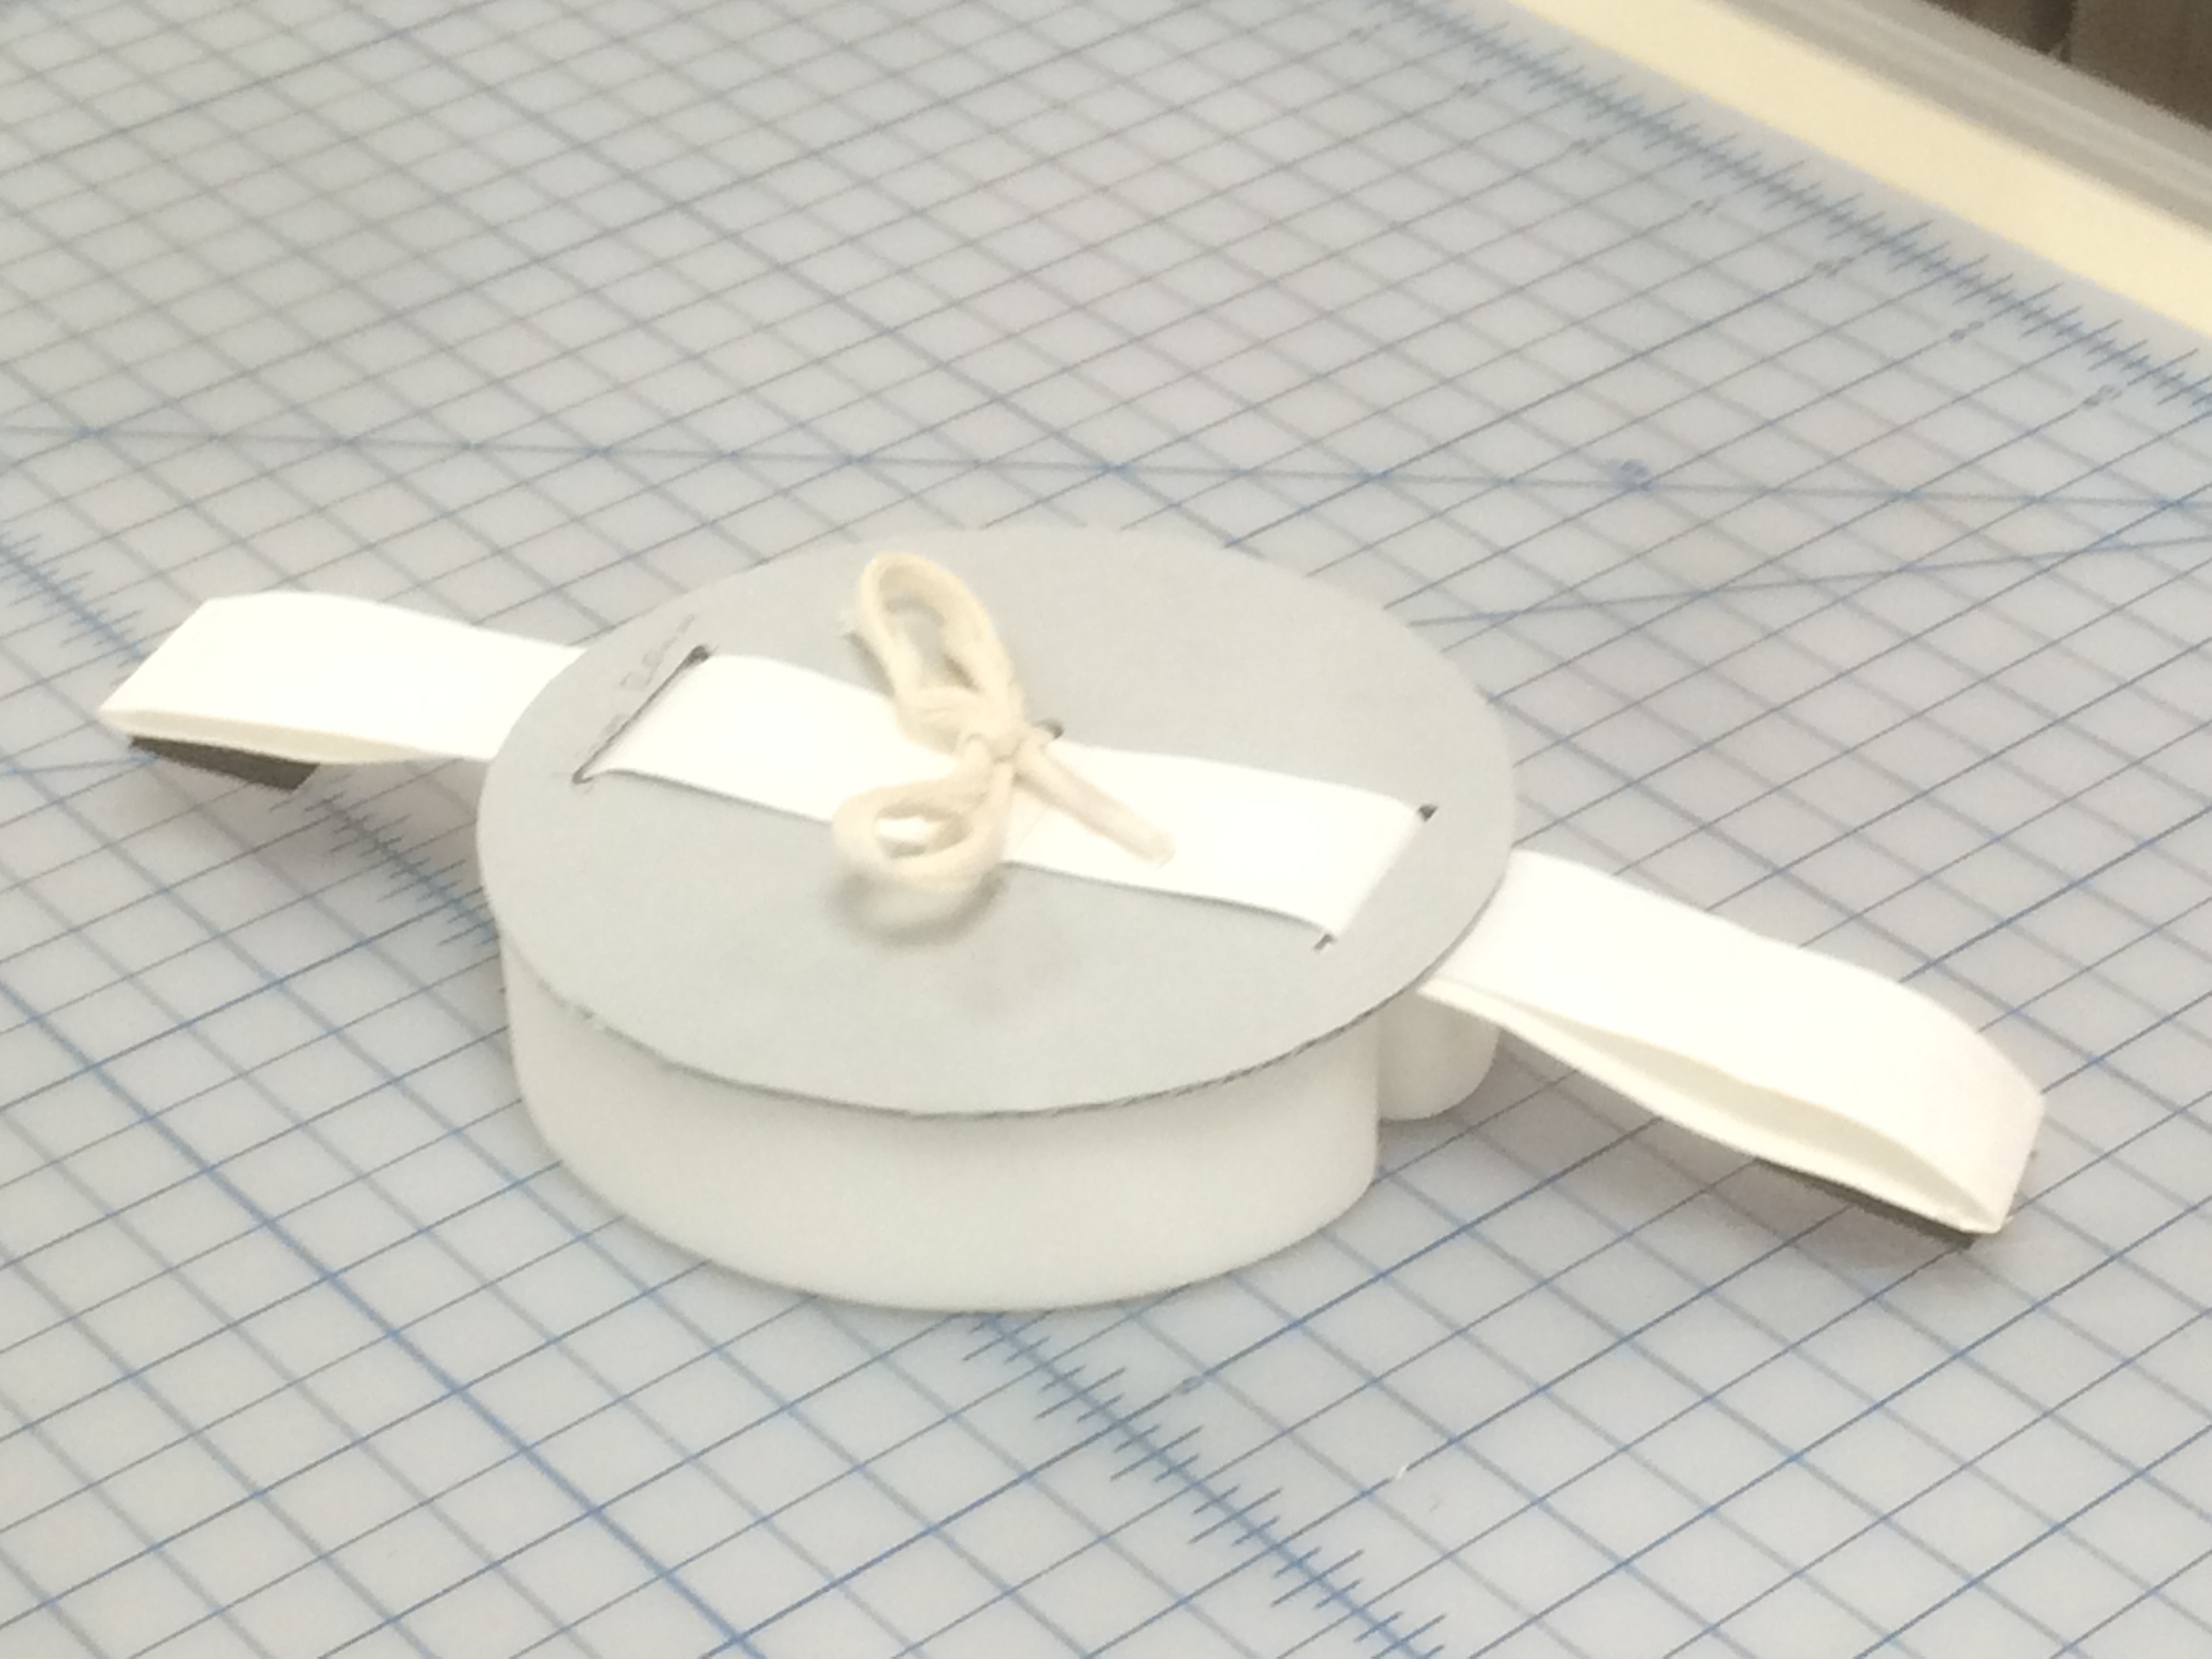
The perfection of these laser cut parts is especially apparent when compared side by side with my hand cut parts, and the laser cut parts are completed in a fraction of the time.

Laser cut on the left, hand cut on the right

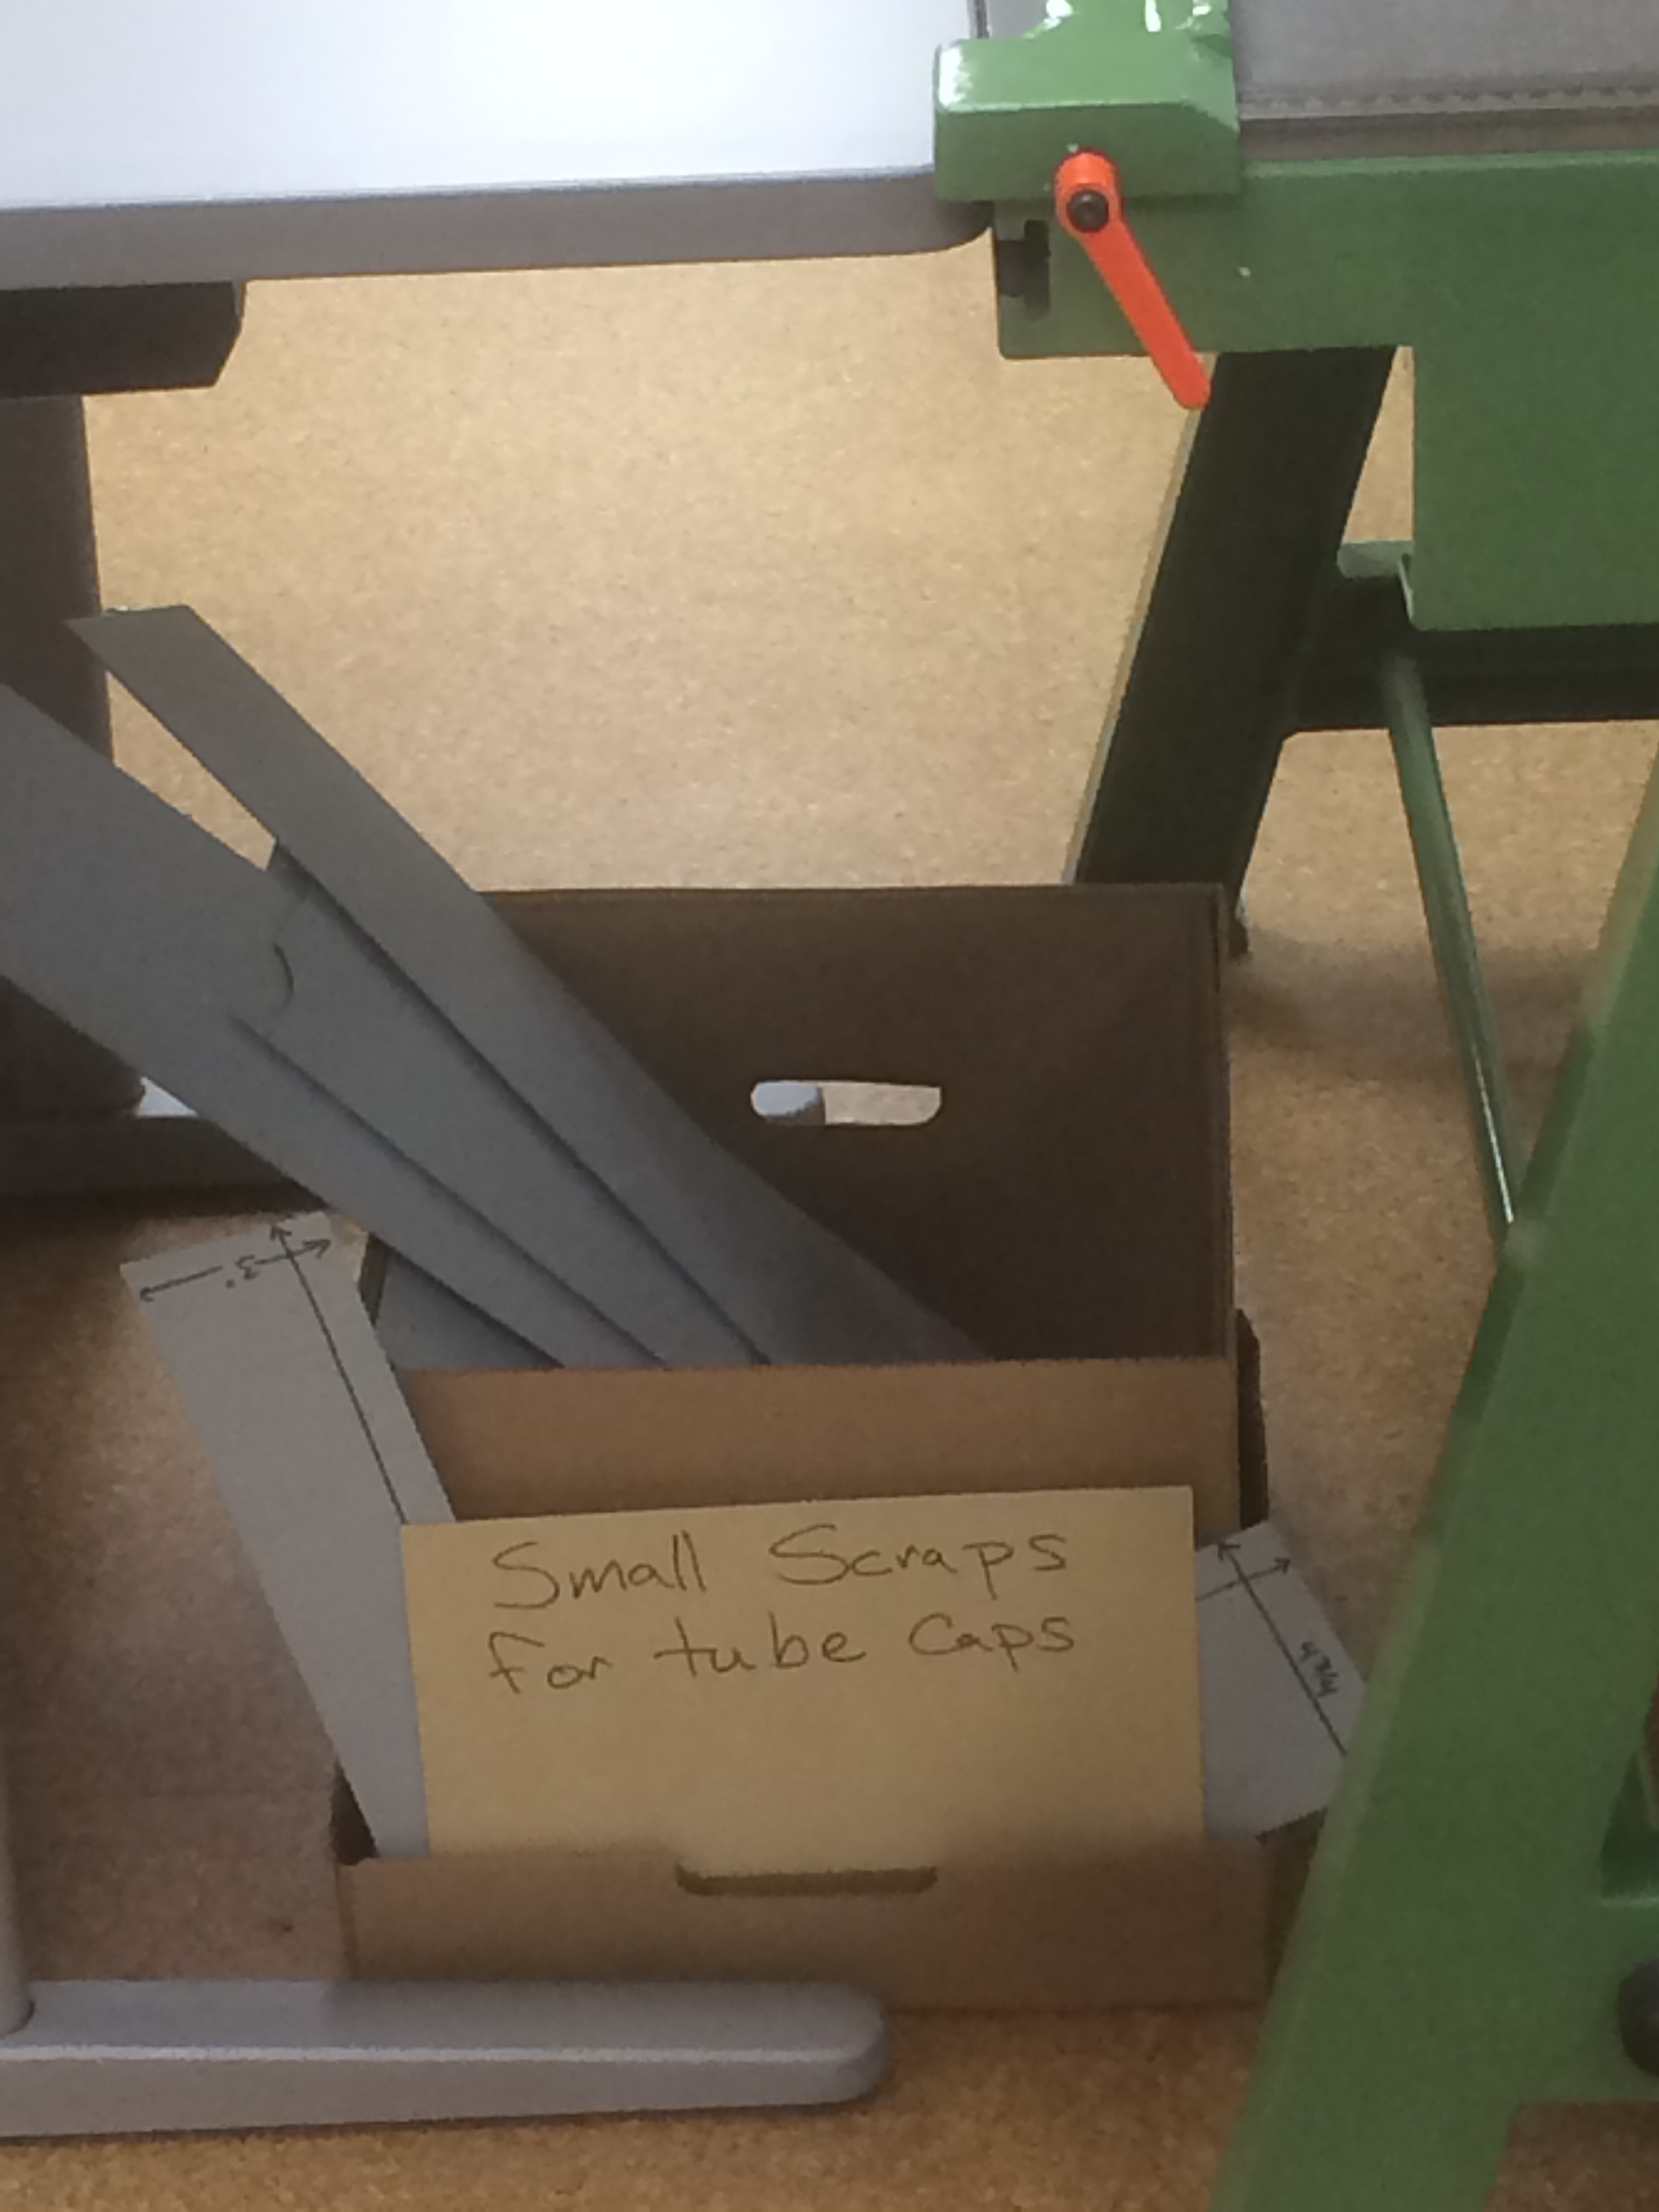
One of the great advantages of the laser cutter is that it can take any size board 12×24” or smaller. So even small scraps can be laser cut into cap parts. I have put a new bin under our board shear to collect scraps that would otherwise be destined for the recycle bin. This makes me especially happy because we are able to make almost the entire cap out of material diverted from the recycle bin.

Scrap bin
Scrap bin

After perfecting the method I plan to collect scraps until I’ve got a good pile, then cut out a number of cap parts all at once. Then we can have a supply of parts ready to assemble whenever a new rolled item needs storage. The prototype was an excellent success though and has already been put into use.

Welcoming Tube Cap Version 3.0 to its new home in the stacks

My experience at the iStudio has sparked my interest in other potential uses for laser cutting or engraving. Could this be used for creating other enclosures? Or could we accommodate making more complex enclosures if they could be modeled and cut on this machine?

The folks at the iStudio had a wooden box on display that was cut and engraved on the Epilog Zing. A student using the machine on my first visit showed me a template available for free online that would calculate the cuts for a box of any size including calculating the size to make perfect finger joints.

Wooden box cut and engraved on the Epilog Zing

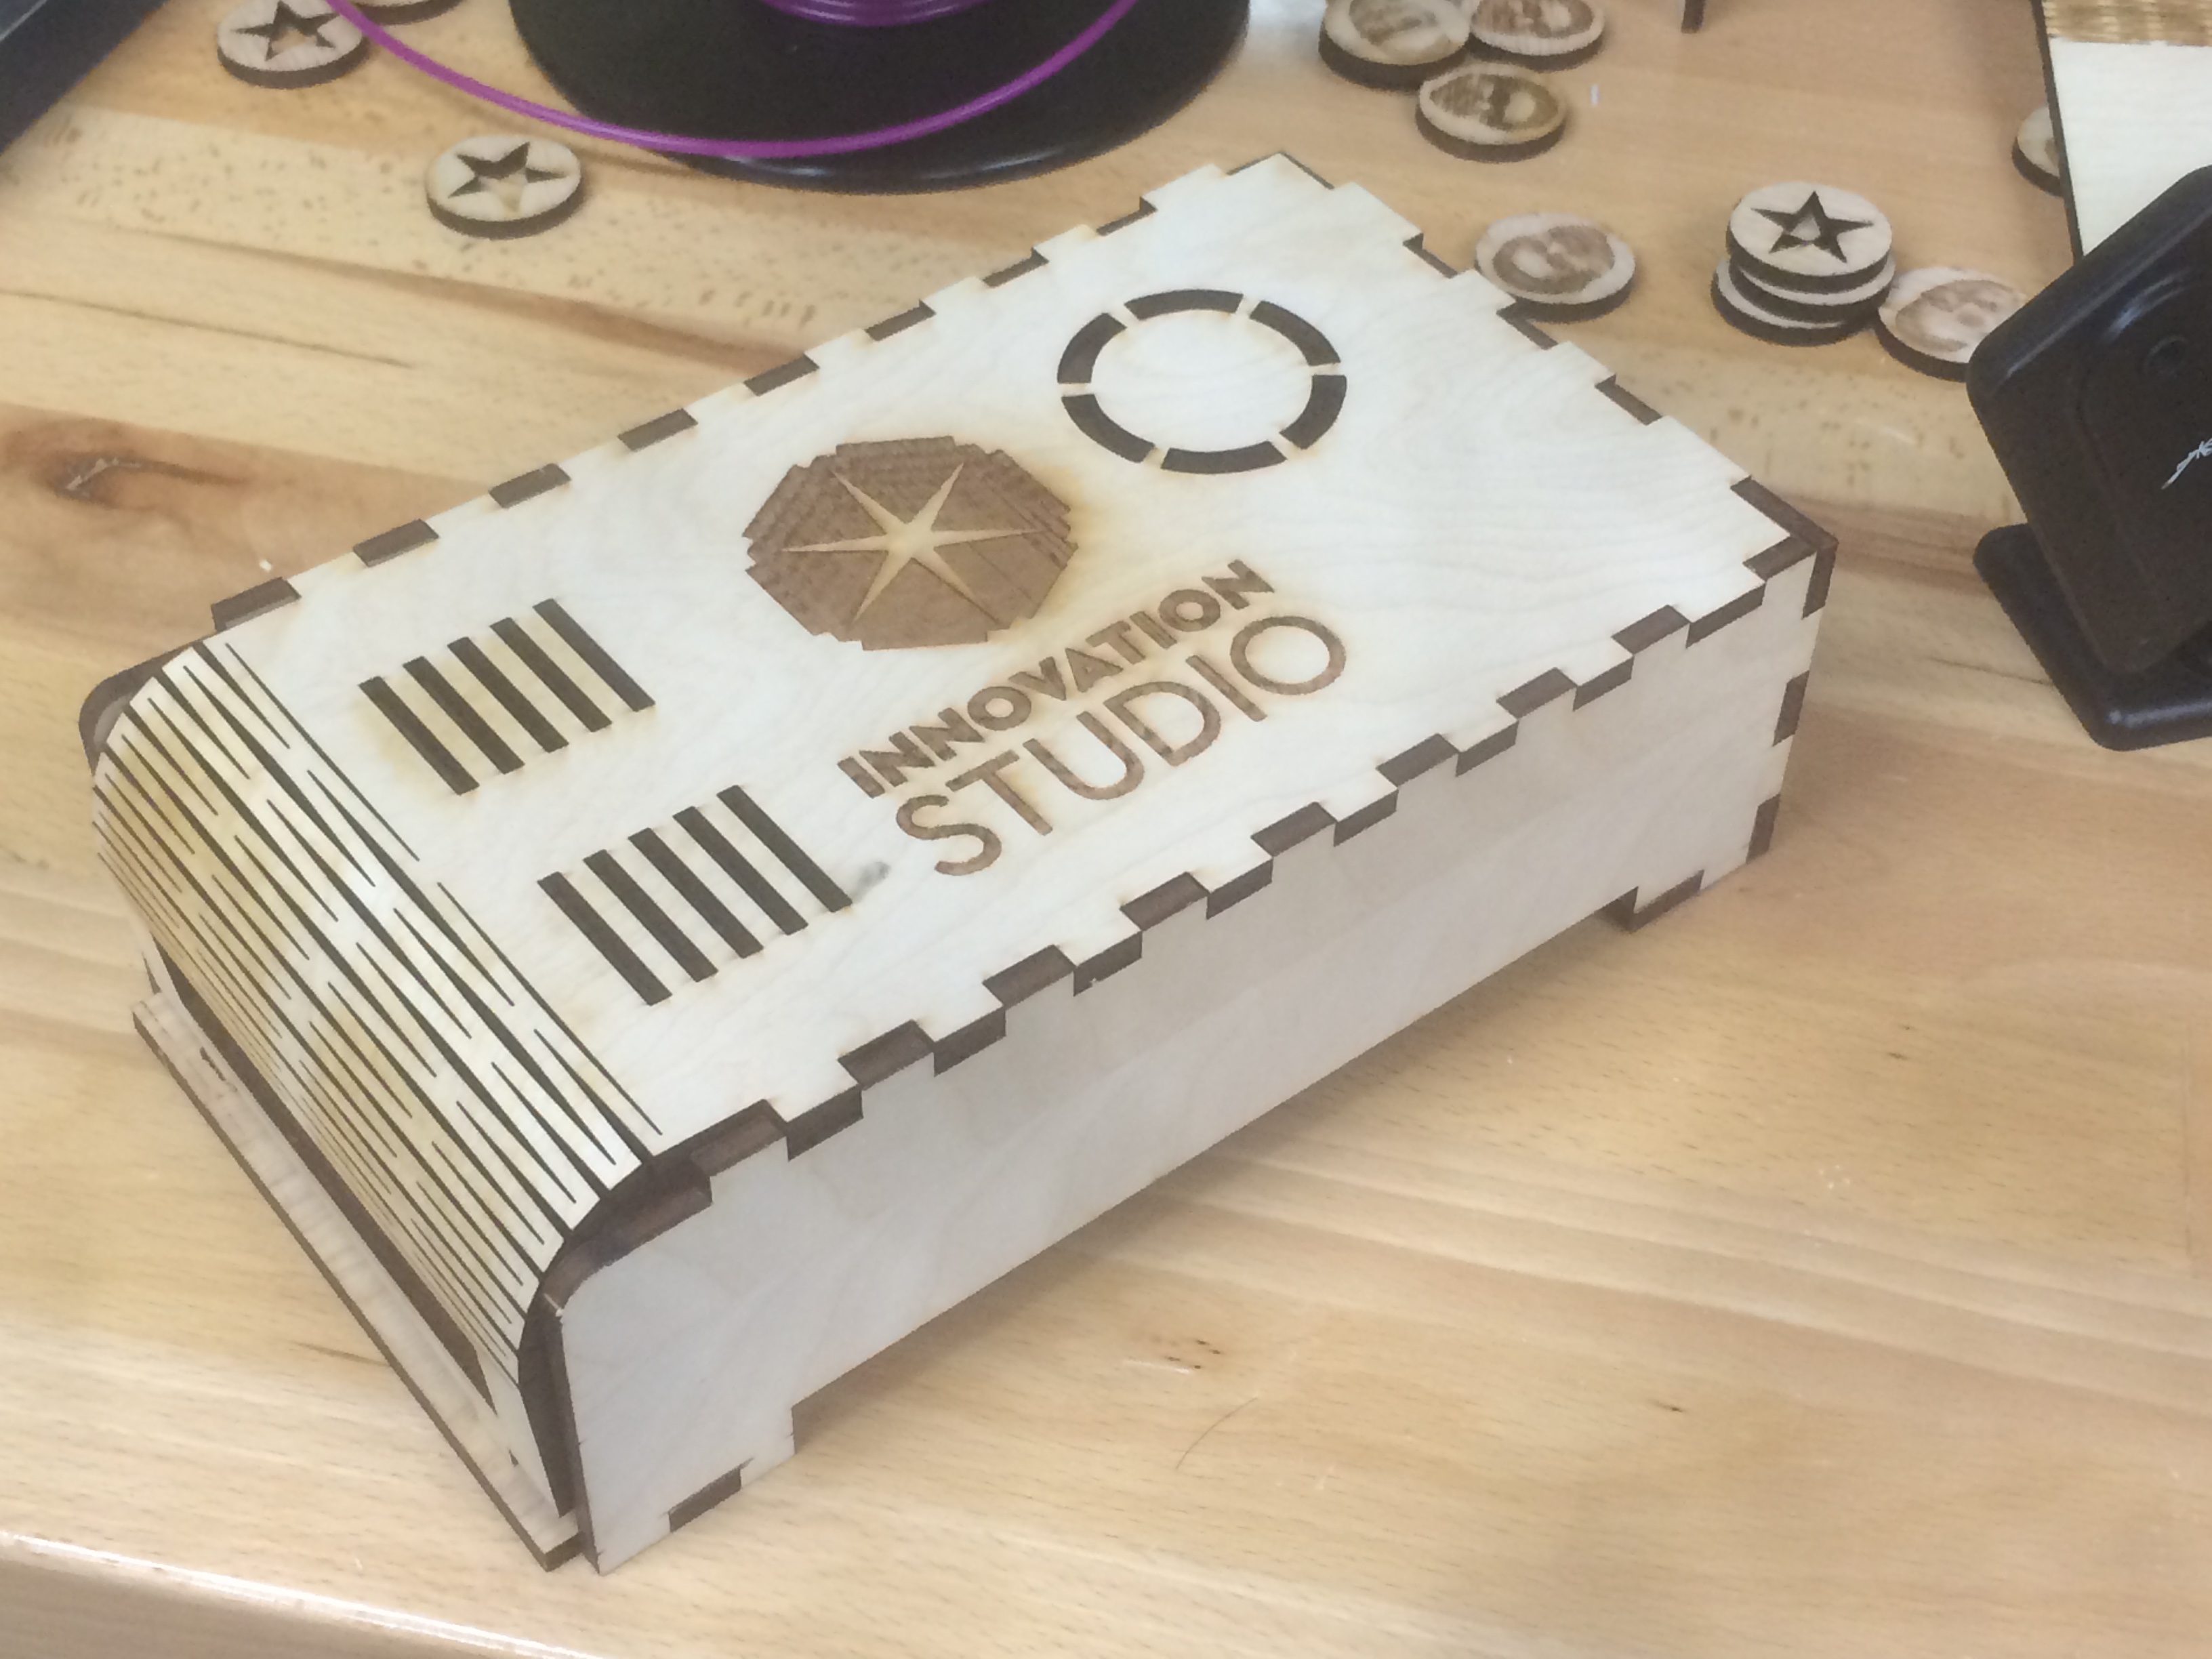
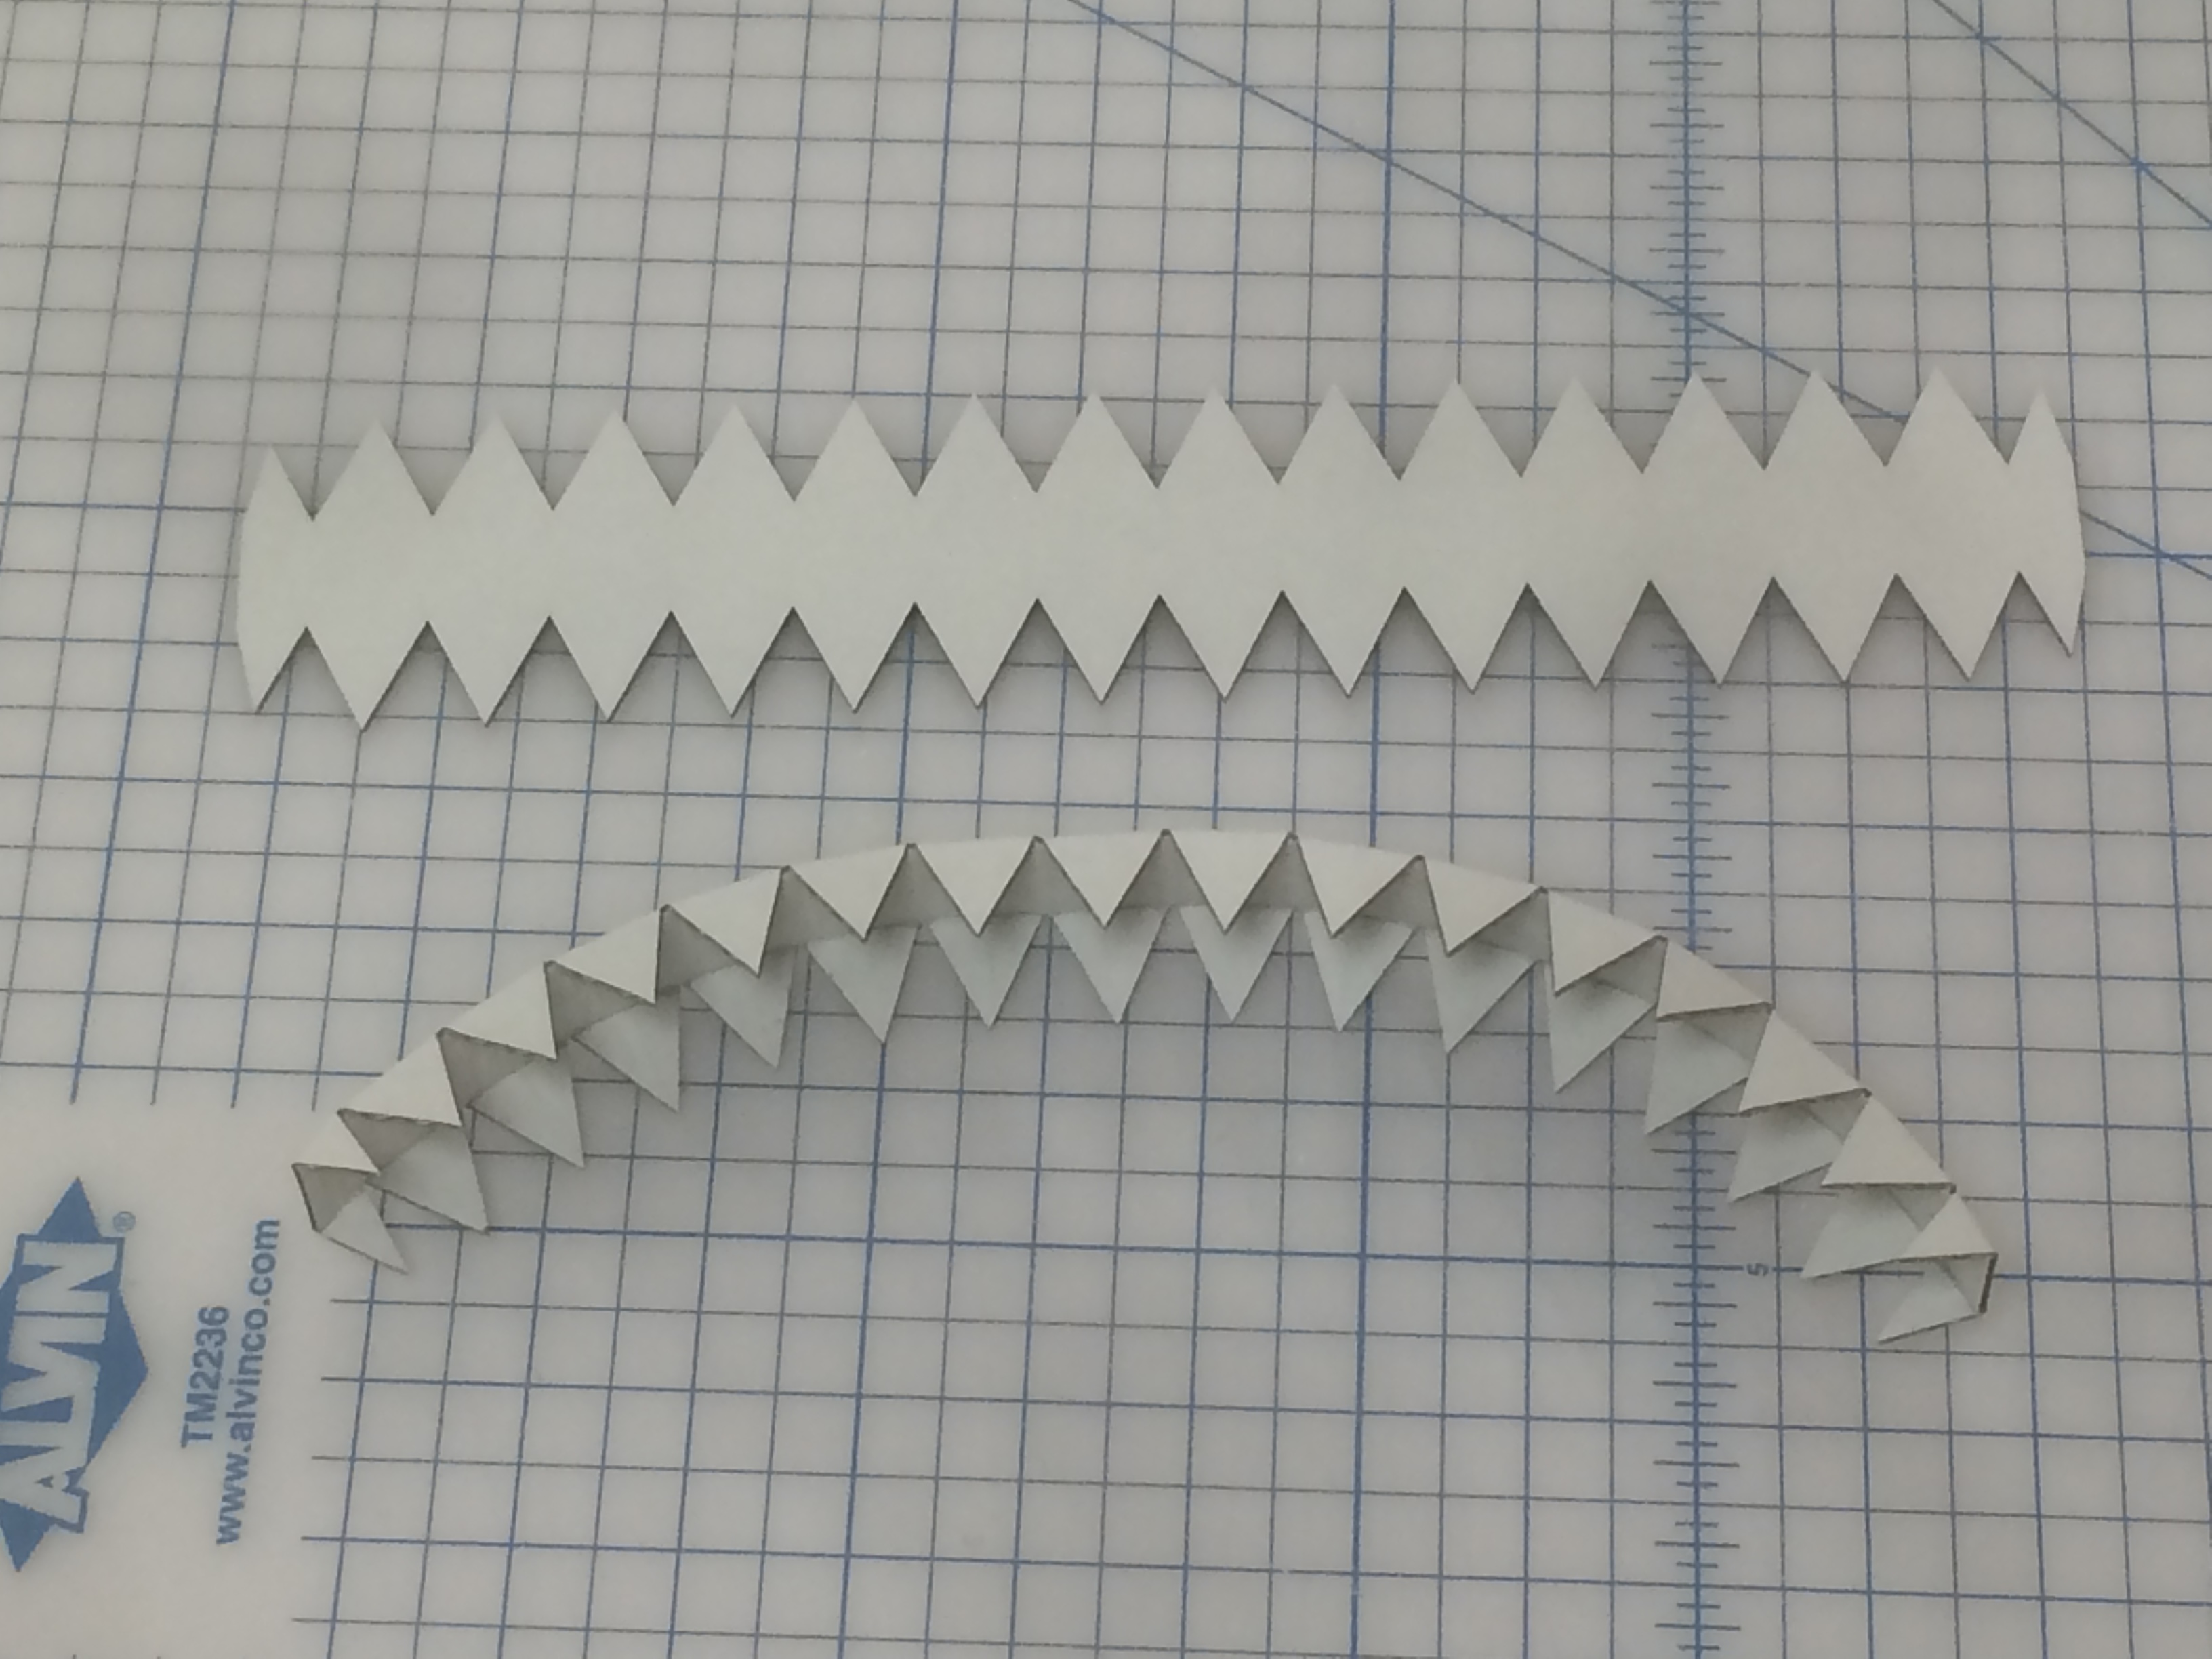
To me was the lid of this box was even more inspiring. By cutting a series of parallel slits in the wood the flat board became bendable.

Lid cut from a flat piece of ¼” plywood
Bendy!!
Bendy!!

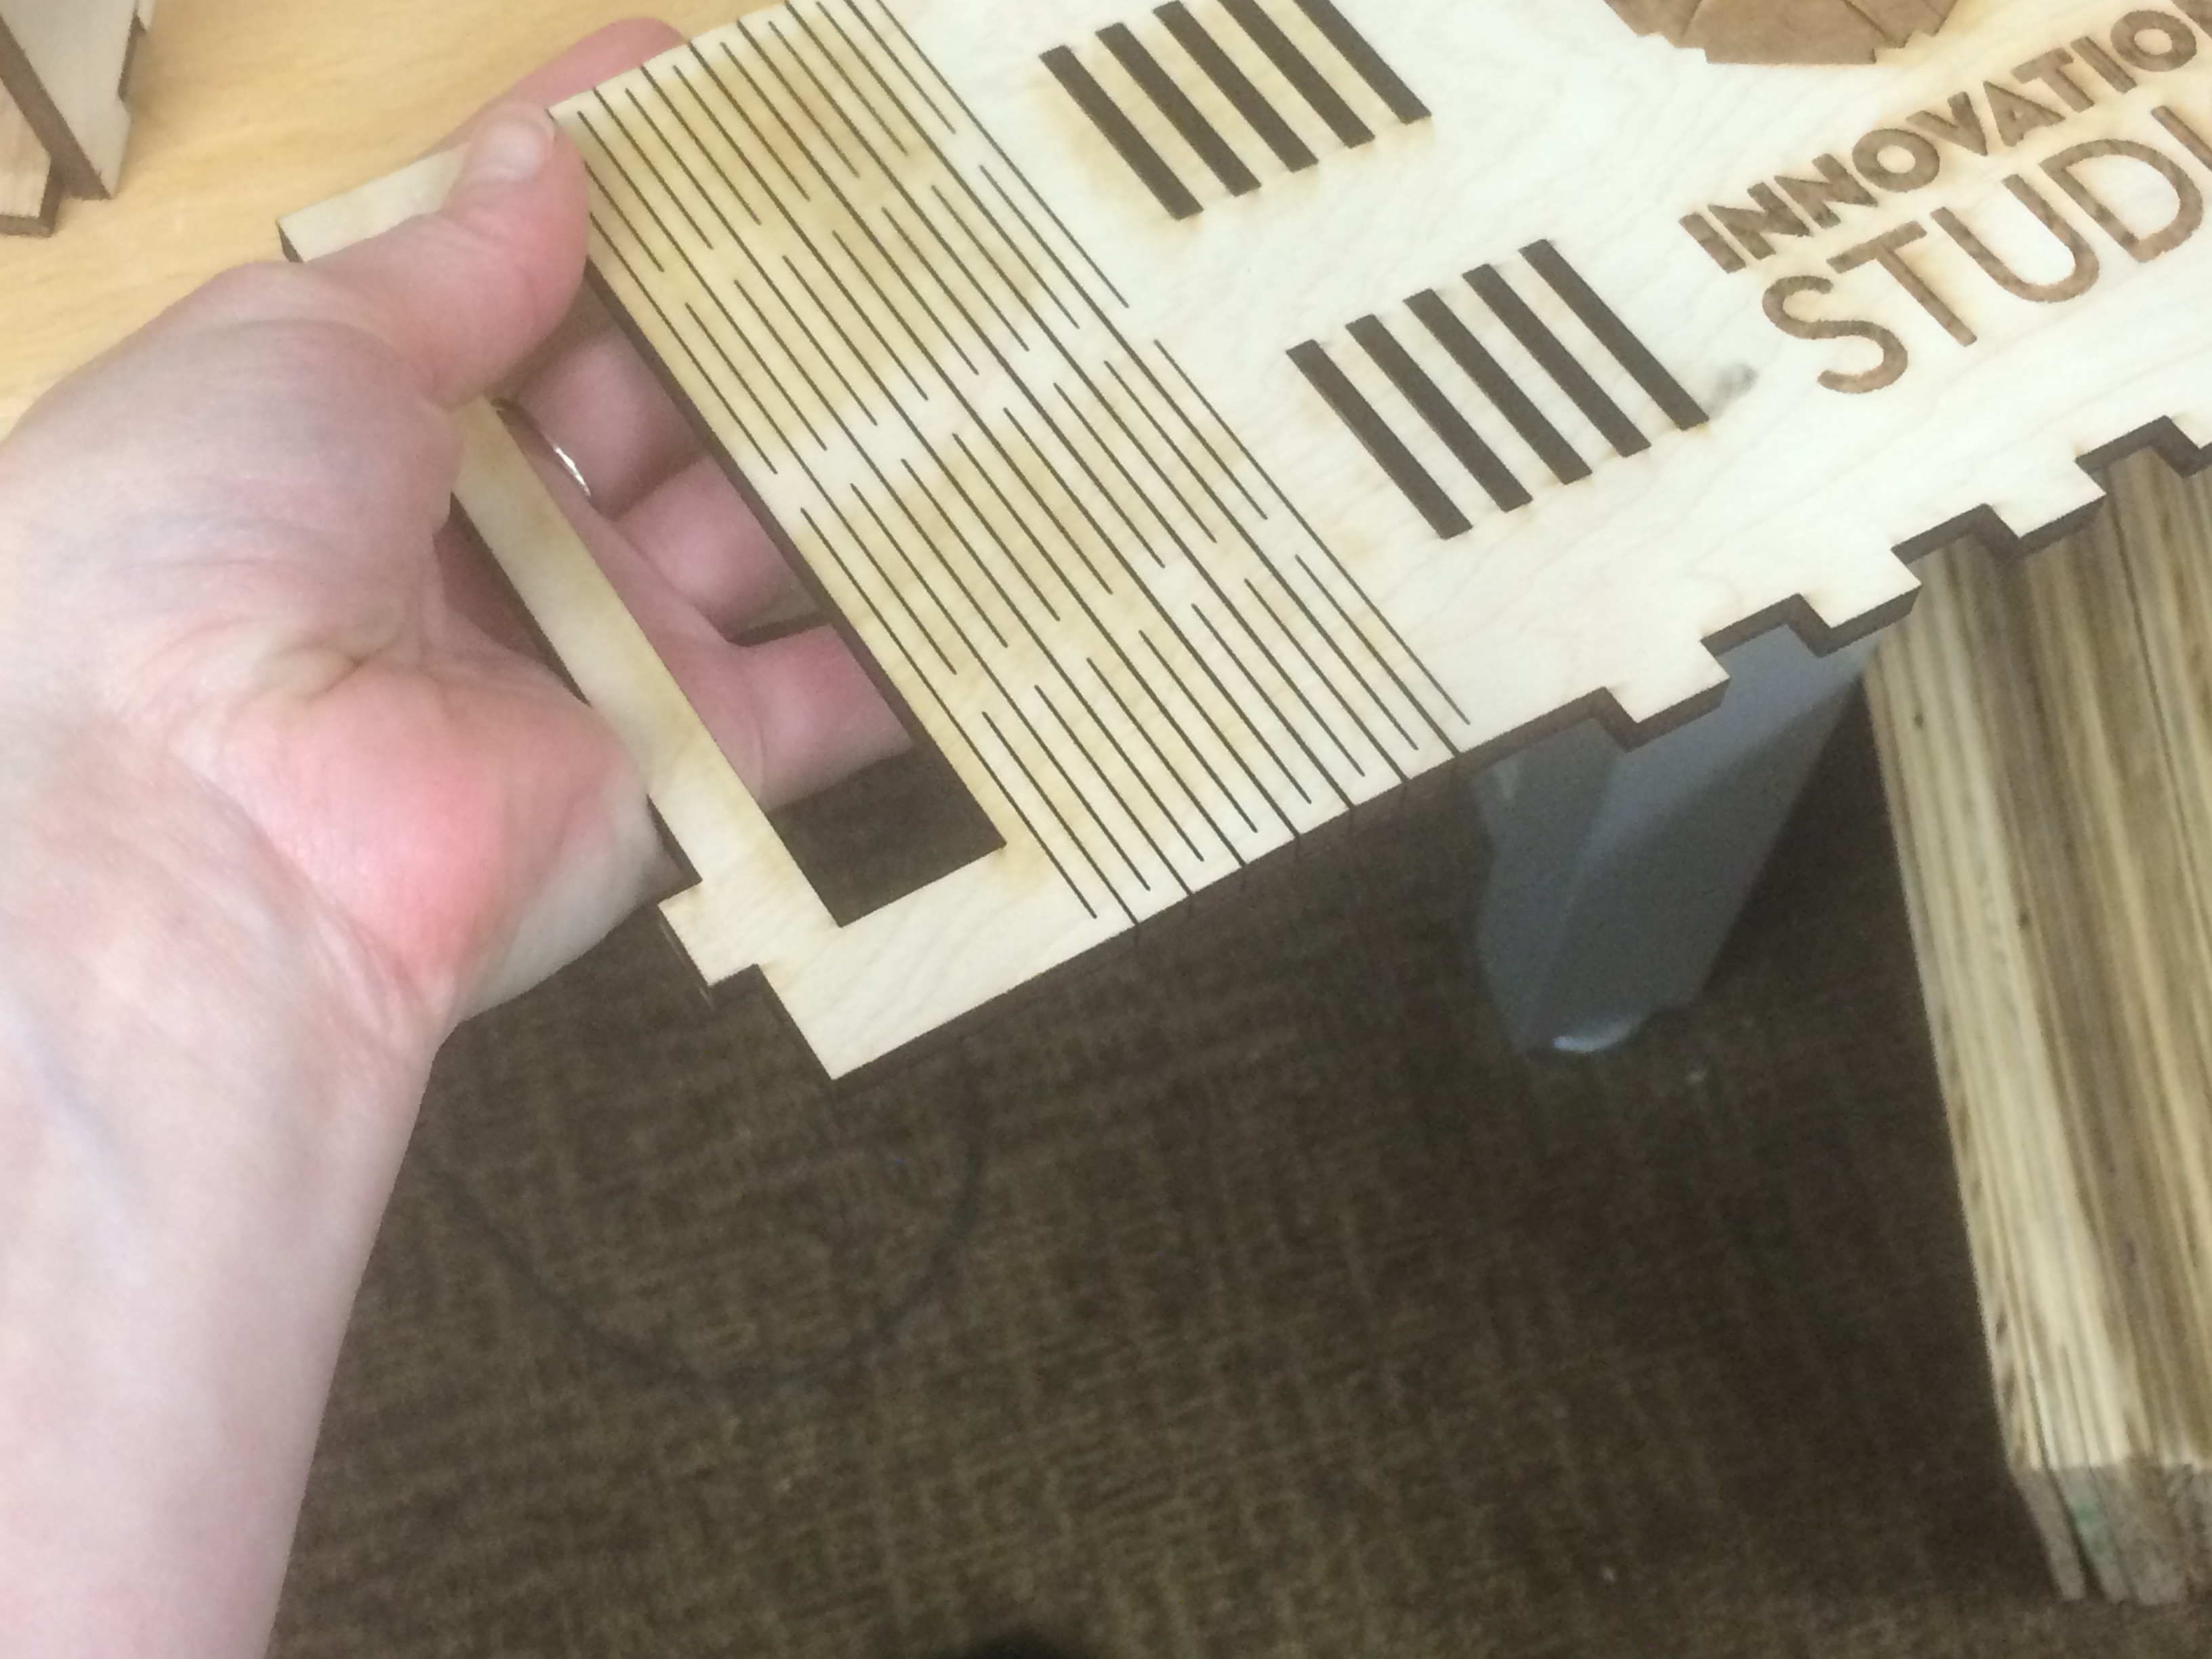
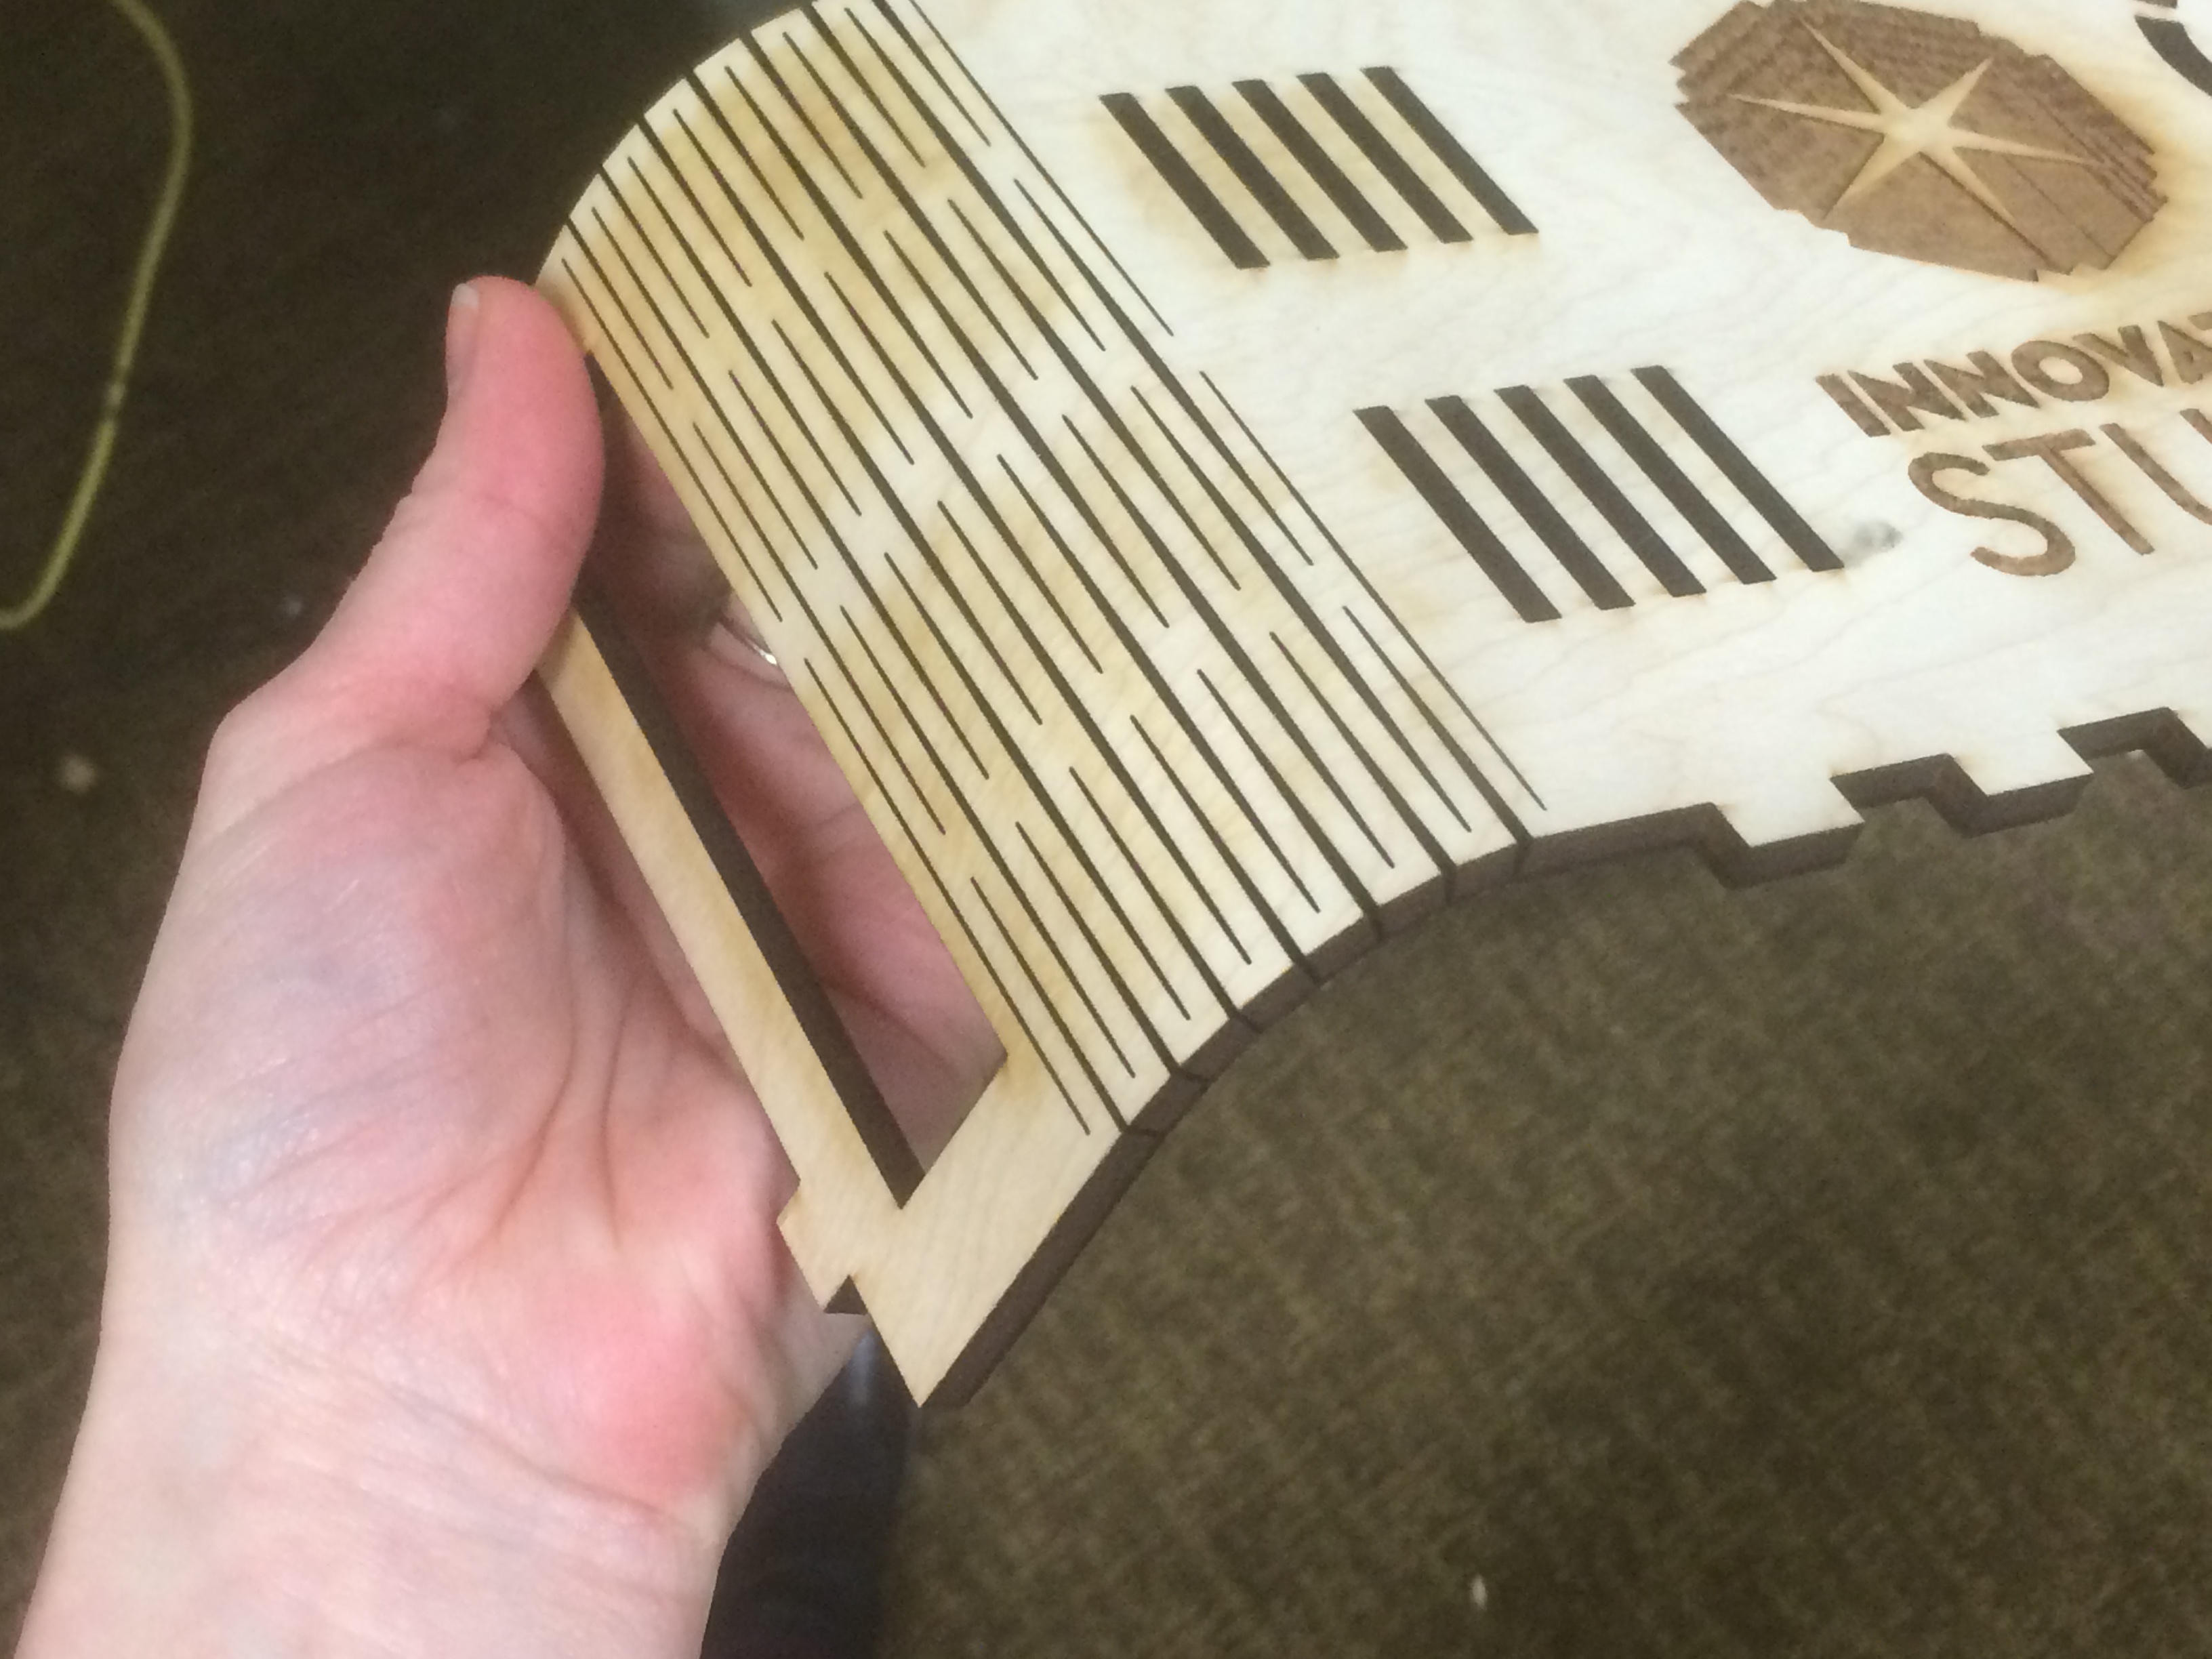
The website for the Epilog Zing has a number of project templates that are free to download. One of the projects is a binding for a book cut from a single piece of wood that utilizes this kind of living hinge for the spine.

Could we cut an archival material with this living hinge method to fabricate a custom cradle for book display with a bendable spine that would accommodate multiple angled openings? Could we create supports for oddly shaped or rounded artifacts in our collection more easily? What other materials could we start using now that we have a tool to easily cut and modify them? Could complex acrylic supports be cheap and easy to make in house now? Or are there new materials that we could consider using now that we have a tool to manipulate them.

And these are all ideas for using just that one tool. How else could we make use of the Shopbot or Makerbots also available for use? A quick review of conservation literature doesn’t yield much being published on the subject yet. I did find one excellent blog post from Indiana University Bloomington Libraries preservation lab about taking a 3-D scan of an item and using their Kasemaker machine to cut out a three dimensional support for a warped panel painting. Surely with so many universities and libraries building maker spaces there must be many other preservation professionals with these tools at their disposal now too.

Has anyone else in the conservation or library world found a good use for this technology? I’d love to hear if anyone else has experimented with laser cutters or Makerbots. If anyone is interested in using my templates to create caps of your very own, I’m happy to share the vector files.

Don’t Put That In Your Scrapbook

The holidays are upon us and that means it is the season for parties, family get-togethers, and making memories. There will inevitably be photographs and keepsakes from these events, and you may at some point consider gathering them together in a photo album or scrapbook. Before you begin, however, let us take a look at some historical examples so that you can avoid the mistakes of our scrapbooking-forebears.

Duke, like many research libraries, holds a large number of scrapbooks and photo albums across our collections. Scrapbooks are complex objects and they frequently come to the conservation lab to address inherent problems with the materials or housing issues. Usually, we find some pretty strange objects inside as well. A student scrapbook from the 1940s recently arrived in the lab which perfectly illustrates five common and problematic conditions.

No. 1: Tape

Evil tape
Evil tape

There are so many varieties of pressure sensitive tape and, because it is a very convenient way to attach materials to pages, we encounter it all the time on collection material. Unfortunately, adhesive tapes do not age well and can exhibit a number of problems, such as discoloration, adhesive creep, or even adhesive failure. Tape can stain the items it touches (like the white tabs on the felt flag above) or cause pages to stick together. A better option is to use a simple and reversible attachment method, such as photo corners. Stable plastics such as polyester, polyethylene, or polypropylene are preferred.

No. 2: Glitter

Glitter

This one is more social etiquette than preservation practice: When you add glitter to your scrapbook,  you give the gift of glitter to every person who looks at your scrapbook until the end of time. It is literally all over my bench as I write this.

No. 3: Perishable Items

Flower
This was once a flower.

Flowers and candy may hold many memories, but they are not so compatible with scrapbooks. Like tape, perishables can either discolor the pages and items around them or adhere pages together. These items may also be attractive to insects or mold, potentially compromising the entire scrapbook and putting other items in the collection at risk. Photographs of the flowers will function a little better in the book.

Cigar

Strangely, tobacco products, like cigars or cigarettes are also commonplace in historic scrapbooks. Use of tobacco products in general seems to be declining, so maybe we will stop seeing this in more modern scrapbooks that come into our collection. If the urge does strike you, however, I would suggest just including the wrapper or packaging (like the Lucky Strikes on the left, above), rather than an entire cigar (as on the right).

No. 4: Rocks (Or really any hard, pointy object)

Yep, that is a rock taped to a page.
Yep, that’s a rock taped to a page.

Books are not the best containers for three-dimensional objects. In addition to distorting the entire book, pointy objects can pierce through facing pages and damage the attached photographs or ephemera. Heavier objects can even tear support pages from the book. Objects like this will be much happier in a box.

No. 5: Large format materials

Whole Newspaper
A whole newspaper tucked inside and actually in remarkable shape for its age.

In a similar vein, larger format pages, such as whole newspapers or large posters, may not survive well when folded up and tucked inside a scrapbook. The bulk of the folded piece can strain the scrapbook binding. Some papers become very brittle as they age and may crack along the folds- especially as they are unfolded and refolded with use. These items are better left out of the book and stored flat.

Scrapbooks can be important cultural artifacts. I hope that in this digital age people continue to make them and that they will eventually make their way into library and archives collections. But I also hope that they do not contain so much tape.

Happy Thanksgiving!

Back to the Drawing Board, or “Tube Cap, Part 1”

By Rachel Penniman, Senior Conservation Technician for Special Collections

In my last blog post I showed an example of a tremendously oversize item that ended up in our super-size flat file storage. Not everything is best stored flat in a drawer. On some occasions we choose to keep an oversize item rolled. The new Rubenstein Library stacks space has cubbies purpose built to house rolled items.

cubby storage
Super-oversize flat storage drawers on the bottom, cubbies for rolled storage on the top.

For protection, we store our rolled items in archival tubes in either a 4.5” or 6” diameter and a 4’, 6’, or 10’ length. However after purchasing a number of 4.5” diameter tubes I discovered that none of our suppliers could provide caps for that size tube. Virtually every other size tube had a corresponding cap, but not this size. What to do? Without caps the rolled items could just slide out the end of the tube defeating the purpose of a protective housing.

With all the materials and know-how at our disposal we decided to fabricate caps in-house. To the drawing board!

Tube Cap Version 1.0.

Our first attempt at making caps were created by cutting a large circle out of archival corrugated board and creasing a smaller circle in the center. Segments of the outer part of the circle are cut and folded up like an old fashioned vegetable steamer basket. The cap is placed on the tube and tape is wrapped around the outside to hold the segments in place.

3 tube cap v1 template
Cap after scoring and cutting.
Bending the segments up like a vegetable steamer basket.


Interior of the assembled cap.

These were relatively quick to produce, though the fit was finicky. It was really difficult to get the sizing just right so it slipped onto the tube without being too loose. Even with the perfect sizing, the little segments would often catch on the lip of the tube making it difficult to put on. They didn’t look terribly professional either. Worst of all, we discovered that over time as they were taken on and off the tubes they became looser and looser.

So I went back to the drawing board and mocked up a different model.

Tube Cap V. 2.0 on a tube.

For the second version I opted instead to try a cap that inserted into the tube instead of one that slid onto the exterior of the tube. I started by building up alternating layers of archival corrugated board and Volara foam to create the round plug. I then wrapped Volara foam around the perimeter of the plug to help it fit snugly inside the tube. A couple of slightly larger round pieces of archival corrugated board created the top of the cap. A strap of Tyvek tape with Velcro at the ends helped to hold the cap securely in place on the tube, and a loop of linen tape through all the layers gave a handle to pull the cap off.

Bottom of Tube Cap V 2.0.
Tube Cap V 2.0 partially disassembled to show layers.

What an improvement! Version 2.0 fit better, stayed in place, held up over time, was easier to insert and remove, and looked pretty spiffy too. In terms of function this model was an A+. But cutting perfect circles out of cardboard is difficult, time consuming, and rough on the wrists. Also no matter how well I measured I could never get all the slots and holes on the circles to line up perfectly. I also wasn’t happy with how much expensive Volara this model used. I considered replacing the Volara with more layers of cardboard but estimated that would require cutting 12 more circles out of board. Too much board use and too much wrist pain!

Back to the drawing board again.

This time I tried to take the parts I really liked from Version 2.0 (the general plug design, the Velcro strap, the linen tape handle) and modify the parts I didn’t (cutting lots of circles out of cardboard).

Tube Cap Version 3.0 (looks almost the same as 2.0 huh?).

While the final product of this version looked almost exactly like Version 2.0 the interior was very different. Rather than layering Volara foam and many circles of corrugated board to create the plug, I created a wall out of a single piece of corrugated board that is attached with double stick tape to only two circles of corrugated board.

Tube Cap Version 3.0 partially disassembled to show layers.
Wall piece after cutting (top) and after creasing and bending (bottom).
Wall attached to one side.

This model reduced the number of circles to I needed to cut from 6 to 3 and greatly reduced the amount of material used overall. I really liked this model and was extremely happy with the function and happier with the small quantity of material needed, but three circles per cap would still take some time to cut by hand.

13 Tube Cap v3

I wonder how other institutions handle capping their rolled storage. Has anyone else found an easy, efficient, archival way to cap their tubes?

Stay tuned for part 2 of the continuing saga of Tube Caps: Adventures in cutting!


Welcome To Our New Staff: Henry Hebert

Henry HebertIn early August, just as the final move back into the renovated space was taking place, Henry Hebert joined Conservation Services as the new Conservator for Special Collections. Henry is no stranger to the lab, having worked on the circulating collection as a graduate student several years ago.

I always ask our new staff about their favorite conservation project. Here’s Henry’s favorite:

While working as a contractor at Baker Library at the Harvard Business School, I was able to assist with treatment of the United Fruit Company Photograph Collection. The collection is composed of around 10,000 photographs documenting the company’s extensive banana production and shipping operations in Central and South America. Every day brought new and exciting photographs – everything from serpentariums to stone ruins in the jungle. The working condition on the farms were harsh and some of the images of workers were quite haunting. Through this project I learned that the story behind your typical grocery store banana is far more strange and interesting than you would ever think.

Henry holds a masters degree in library science from the University of North Carolina at Chapel Hill and a diploma in hand bookbinding from the North Bennet Street School. Following graduation, he served as the Von Clemm Fellow in Book Conservation at the Boston Athenaeum. Henry returns to North Carolina from the University of Illinois at Urbana-Champaign, where he was the Rare Book Conservator.

Welcome back to Duke, Henry!

Let’s Experiment!

experiment day

Every now and then we take some time to practice new techniques we learn at conferences and workshops. At the 2015 AIC Annual Conference, Erin learned how to use an airbrush and how it could be applied to conservation. Last week she showed us what she learned, and gave us all time to practice with the airbrush. Erin has experimented with tide line removal and tissue toning with the airbrush. We brainstormed other ways we could use this method, too, including consolidation and perhaps spot washing on the suction platen. Have you used an airbrush in your lab? Let us know in the comments how and to what effect.

The ‘Largest Sheet of Paper Ever Made and Printed’

Written by Rachel Penniman, Senior Technician for Special Collections

When two copies of a newspaper arrived in the lab I didn’t expect then to be terribly exciting.

Sigh, another brittle newspaper.

They were folded and as is typical with old, acidic newsprint it had become brittle and split along the folds. After discussion with curator Andy Armacost we decided to carefully unfold and repair the one copy that was in slightly better condition.

02 Copy 2 BT detail
Looks like I’ve got a lot of work ahead of me.

Unfolding the newspaper revealed something quite unexpected: the paper was gigantic! What I expected to be multiple issues folded together was in fact a single extremely large issue.

03 Unfolded BT
I had to use a step stool just to get the entire sheet in the photo.

The Constellation: Illuminated Quadruple Sheet claimed to perhaps be the largest sheet of paper ever made and printed when it was published in 1859 in New York. Created as a one-time, limited edition of 28,000 copies, it had taken ‘eight weeks of unceasing labor of nearly forty persons to produce this MASTODON PAPER!’ To generate one issue, a single sheet of 70X100” paper was printed and folded into four leaves of 35×50” each. In comparison, the massive double elephant folio Audubon Birds of America volumes currently on display in the Mary Duke Biddle room are a paltry 26×39”.

04 the great wonder croppedIn total each copy of The Constellation has 49 square feet of paper! It is made up of 8 pages with 13 columns of text per page, and 48” per column totaling 416 feet of printing. Along with historical articles, essays, stories, and poems, there are four pages with numerous portraits and illustrations. Originally sold for 50 cents an issue, this copy was marked down to only 15 cents. This seems like a really good deal for what adds up to a small book’s worth of reading material.

The title banner and red ink noting the price reduction

Unfolding the paper also revealed the full extent of the damage. The main folds separating one leaf from another had degraded so badly that each leaf was held to the next with only a few inches of weak paper.

The only thing holding these two leaves together are a few inches of paper, habit, and hope.

In order to allow for safer handling and easier storage, I got approval to completely separate each leaf. Working with individual leaves of 35×50” was much more manageable; though I still had to work on two folding tables pushed together with board across the top in order to have a large enough flat work surface.

Feeling a bit like Lily Tomlin’s Edith Ann character

Very carefully, bit by bit, I flattened the creases and mended the tears using a very thin toned Japanese tissue paper and wheat starch paste making the repairs almost invisible. Wherever possible, I reattached loose fragments of paper that I found loose in the old folder. With 49 square feet of paper work on, I did mending on and off for many weeks.

Tears along the folds
Tools of the trade: a tile for brushing out paste, Remay and blotter, acrylic blocks, bean bag weights, brush, Teflon folder, tweezers, scissors, and toned Japanese paper
Can you spot the mends? No? Good!

After mending, each leaf was encapsulated between sheets of Mylar using our ultrasonic welder. See this previous blog post for a video of our encapsulator in action.

It’s so big I had to drape it off the edge of the encapsulator and weld it in sections.

Now that it’s finally finished, this huge newspaper is the perfect candidate for storage in the Rubenstein Library’s new super oversize cabinet drawers. It actually looks tiny in comparison to this large flat file drawer.

The new super oversize cabinets in the Rubenstein Library are ready to handle the biggest items.

Part of a description of the newspaper on the back page reads:

The Publisher does not wish to conceal the honorable pride which he feels in presenting this magnificent sheet to the public. It is the off-spring of Invention, Taste, Enterprise and Herculean Industry; it is without a compeer or rival; and he believes it will never be excelled. It cannot be surpassed in typographical beauty – in its artistic splendor – in its general imperialism of thought and design. It will be the pride of every true-hearted American, and the wonder of the world; and those who are so fortunate as to obtain a copy will obtain a curiosity which they will keep and treasure with the utmost care.

I am very proud to have been able to help provide this curiosity with the utmost care its publisher desired. Though to be honest I would be happy to take a break from such oversize items and work on miniatures for a while.


Link to catalog page:


Grand Opening Tours of the Underground

Today is the grand opening of our renovated building. There are many VIP’s and donors here today to see the new spaces and to hear speeches from dignitaries. We gave a behind the scenes tour for 17 people. While it is more fun to have staff here during tours to talk about their work, it was still a fun and engaging morning.

conservation work

I set up four zones of work to show. Clockwise from the top left are: special collections conservation, Adopt-a-Book Program, custom enclosures, and circulating collections conservation. People were really interested in each section. They were especially interested in the giant newspaper that Rachel is repairing. Rachel is writing on a blog post about that, so stay tuned. It is an incredible thing.

The mark of success? Two books got adopted today! Now I need to go update that page and find some more adoptable items to put on the list.

Papyrus Project Final Update: It Is Finished For Real This Time

The papyri collection is finally in its new home in the renovated Rubenstein Library stacks. We successfully completed its move yesterday to the new vaults. Part 1 of this project started in 2010 as a proposal for a new housing strategy for the papyri. In 2012 the project began in earnest as we prepared the collections for the move out of the old stacks to make way for renovation. We finished the project in 2013 and moved the papyri to the temporary Rubenstein stacks on the third floor of Perkins Library.

Papyri in their new(ish) boxes in the renovated stacks.

Yesterday we moved the collection into its new home in the renovated Rubenstein stacks. They are now in a cool, dry and stable environment, with fire sprinklers even! I nearly shed a tear of joy when we placed the last box on their new shelves.

If you haven’t been reading The Devil’s Tale posts about the move, you really should. There are some great posts there and on the Duke Libraries Tumblr, including this little gif I made when enveloping books. I cannot wait until all of the collection is moved home.

Moving Special Collections, Again

If you are a long-time reader you may remember a couple years ago we embarked on a large-scale enclosure project to prepare special collections materials for the their move prior to renovation. We called it the “Enabling Project.” Now that the Rubenstein Library collections are moving back, we are finding that we need to do some additional enveloping for fragile items with loose parts or furniture.

Insert into Tyvek envelope, seal, label, repeat.

This time we won’t be doing thousands of items, perhaps only a few hundred. The Tyvek envelopes allow us to keep pieces together, keep furniture from scratching neighboring books, and tells us at a glance the amount of work the collection needs. It’s both good and daunting to see. If you want to see this “in action,” visit our Tumblr post.

Before and after enveloping.

Duke University Libraries Preservation