Preservation Week Panel Discussion on Public Digital Collections of Conservation Treatment Documentation
For Preservation Week 2024, Duke University Libraries will host a virtual panel discussion about Public Digital Collections of Conservation Treatment Documentation on Thursday May 2 at 11 am EDT. Conservation representatives from four institutions (The British Museum, The Preservation Lab (Cincinnati, Ohio), Duke University Libraries, and Stanford Libraries) will share their experiences in building and sharing their institutions’ digital collections of conservation treatment documentation. Panelists will introduce their collections and discuss topics such as digital preservation of treatment records, metadata creation, linking to catalog records and finding aids, and potential privacy and copyright issues.
Details:
Cost is free but registration is required
Thursday, May 2, 2024
11:00 a.m. to 12:30 pm EDT (Starts at 10:00 Central, 8 am Pacific Daylight Time, 4 pm British Summer Time)
The panel will be recorded and the video will be shared with registered attendees upon request.
Louisa Burden, Head of Conservation, British Museum
Ashleigh Ferguson Schieszer, Book and Paper Conservator, Co-Lab Manager, (she/her)
Erin Hammeke, Senior Conservator for Special Collections, Duke University Libraries (she/they)
Ryan Lieu, Conservation Operations Coordinator, Stanford Libraries (he/him)
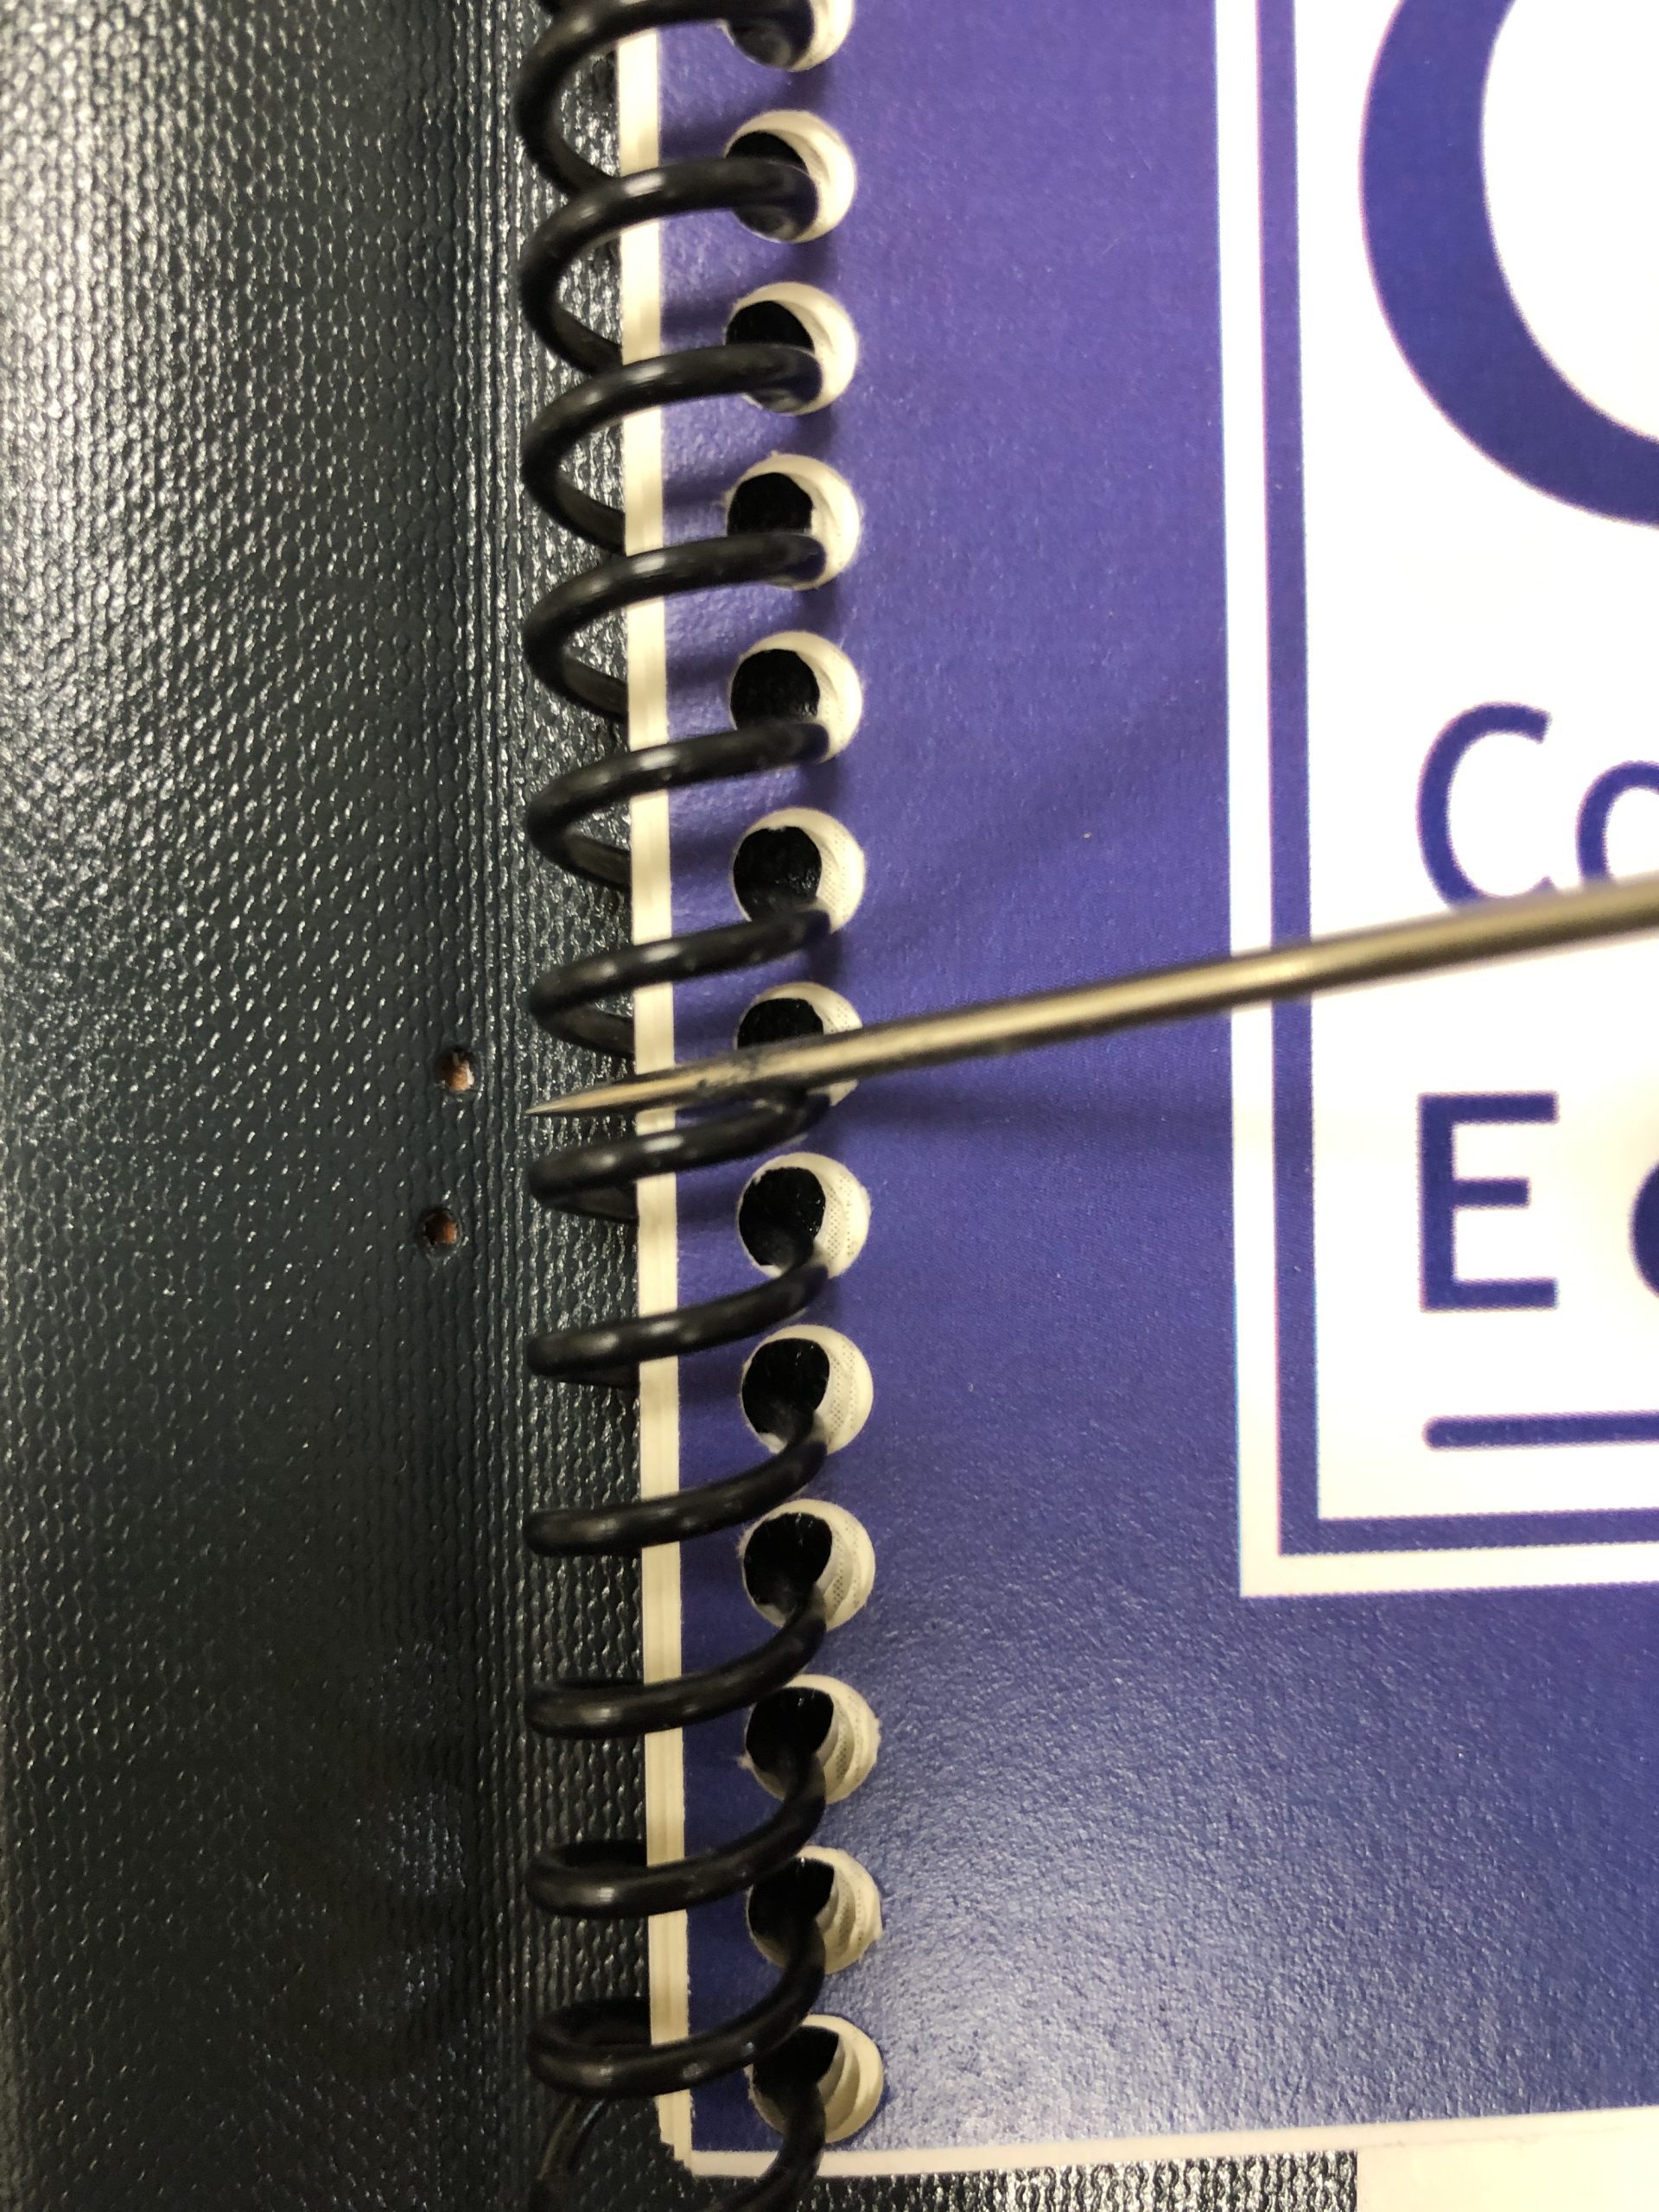
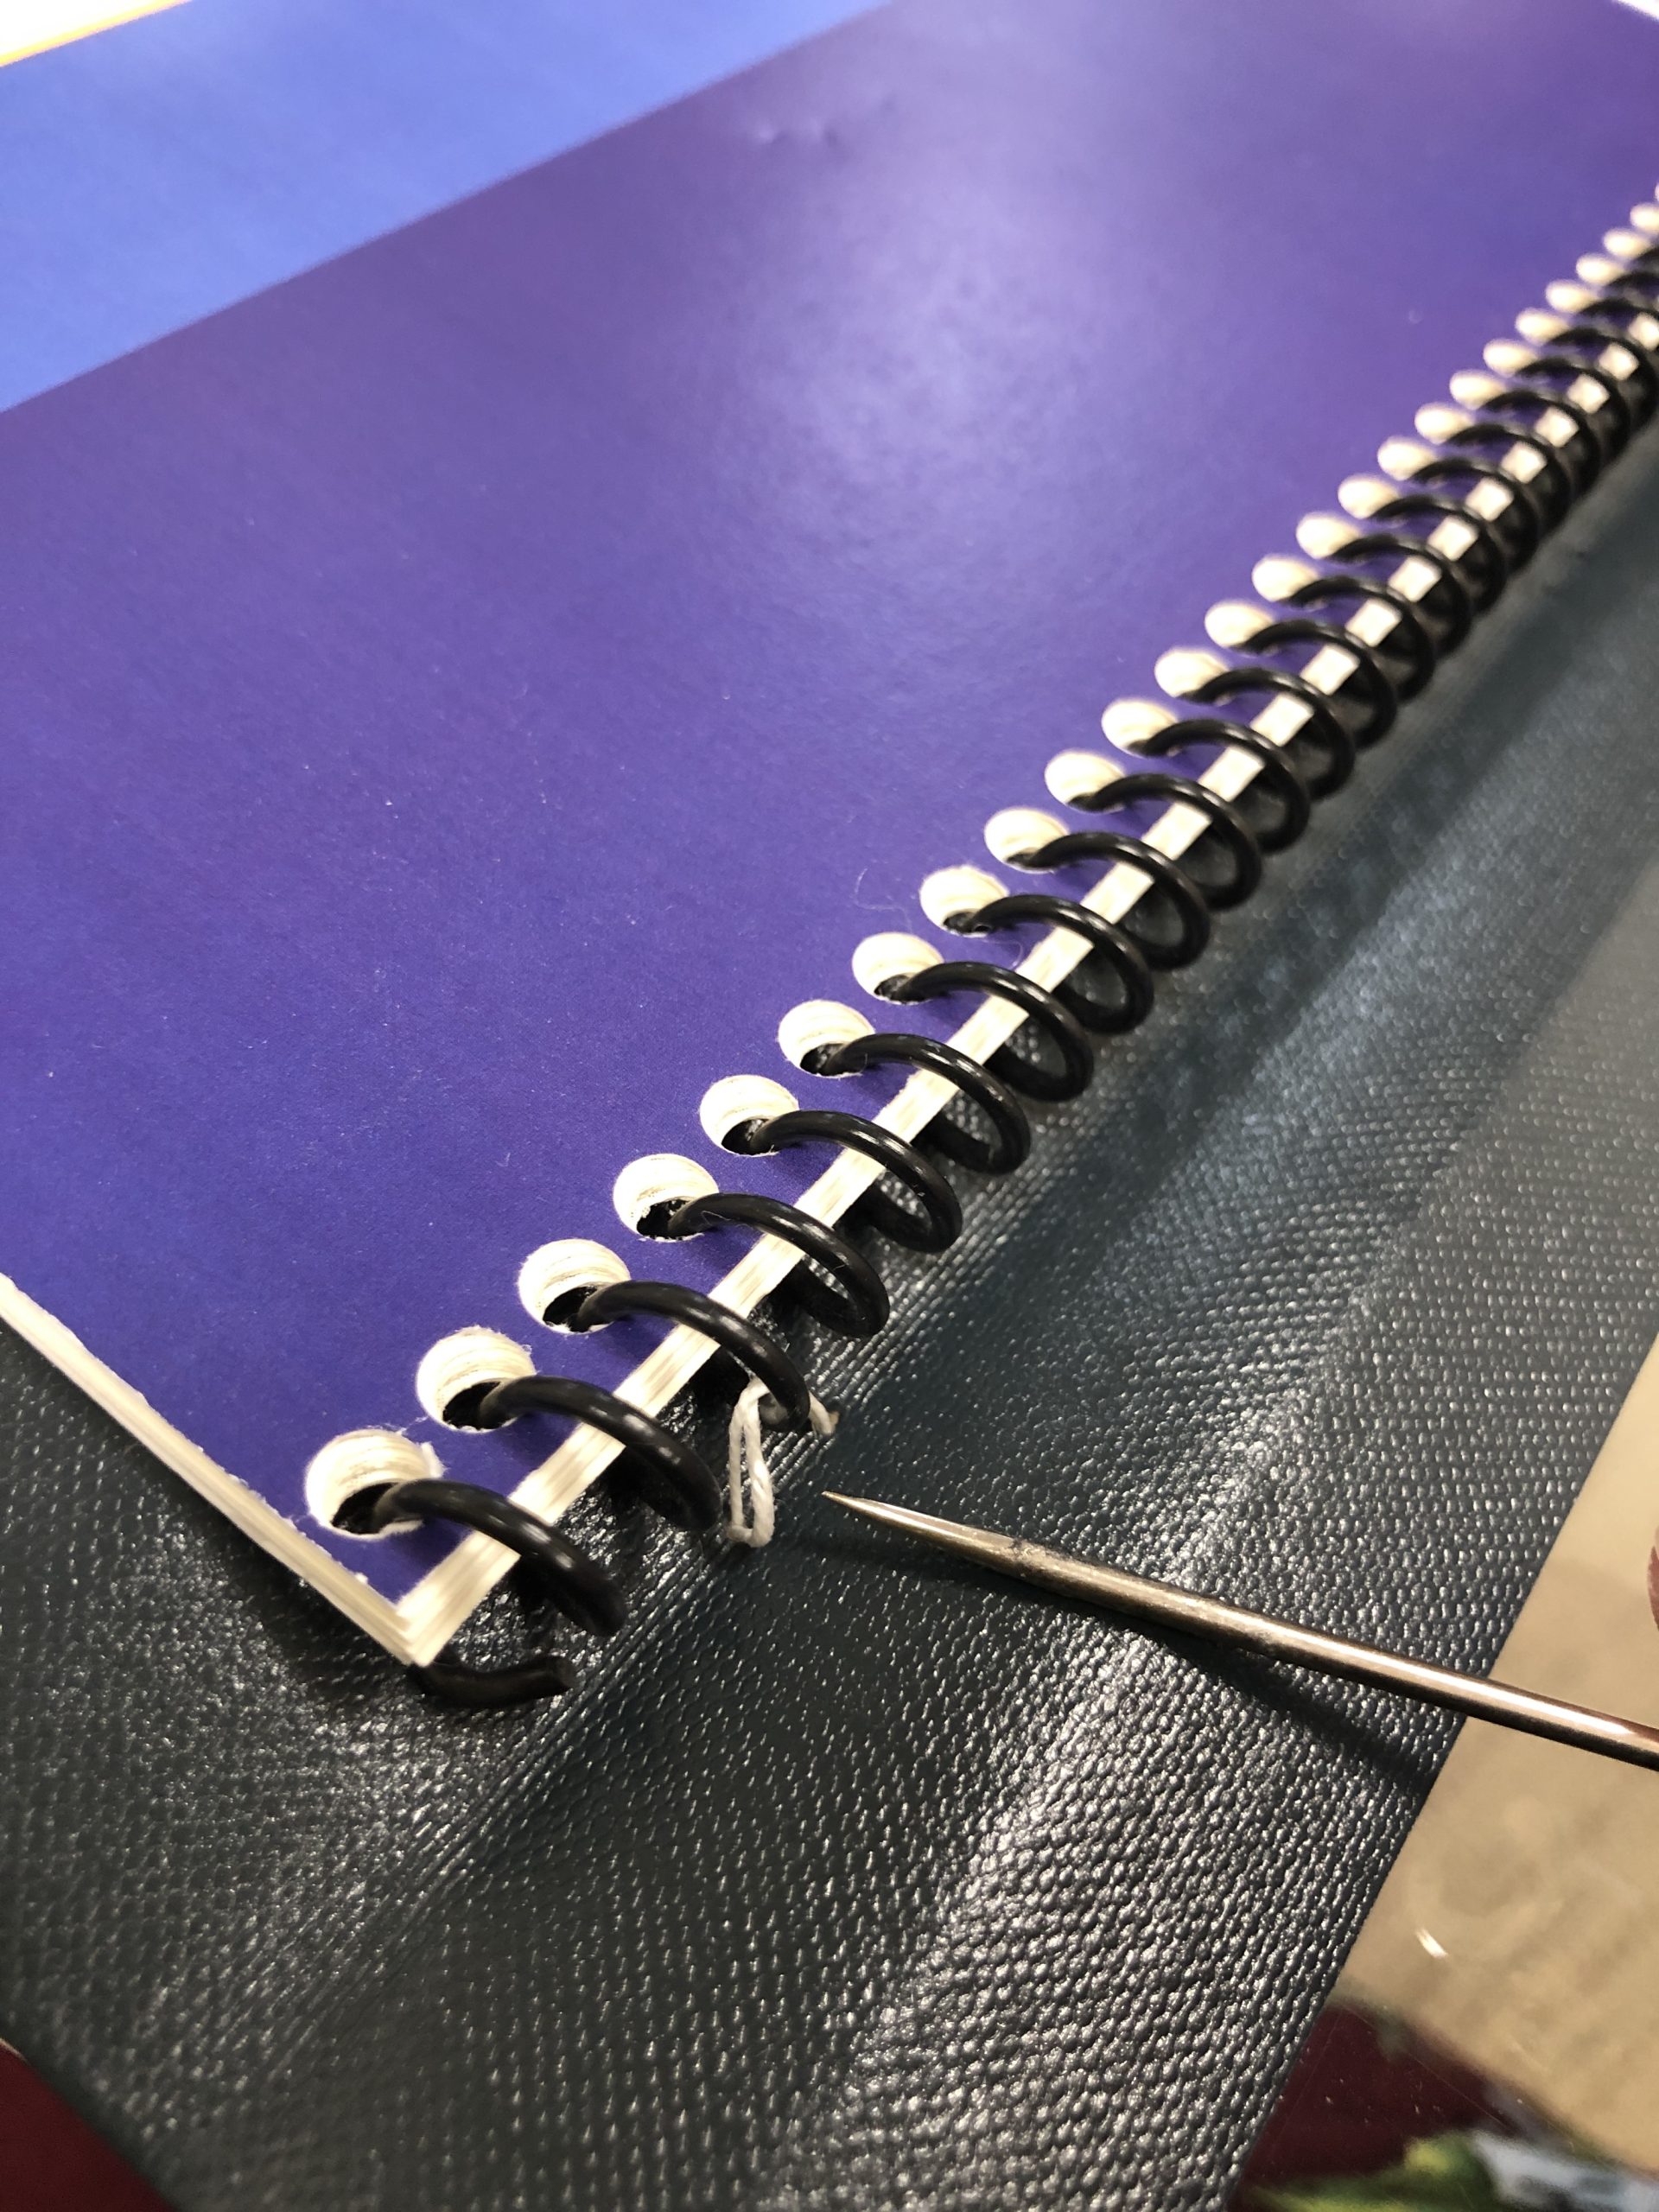
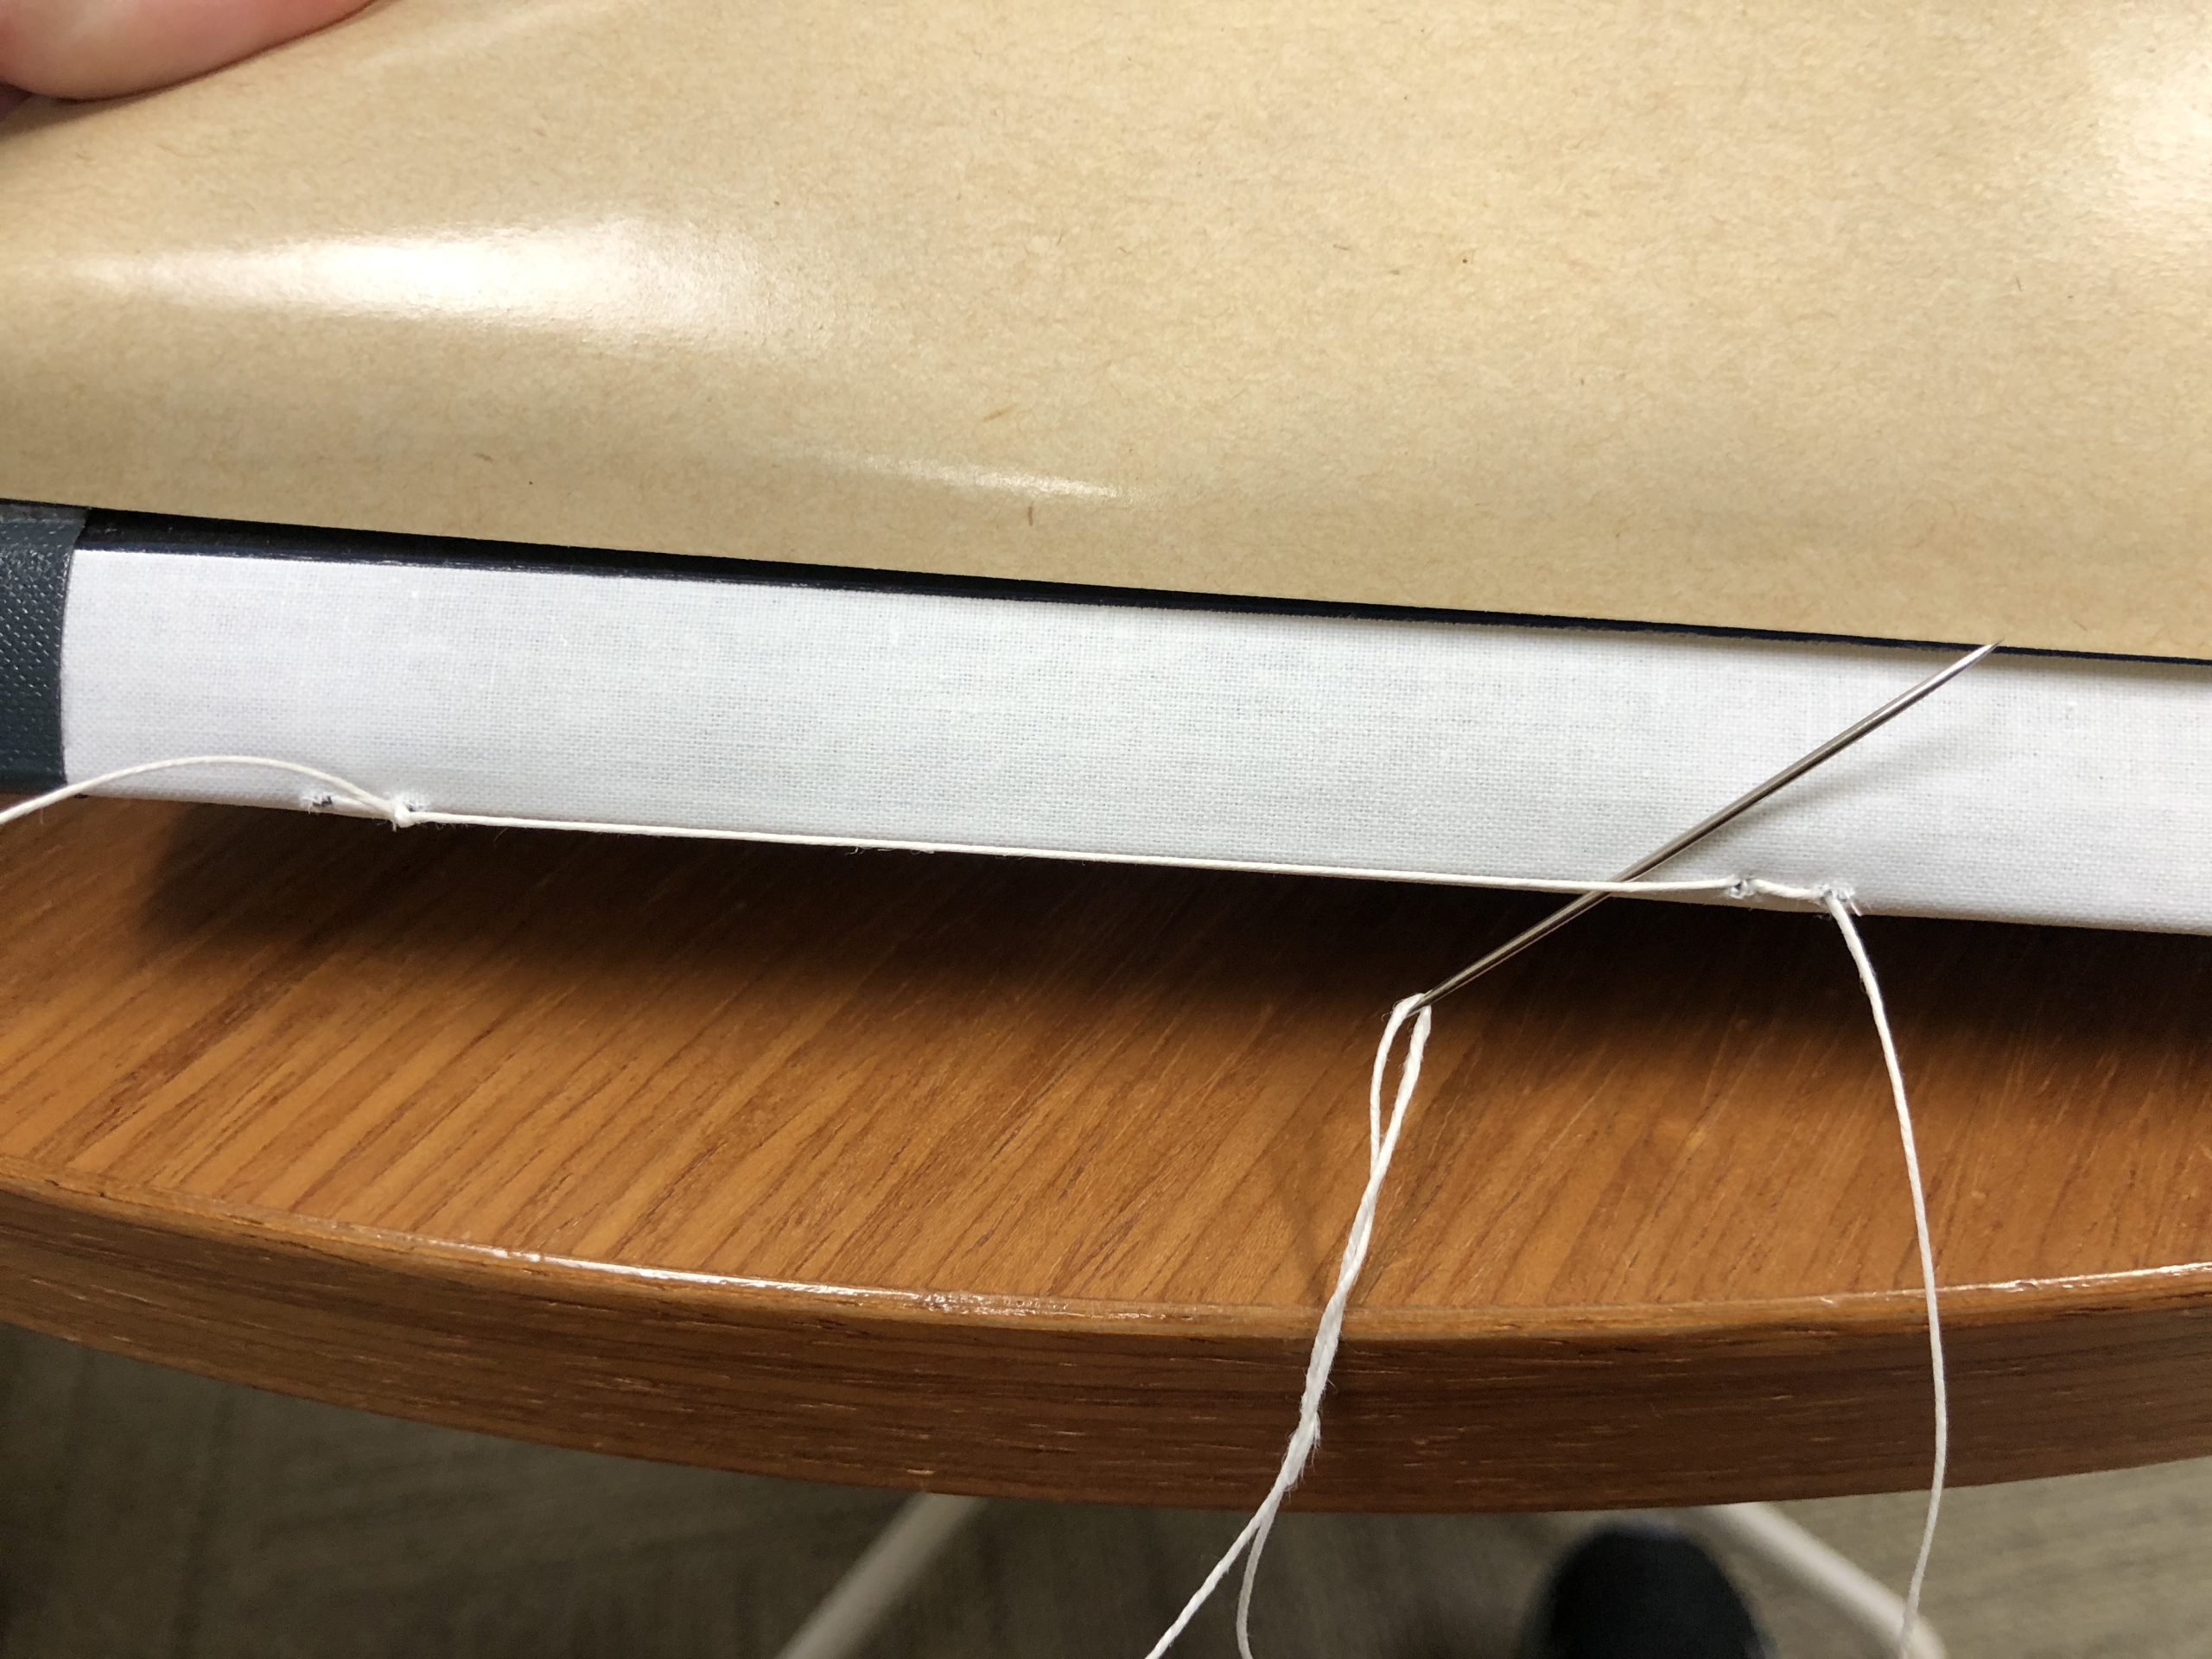
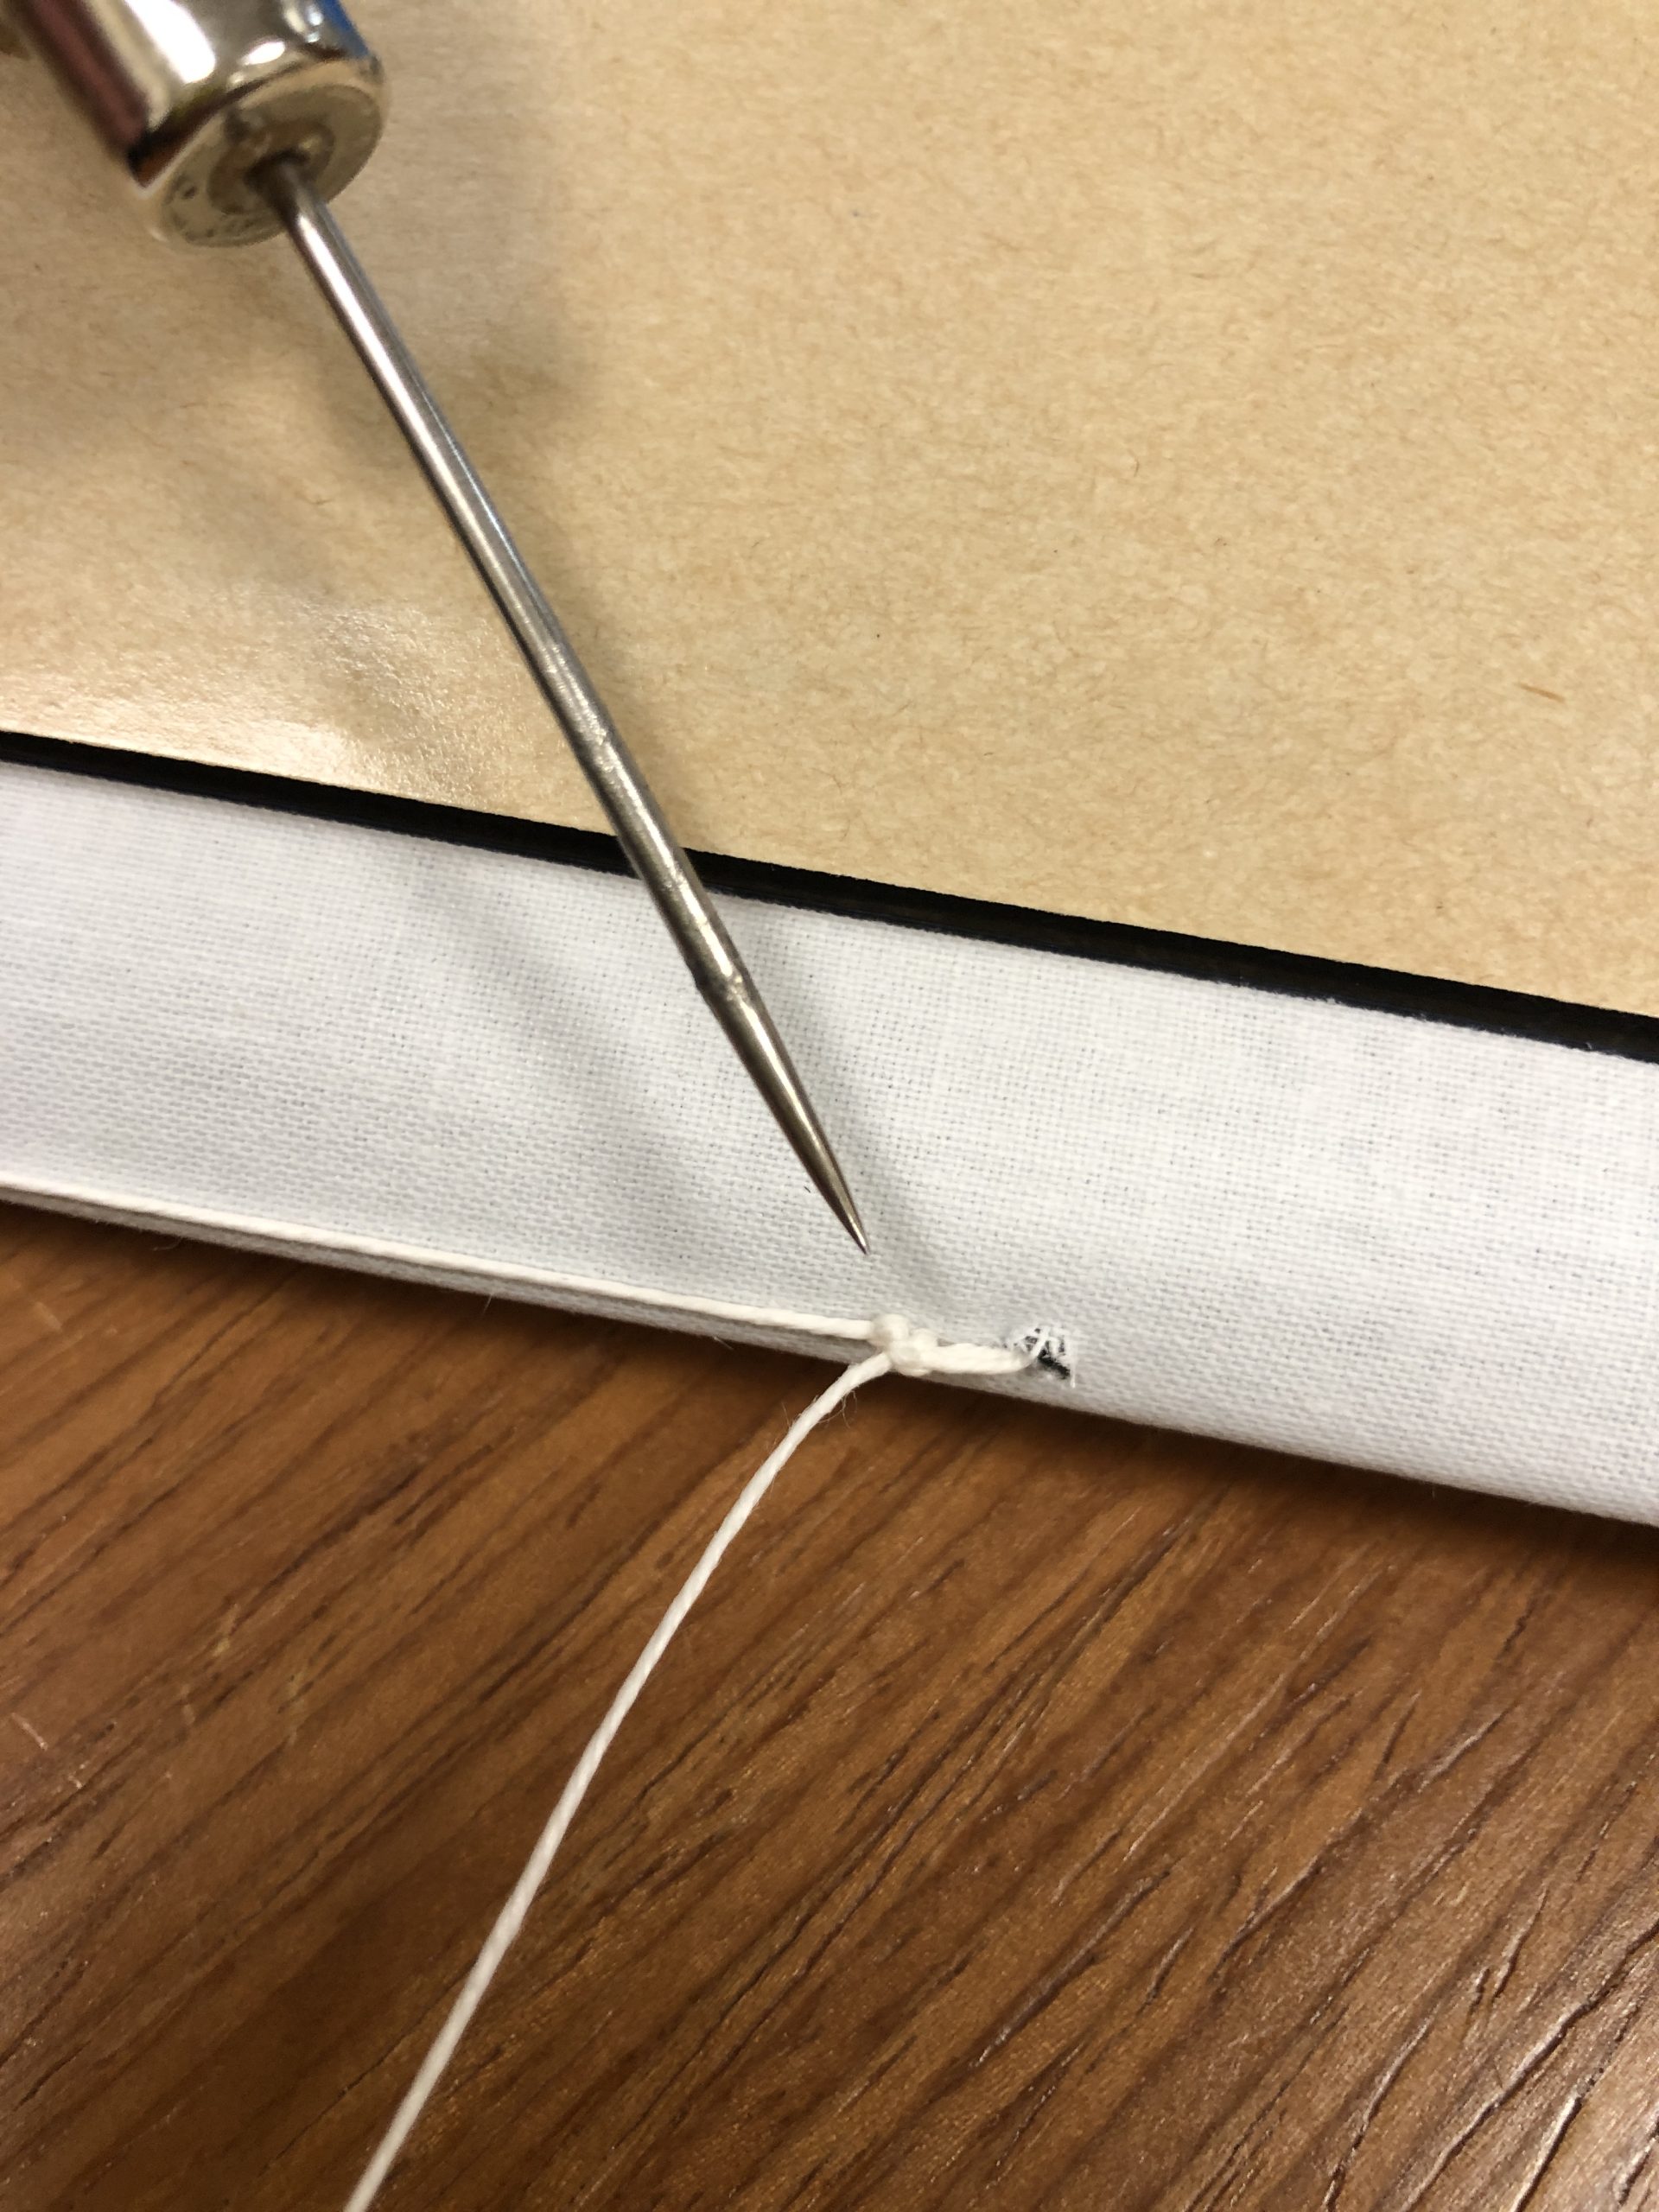
People asked if we had instructions, which of course has been on my to-do list for a while. So I created this short video demonstrating how we sew these. There is no narration, only ambient noise. Some day I will write up the instructions, but until then, hopefully you can use this video and the quick explanation below to see our method. Once you do three or four, you get the hang of it and it goes really quickly. At the 05:40 mark you can see the “shake test.” These are firmly attached as long as your sewing is tight, and you have the full function of the spiral.
The quick explanation:
With an awl, punch sewing stations. Each station consists of two holes, one on either side of a wire. 3-5 stations is adequate unless your pamphlet is very large.
Starting at the top, go in through the back and through a wire loop. Go out and back in again, wrapping the wire twice.
Pull tight, and tie a square knot. Go to the next sewing station and do the same, wrapping the wire twice. Loop the needle under the thread at the spine to create leverage when tightening, and continue along until the end.
At the end, once you have looped the wire twice and tightened the thread, loop the needle under the thread above and tie a square knot.
Finish the pamphlet by removing the paper and wrapping the spine around neatly. Remove the protective blue film. Voila!
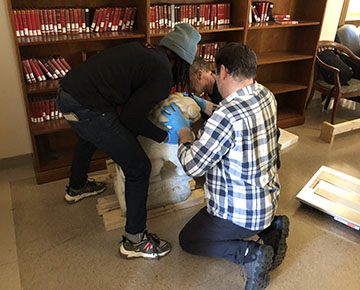
Last week, Crozier Fine Arts was on site to de-install, crate, and move the art and artifacts from the Lilly Library Thomas Room in preparation of the start of renovation this summer. It was incredible to watch this team get all of the work off the walls and into crates in five days.
The custom crates were made off site and shipped to the library. First up was crating the pair of marble lions that stood at the south door of the Thomas Room.
How do you wrangle marble lions? With many steady hands and a lot of shims.
Twinsies!
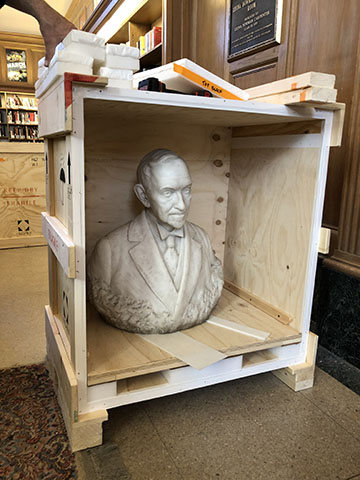
The statue of Benjamin Duke was estimated to weigh about 450 pounds. It took a lot of time, and careful planning, to get it off its platform and into a crate.
Benjamin Duke awaiting his crate.Moving Ben, inch by inch.Ben is ready for his road trip!
We have a lot more photos to share from the week. Until we get them posted, please see these other excellent recaps of the move of the art and artifacts from the Thomas Room. You can read more about the upcoming Lilly Closure and Renovation here.
I love finding things inside books. We even have a category on Preservation Underground called “What We Find In Books.” Photographs, notes, flowers, printers waste…they all tell a story. But what if we put something inside a book intentionally?
We wanted to conduct an experiment that would compare the environment inside a book compared to the the environment of the stacks. Luckily we have a discarded book that already has a small hole cut out for a datalogger. I made the hole bigger to accommodate an Onset HOBO dataloggers. While this book now has less of a cellulosic load and may not compare exactly to other “whole” books, I think it will give us some interesting data.
The book is quietly gathering temperature and humidity data every 15 minutes. We will report our findings at a later date. Until then, happy environmental monitoring!
When we noticed there was condensation around our freezer’s door, we called our awesome repair tech, Jeff McLean. Little did we know this would be a multi-day effort that involved removing the door and the heating mechanism around it, which are both under a bunch of foam insulation. It may look bad now, but Jeff will have this up and running today.
Back in early 2020 Henry gave a little peek into a project I was working on. When four architectural drawings of the Benjamin N. Duke House on 5th Avenue in New York City were acquired by the Rubenstein Library they were removed from their frames in order to incorporate them into the Semans family papers. After the drawings were removed from their frames the staff in the Rubenstein Library Technical Services department found they had been mounted directly onto a non-archival foam-core backing. The drawings were sent to Conservation to see if we could remove the poor quality board.
Drawing mounted to foam core before treatment.
These drawings were created by a reproduction process called aniline printing which was used in the late 1800’s to the early 1900’s and is identifiable by the distinctive green background color and blueish-black lines. These prints are not on paper but on drafting cloth; a cotton or linen fiber fabric that is heavily starched and rolled to give a smooth surface. Aniline prints fade quickly with exposure to light and are sensitive to heat, humidity, alkalinity, and a number of solvents including alcohols. The starches and additives in the drafting cloth can also be very sensitive to heat and water, and the acidic process of aniline printing degrades the cloth over time making it fragile. So my toolbox of conservator tricks to remove the backings was really limited: no heat, no humidification, and few safe solvents.
I could tell there was another layer between the foam core board and the architectural drawing but it was hard to tell what was going on back there. The backing board was attached with long 2” wide strips of a very sticky, waxy adhesive. I managed to separate the board by hand, lifting it away with a thin spatula and discovered something I have never seen before.
Back of drawing after foam core removed and contact paper revealed.
The entire back of every drawing was covered with big sheets of cream colored, self-adhesive plastic like you might use to line your kitchen shelves. It’s commonly called contact paper, though there’s nothing paper about it. The plastic used in these products is usually polyvinyl chloride which degrades very quickly and destructively over time so it needed to be removed before it caused further damaged to the drawings. Although the adhesive on this product is weak in order to allow you to lift and reposition it during installation on a kitchen cabinet, the drafting cloth was too fragile in many places to just peel it away. I needed to find a way to more gently remove the contact paper but my options were limited. After a lot of solvent testing and experimentation I found that timed application of a small vapor chamber of solvent would soften the adhesive on the contact paper enough to gently lift it away without leaving an adhesive residue behind and without damaging the print or the drafting cloth.
Contact paper being removed with solvent chambers in a fume hood with a pile of removed contact paper on the right.
Working slowly across each drawing I softened the contact paper backing and gently peeled it away to reveal lots of self-adhesive tape had also been applied directly to the back of the drawing. This object was like an onion: full of layers! Some of the tape came off along with the contact paper but the rest I removed with a small spatula and a crepe eraser. I then repaired the tears with a very thin, green toned archival paper. Whoever put the tape down was heavy handed and I often found there were no tears or damage beneath the tape at all.
Many pieces of tape revealed below the contact paper during treatment.
The same area with all the contact paper and tape removed and new archival mending in place.
This treatment was a good example of how sometimes less is more. Whoever applied hundreds of inches of tape, layers of contact paper, and huge areas of sticky adhesive to attach foam core backing board surely thought they were helping to protect a valued item. Instead they created a mess that took weeks to undo.
Diagram of the many layers in cross section.
Front of drawing after treatment completed.
Back of drawing after treatment completed.
The best part about removing all of those layers was revealing a manufacturer’s mark printed in pale purple ink on the back that reads:
Copied by
Peerless Blue Print Company
122 East 14th New York
Phone 168-18th
This mark helps us to date when and where these drawings were created and would have been lost if all those layers weren’t removed.
Manufacturer’s mark previously covered by all the layers.
The property shown in these historic architectural drawings has recently been restored and is now on the market. The 8 bedroom, 10 bathroom, 20,000 square foot home which is directly across the street from the Metropolitan Museum of Art can be yours for just $80 million. Hopefully it’s not also held together with tape and contact paper.
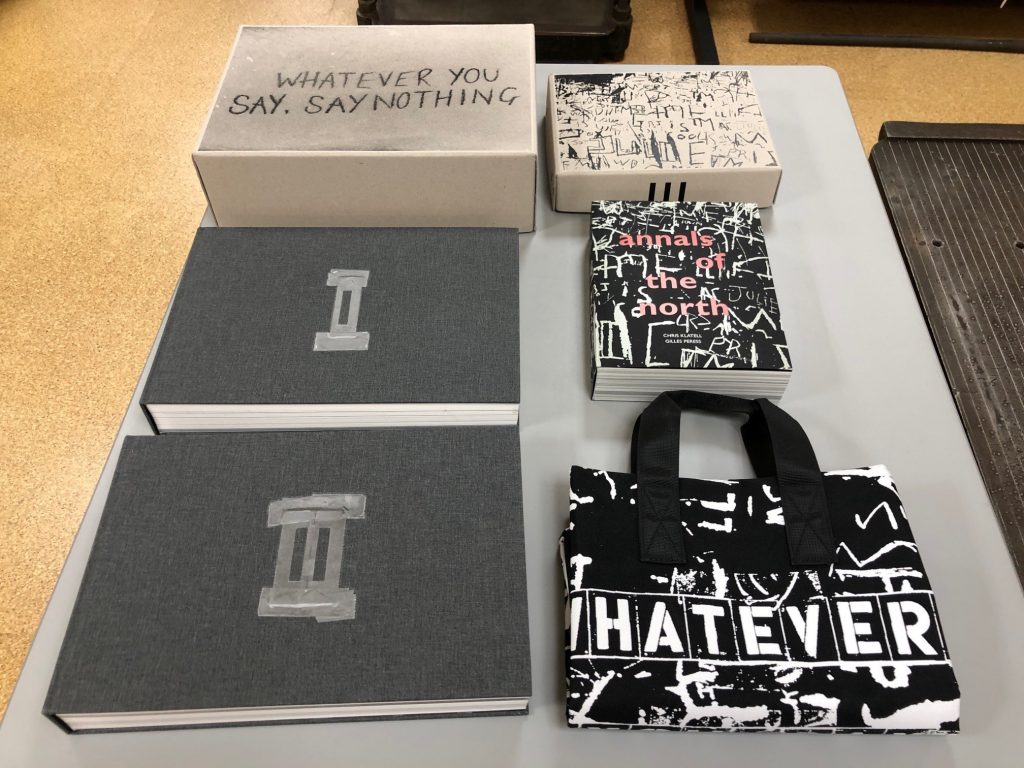
We have been on a Big Book Box roll lately. Last week you read about a boxing project for two large “boxed withs” (is that a real term in library land?). This week we bring you another multi-piece set that posed some challenges. “Whatever You Say, Say Nothing,” by Gilles Peress, consists of three books, two boxes, and a canvas bag. You can read more about this project and watch an interview with the author at Steidl Books.
Prepare for boxing!
Artist books are often a challenge for shelving in library stacks. Rarely are they shelf-ready due to their materials or construction. How do you shelve a bag full of books? Do you separate the pieces for easier shelving and retrieval? Or box them all together to keep the items together? Did we mention this weighs a total of 27.5 pounds?
Time to box the boxes and bags.
We decided to take the boxes out of the canvas bag, and box all the parts in one enclosure that will include a label warning of the weight of the object. This makes it easier to shelve, and easy to put back together in its original form when it is used or exhibited.
All together now…
Now we need to find a bigger bin to send this over to Lilly Library. If your library has this title, let us know how it went to the shelf. We would be really interested in hearing about it.
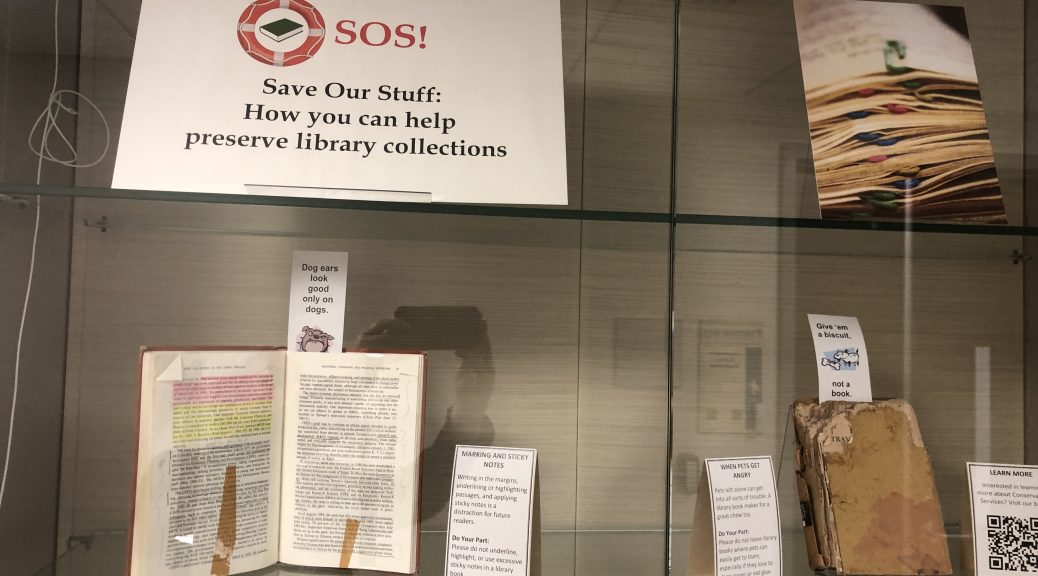
Longtime readers will remember the banana book, one of the best worst things that has come to the lab over the last 20 years. It has made its return to the Preservation Exhibit Case in our new exhibit, “SOS–Save Our Stuff: How you can help preserve library collections.” The exhibit is viewable during regular library hours on Lower Level 1, outside the Verne and Tanya Roberts Conservation Lab (Perkins 023).
The banana book is just one of several uniquely damaged items on display. Want to see what happens when you use sticky notes? Or attempt DIY book repairs? Come on down!
As mentioned last week, staff in the Collections Services division have been creating a “behind the scenes” look at the work we do to get books to the shelf. The exhibit is now up! Come see a selection of the work we do to make sure the book you need is on the shelf when you need it.