Tag Archives: photo conservation

When Everything Goes Right

By Rachel Penniman, Senior Conservation Technician

Sometimes items come to the lab that have so many problems we just can’t predict how the treatment will go at first glance. These items from the Reva Korda papers were that kind of challenge.
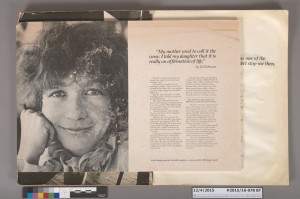
201516_078_bt01 201516_078_bt05

Mounted advertisements before treatment.

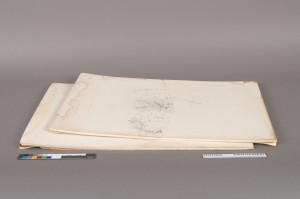
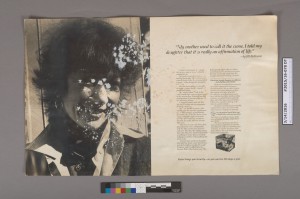
These four advertisements had been mounted onto foam core backing board that was deteriorating and delaminating. They had also been exposed to water which caused mold, warping, and two of the ads stuck to the back of two other ads. Because the ads were stuck together, we couldn’t even see what the bottom two ads looked like.

201516_078_bt03 201516_078_bt08

Mounted advertisements stuck together and warping.

With all the condition issues there were plenty of ways for this treatment to go wrong. The back of the ads could get skinned or tear as I tried to remove the backing boards. The mold could have completely disfigured the lower ads. The ads stuck to the backing boards could be stuck so irreversibly that we would lose parts of the image in trying to separate them. We had a meeting with the curators to discuss the range of options. We decided that because the bottom two advertisements were so completely obscured, it was worth making an effort to separate them even if it resulted in a little bit of loss. I first planned to try mechanically removing the foam core backing boards and separating the stuck ads either mechanically or with a little humidification. If that didn’t work we agreed to have another meeting to discuss more invasive treatments like full immersion in a water or solvent bath.

The first step was to remove as much of the mold as possible with a soft brush and vacuum. Once that was done I started trying to separate the ads from their backing boards. Sometimes conservators really hate how old adhesives turn yellow and brittle with age, but when an adhesive has aged so poorly that it fails completely it can actually make our jobs easier. In this case, on three of the advertisements the dry mount adhesive had become so brittle that with the tiniest bit of pressure I was able to slip a thin metal spatula between the board and the advertisement and it just popped right off. Success! It was very satisfying separating these from their foam core boards. Using a little bit of solvent on swabs I was able to remove most of the yellow adhesive residue from the back of each advertisement.

201516_078_dt10 201516_078_at10

Back of one advertisement before yellow adhesive was removed and after adhesive was removed.

The fourth advertisement had a different adhesive that felt soft and waxy. Sadly for me, it was still doing its job and was holding the ad firmly to its backing board. In 2014 our lab hosted a photograph conservation workshop taught by Gawain Weaver. We learned a number of methods for removing photographs from mounts. I recognized this waxy feeling adhesive from that workshop and remembered doing tests on how to most easily remove it.
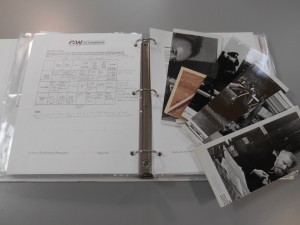
photo notesThank goodness for taking good notes and keeping all my test samples!

By placing the advertisement face down on a piece of blotter on a hotplate on the lowest setting I was able to soften the adhesive so I could separate the final ad off its backing board. More success!

I was able to separate the ads that were stuck together but some of the paper from the foam core board remained stuck to the faces of the ads. This was far better than the alternative where some of the face of the advertisement could have been skinned off though so I considered that a win.

201516_078_dt05 201516_078_dt09

Advertisements that had been stuck on the bottom with paper still attached to the front.

I was able to remove all of the attached paper with water or alcohol on swabs pretty easily. There was still some discoloration from the mold but the alcohol helped to reduce it. Mostly success!
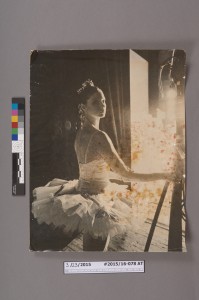
201516_078_at05 201516_078_at09

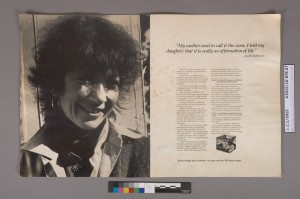
Previously hidden advertisements after the paper was removed.

While these ads still show evidence of their hard life they are now free of their bad mounts, failing adhesive, and separated from each other. The discoloration from mold and water damage will remain, but at least now we can see what had previously been completely hidden. It’s always a happy surprise when something goes smoother and more easily than anticipated. It’s a rare treat. With the very low expectations for the treatment it was an extra special pleasure to be able to show the previously unseen advertisements to the curators.


Photo Conservation Workshop: Wrap Up

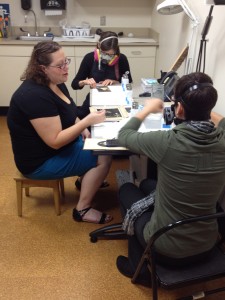
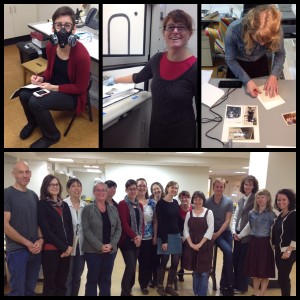
Surface cleaning station. Don't worry, we do actually have real chairs.
Emily Rainwater, Whitney Baker and Melissa  Tedone at the surface cleaning station. Don’t worry, we do have real chairs in the lab.

We are all still talking about the shear amount of information we learned last week at “Photo Conservation for Book and Paper Conservators,” taught by Gawain Weaver and Jennifer Olsen of Gawain Weaver Art Conservation.

Colleagues from across the country came to the Verne and Tanya Roberts Conservation lab for this event. We had people from California, Colorado, Iowa, Kansas, New York, Minnesota, and of course several from the Raleigh-Durham-Chapel Hill area (Duke, UNC Chapel Hill and the NC State Archives). Some work in university libraries and archives, others in private practice, and some in other types of organizations. It was a great mix of experiences and perspectives.

This workshop was geared toward mid-career conservators who already have a fundamental understanding of materials and solvents, experience in evaluating the condition of materials, and experience in making treatment decisions. The goal was to give paper and book conservators hands-on experience working with various historic and modern photographic processes and to get us more comfortable in doing so.

Jennifer Olsen (R) and Gawain Weaver (L).

Gawain and Jennifer are very generous teachers. They use a good mix of demonstration, hands-on practicums and lectures to get the information across. We were also able to work with samples of actual photographs, which helped move theory into practice. We learned about removing silver mirroring, removing photos stuck to glass, attaching and removing heat set tissue, and various methods of mechanical and chemical surface cleaning.  We also discussed disaster recovery, mold removal, humidifying and flattening, housing options, and general mending.

Clara and Whitney discussing dry cleaning options.
Clara Ines Rojas Sebesta (L) and Whitney Baker (R) discussing treatment options.

We participated because so much of our photographic collections are valued primarily for their informational content, not their artistic value (although that isn’t always the case). Therefore, they do not rise to the level that would trigger sending them out for treatment. Yet, some of our photos need more treatment than simply housing. I think we all came away with a better understanding of what we can do even though photographs are not are area of expertise.

What I value most about last week is the camaraderie of professionals learning from each other; meeting new colleagues and working with long-time friends; being treated professionally by people outside your specialty; learning skills that would otherwise be difficult to learn; and walking away knowing more about when you should and shouldn’t undertake treatment. I also enjoyed the parts that began with the caveat, “You would never do this with real objects, but watch what happens when you do!”

We have posted images from the workshop on Flickr, and you can see composites and a brief description of Day 1, Day 2, Day 3, and Day 4 on Preservation Underground. Check out Melissa Tedone’s review of the week on Parks Library Preservation.

Photo Conservation Workshop: Day 4

Working with a variety of historic and modern heat set tissues.

Last day of class and we are knee deep in attaching and removing various heat set tissues. We removed them mechanically with a variety of implements, and attempted to remove them chemically with varying success. I have a feeling some of these were successful only because they haven’t been sitting in an attic or outbuilding for 50 years. Maybe some artificial aging of the samples is in order.

Thanks to the Nasher Museum for lending us their heat set press. We wouldn’t have been able to do any of the last day without it.

Addendum: We have posted images from the workshop on Flickr, and you can see composites and a brief description of Day 1, Day 2, Day 3, and Day 4 on Preservation Underground.

Photo Conservation Workshop: Day 3

Gawain Weaver and Jennifer Olsen demonstrate heat set tissue and review Day 2's results.
Participants work on photos, Gawain Weaver and Jennifer Olsen demonstrate heat set tissue, and we review Day 2’s results. So much tape to remove!

Day 3 of photo conservation for book and paper conservators was incredibly busy. We learned about platinum prints, then got to work experimenting on a variety of color print technologies. We tried tape removal techniques and played “what would happen if…?” by cutting up color prints and immersing them in various solvents. The sounds coming from the fume hood were similar to those at a fireworks show.

We ended the day learning about a brief history of cold-press and heat-set tissues, and prepped for today’s session of sticking photos to things and unsticking them from things.

See Day 1 and Day 2 posts.

Addendum: We have posted images from the workshop on Flickr, and you can see composites and a brief description of Day 1, Day 2, Day 3, and Day 4 on Preservation Underground.

Photo Conservation Workshop: Day 2

Gawain Weaver and Jennifer Olsen teaching photo conservation techniques to book and paper conservators.

On Day 2 of the photo conservation workshop we concentrated on silver gelatin prints. We learned how to dry clean surfaces, a couple techniques for removing silver mirroring, and attempted to remove prints that were stuck to glass.

One of the best things about workshops like this is learning tips from each other, and learning that when you find things difficult it may not be your skills that are faulty. It may be that the treatment is difficult even for very skilled professionals and almost always leads to heartbreak [see also: removing prints stuck to glass].

Addendum: We have posted images from the workshop on Flickr, and you can see composites and a brief description of Day 1, Day 2, Day 3, and Day 4 on Preservation Underground.

Photo Conservation Workshop: Day 1

Workshop participants are learning photo conservation techniques from Gawain Weaver and Jennifer Olsen.

Day one of “Photo Conservation for Book and Paper Conservators” was incredibly informative. Tuesday we learned some basic early silver print history and manufacture, and how to dry- and wet-clean albumen prints.

The class is made up of conservators from all over the country, in private practice, libraries and archives. It’s fun to study with long-time friends and to meet new colleagues. We are looking forward to day two.

By the way, Beth Heller (Beth Heller Conservation) and Melissa Tedone (Parks Library Preservation) are here. Check out their blogs for highlights from the workshop.

Addendum: We have posted images from the workshop on Flickr, and you can see composites and a brief description of Day 1, Day 2, Day 3, and Day 4 on Preservation Underground.