
Remember our post from May 2020 that introduced “The Disaster Recovery Wiggle?” The Wiggle is back for an encore!
I am working on a large collection of paper and photographic records that were recently acquired. These were stored in a wet garage and came to us damp and actively moldy. Pro tip: don’t store your papers in a wet garage.
I divided the records into packs containing 3-4 folders each, wrapped them in plastic, labeled them well, and put them in the freezer. Each package contains a group of photographs and/or documents that should fit into the fume hood for easy drying. Time warp to almost a year later and I am ready to get these thawed and cleaned.

Step 1: Thawing
I remove one package at a time from the freezer and spread the documents out in the fume hood to thaw. The contents are carefully spread out so that the original order can be maintained. When the pages can be carefully separated, I remove the rusty fasteners.
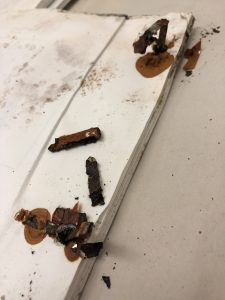
This is a good time to remind conservators that they really should keep their tetanus vaccine up to date.
Step 2: Drying
Many of the packages had too many papers in them to all fit on the deck of the fume hood. I had to figure out a way to expand the available surface area for drying without inhibiting air flow. I figured there must be a way to recreate the double-decker drying we set up in May of 2020 (again with the time warp) but with more airflow.
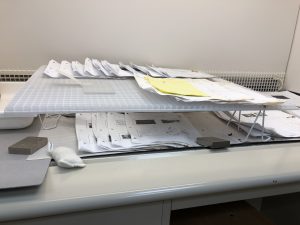
We use diffuser panels as a base in humidity chambers because they are sturdy, but have holes in them that allow moist air to move through the paper. I thought, “Why not reverse the process?” I grabbed a panel, propped it on some supports, and voila! A double-decker fume hood drying rack.
With the double-decker drying rack in place, I needed to be sure the air flow was constant at the top and bottom. I cut two pieces of newsprint, grabbed a couple of Plexi Glas weights, and fashioned a “flag” that could wave in the breeze if it was sufficiently windy. Will it wiggle?

The top rack had no problem with air flow. But the space below was smaller. Will it wiggle, too?

It does! With the flags gently waving I felt that the air drying could commence.
Step 3: Vacuuming
I’m leaving each package in the fume hood for at least two days to thoroughly dry before vacuuming. Once cleaned, I will re-folder the documents and repeat with the remaining 19 packages in the freezer.
More info on preservation your collections
For more tips on preserving personal collections, see our “Preservation Week: 10 Tips for Your Collections” series.
Tips 1-2: Environment and Enclosures
Tips 3-5: Handling, Display, Facsimiles
Tips 6-7: Disasters and Non-paper collections
Tips 8-10: Preservation/Access, Informed purchasing, DIY repairs
Too clever by half. Great work, Beth.
Sometimes you have to figure out how to make something work with the tools you have. I’m just glad it works, because this project is big enough. I didn’t want to extend it by not having space to dry everything in one packet.